
Crocheted house-shaped cookie for Christmas tree

The Crochet Mouse on Ladder – Pattern is an adorable and whimsical project for crafters who love amigurumi and tiny, creative creations.
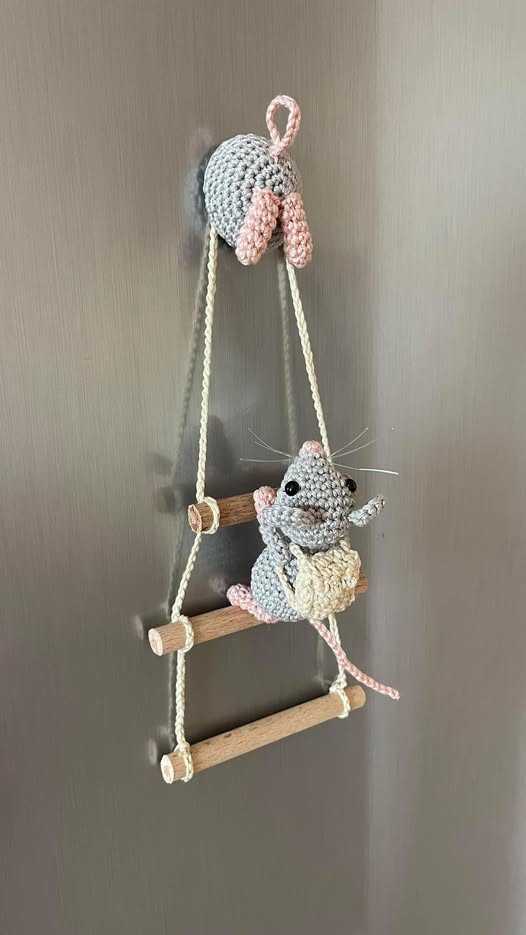
This DIY crochet toy combines the charm of a miniature mouse with the fun of a playful ladder scene. Using this free crochet pattern, you can make a small decorative piece that’s perfect for gifts, home decor, or as a collectible. The project is suitable for beginners and intermediate crocheters, offering both a learning experience and a delightful result.
Creating a crochet mouse on ladder allows you to explore different amigurumi techniques, such as working in rounds, shaping small limbs, and attaching tiny details like ears, tail, and paws.
Each mouse can be customized with different colors, yarn types, or expressions, giving it a unique personality. By following the free crochet pattern, you can achieve professional-looking results while enjoying the creative process, making this a rewarding and satisfying project for any crochet enthusiast.
Beyond the joy of crafting, this project also serves as a small exercise in patience and precision. The mini scale requires careful attention to stitch counts, assembly, and detail placement. Despite its small size, the DIY crochet toy is sturdy and can be displayed as a whimsical decoration, attached to keychains, or given as a gift that is both handmade and heartfelt. The crochet mouse on ladder is not only fun to make but also a conversation starter, showcasing your creativity and love for crochet.
To make your crochet mouse on ladder, gather essential materials to ensure a smooth crafting process. High-quality cotton or acrylic yarn is recommended for both durability and soft texture. Choosing different colors allows for customization: for example, grey for the mouse body, pink for the ears, and brown for the ladder.
A small crochet hook, typically 2mm to 3mm, is ideal for working with fine yarn and creating tight stitches. Tight stitches are especially important in mini projects, as they prevent the stuffing from showing and maintain the mouse’s shape. Alongside the yarn and hook, polyester fiberfill is required for stuffing the body and limbs, providing a soft but stable structure for your DIY crochet toy.
Additional tools include safety eyes, embroidery thread for facial details, and a yarn needle for assembly. Safety eyes or beads add character and personality to the mouse, while embroidery thread can create expressive features such as tiny whiskers or a smiling mouth. A stitch marker is also recommended to keep track of rounds and prevent counting errors, ensuring a precise and polished final piece.
You will also need scissors and small pins to hold pieces in place during assembly. These tools make it easier to align the mouse’s body parts and the ladder properly. Choosing the right materials from the start reduces frustration and allows you to focus on the fun, creative aspects of your crochet mouse on ladder project.
Finally, patience and creativity are your most important tools. While the free crochet pattern provides detailed instructions, taking your time ensures the mouse has a polished appearance and the ladder remains stable and proportional. The combination of careful planning and artistic choices ensures a professional-looking and charming DIY crochet toy that you’ll be proud to display or gift.
Begin your crochet mouse on ladder by creating the mouse body using a magic ring. This technique allows for a seamless start and tight stitches, which are crucial for maintaining a neat, compact shape. Crochet in rounds, gradually increasing and decreasing stitches to form the head, torso, and base. Pay attention to stitch counts in the free crochet pattern to ensure proportional accuracy.
Next, create the limbs separately, including arms, legs, ears, and tail. Small tubular shapes can be crocheted individually and sewn onto the body. Proper alignment is critical to ensure the mouse appears balanced and can “sit” on the ladder naturally. Pins or temporary stitches help maintain accurate positioning before permanent attachment.
The ladder is typically made using yarn or thin sticks that are covered with yarn. Crocheting small rungs and connecting them to side supports creates a sturdy structure. The ladder should be proportional to the mouse’s size, allowing it to appear as though the mouse is climbing or leaning against it.
After assembling the mouse and ladder, attach the limbs and tail securely. Add facial details using embroidery thread or tiny beads to bring the mouse to life. Small features like whiskers, eyes, and a smiling mouth contribute significantly to the charm of the DIY crochet toy.
Finally, attach the mouse to the ladder. Ensure that it sits securely, either by sewing it in place or using a small dab of fabric glue if desired. The completed crochet mouse on ladder is now ready to be displayed, gifted, or used as a whimsical decoration.
Customization allows you to make your DIY crochet toy truly unique. Experiment with different yarn colors for the mouse, such as soft pastels, greys, or even bright playful shades. Color variations for the ladder, such as natural brown, white, or painted yarn, can create different visual effects.
Facial expressions can be personalized using embroidery thread. A mischievous grin, wide-eyed curiosity, or sleepy expression gives the mouse distinct personality. Tiny accessories like a miniature hat, scarf, or tiny bag can enhance the character of your crochet mouse on ladder.
Varying yarn thickness and hook size can change the scale of the project. Smaller mice create a delicate mini scene, while slightly larger versions can function as keychains or small toys. Adding small textured stitches to the mouse’s body or ladder can also add visual interest and a tactile dimension.
Experiment with positioning the mouse in different poses, such as climbing, sitting, or peeking over the ladder’s edge. These variations create more playful and engaging results. Consider seasonal designs, like holiday-themed colors or costumes, to make the project timely and giftable.
Finally, always ensure that all pieces are securely attached, especially if the mouse will be handled frequently or given to children. Careful assembly ensures longevity and safety, keeping your DIY crochet toy intact and looking beautiful for years.
One common mistake in creating a crochet mouse on ladder is uneven tension. Inconsistent stitches can make the mouse lopsided or distort the proportions. Practicing consistent tension helps achieve smooth, professional-looking results.
Overstuffing or understuffing the body or limbs can also affect the overall appearance. Aim for firm yet flexible stuffing that maintains the mouse’s shape while allowing the limbs to bend slightly. Miscounting stitches is another frequent error. Using a stitch marker and checking your counts regularly prevents uneven rounds and misplaced features.
Improperly securing limbs or facial features can lead to loose parts. Pinning or temporarily holding pieces in place before sewing ensures accurate placement and a stable finish. Choosing yarn that is too fuzzy or thin can make it difficult to see stitches, which may result in mistakes or weak structure.
Rushing through the project is another common pitfall. Taking time to follow the free crochet pattern carefully guarantees a polished final product. Attention to detail, careful assembly, and patient stitching are key to producing a charming and professional-looking DIY crochet toy.
Q1: Is this pattern suitable for beginners?
Yes, the free crochet pattern is beginner-friendly, with step-by-step instructions that guide you through each part of the mouse and ladder.
Q2: Can I customize the colors?
Absolutely! Yarn colors for the mouse and ladder can be adjusted to suit your preferences.
Q3: How long does it take to complete one mouse on ladder?
Depending on skill level, it may take 3–5 hours to complete one DIY crochet toy.
Q4: Can I sell these mice?
Check the licensing for the original free crochet pattern, but many allow commercial use with proper credit.
Q5: Are there size variations?
Yes, using thicker or thinner yarn and a corresponding hook lets you make smaller or larger versions.
Q6: How should I display the mouse?
The mouse can sit on a shelf, be attached to a keychain, or used as a whimsical gift decoration.
Creating a Crochet Mouse on Ladder – Pattern is a delightful and imaginative project that combines skill, creativity, and fun. This DIY crochet toy allows crafters to explore amigurumi techniques while producing a charming miniature scene. The free crochet pattern ensures a polished and professional-looking final product.
We hope this guide inspires you to craft your own crochet mouse on ladder. Share your creations, leave a sincere opinion, and suggest other tiny amigurumi ideas you’d like to see. Your feedback strengthens the creative community and helps make future patterns even more enjoyable for crafters of all skill levels.


