
Crocheted house-shaped cookie for Christmas tree

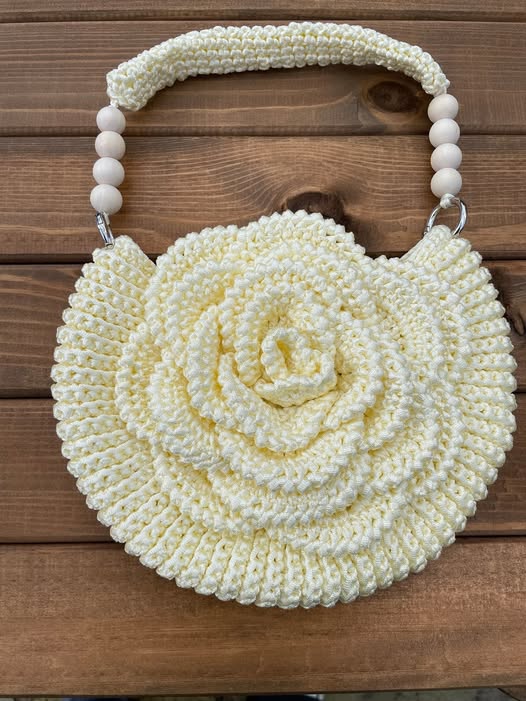
Rectangular Crochet Bag with a Round Flower – Pattern is a charming and versatile project that combines practical functionality with a decorative touch.
This DIY crochet bag is perfect for everyday use, gift-giving, or even as a stylish accessory to complete your outfit. With this free crochet project, you can craft a unique bag that stands out, thanks to the beautiful round flower embellishment on its front.
Creating a handmade crochet bag like this allows crafters to practice their stitch techniques while producing something functional, creative, and visually appealing.
The rectangular crochet bag is ideal for carrying small items, books, or personal essentials. Its simple yet elegant shape ensures that it can be used daily or for special occasions.
The round flower crochet detail adds a playful and artistic element, giving the bag a personalized and handcrafted feel. This crochet bag pattern is suitable for beginners who are familiar with basic stitches and want to expand their skills while making a beautiful accessory that is both practical and decorative.
By following this DIY crochet bag pattern, you will learn how to construct a structured rectangle for the bag base, add a secure handle, and create a detailed round flower to attach. The process also encourages creativity, allowing you to experiment with different yarn colors, textures, and decorative elements to create a bag that reflects your personal style. Whether you are crafting for yourself or as a gift, this handmade crochet bag is a delightful project that is both fun and rewarding.
To make your rectangular crochet bag, you will need a few essential materials that ensure durability, style, and ease of use. Quality yarn is the foundation of this project, with cotton or acrylic being ideal options. Cotton provides a sturdy and structured bag, while acrylic offers flexibility and ease of handling. Selecting your favorite colors allows you to make the bag uniquely yours, combining a neutral base with vibrant accents or bold, eye-catching tones.
In addition to yarn, you will need a crochet hook suitable for the chosen yarn thickness. Typically, a 3mm to 4mm hook is ideal for this type of DIY crochet bag, as it provides tight and uniform stitches that ensure structural integrity. You will also need a yarn needle for weaving in ends, scissors, and stitch markers to keep track of rounds, especially when creating the round flower.
For the round flower crochet embellishment, it is recommended to use a contrasting color to make the design pop against the rectangular base. Optional accessories include buttons or beads to add extra detail to the flower or bag flap. A small measuring tape will help maintain consistent dimensions, ensuring your handmade crochet bag retains its rectangular shape and symmetry. Proper materials and preparation are essential to create a polished and functional final product that looks professional and stylish.
Begin your rectangular crochet bag by creating the base. Start with a chain of the desired length, and crochet rows in single or double crochet to build a sturdy rectangular foundation. The base is critical, as it provides structure and determines the overall size of the bag. Paying attention to stitch count ensures a clean, symmetrical rectangle that is both functional and visually appealing.
Next, construct the sides of the bag by working in rounds or rows, depending on your preferred method. Maintaining consistent tension is key, as uneven stitches can distort the shape of the bag. Ensure that all edges are straight and corners are defined, giving the DIY crochet bag a polished and professional appearance. Adding a border or edge stitch can enhance stability and durability.
The handle is created separately and then attached to the bag. Measure the desired length and crochet a sturdy strip, using reinforced stitches for strength. Secure the handle with tight stitches to ensure it can comfortably support the bag’s weight. You may also crochet small decorative borders along the handle for additional aesthetic appeal.
The round flower crochet is the highlight of the project. Begin with a magic ring and crochet successive rounds, increasing stitches to create a flat, circular flower. Add petal details by using clusters or shell stitches, which give texture and dimension to the design. Attach the flower securely to the bag’s front or flap, ensuring it lays flat and is evenly centered.
Optional embellishments include beads, buttons, or embroidery. You can add these accents to the flower or the bag itself, giving your handmade crochet bag a unique and personalized touch. Once all components are complete, weave in all ends and block the bag if necessary to smooth and shape the fabric.
Finally, check the bag for stability and functionality. Ensure that the rectangular shape holds firm and that the handle is securely attached. Your rectangular crochet bag with a round flower is now ready to use, showcase, or gift to someone special.
Customization allows you to create a one-of-a-kind handmade crochet bag that reflects your personal style. Experiment with different yarn colors and textures to make the rectangular base and round flower pop. You might choose a solid neutral base and a brightly colored flower for contrast, or create a multicolored striped bag with a matching flower accent.
Consider adding additional decorative elements like small buttons, beads, or embroidery. These accents can enhance the DIY crochet bag’s visual appeal, giving it a more detailed and finished look. Using metallic or glittery yarn for the flower can create a standout effect, perfect for gifts or special occasions.
You can also modify the bag’s size to suit your needs. Increase or decrease the base dimensions for a larger tote bag or a smaller clutch-style bag. Adjusting the flower’s size proportionally ensures the design remains balanced and harmonious.
Experiment with stitch patterns on the rectangular base, such as waffle, basket, or shell stitches, to create texture and dimension. Different stitch patterns can give the bag a unique look while reinforcing its strength and durability.
Adding a lining is another great customization option. A fabric lining not only enhances the rectangular crochet bag’s durability but also provides a smooth interior surface, preventing items from snagging or falling through the stitches.
Finally, consider making a set of bags in different colors or flower designs. This approach is perfect for gifts, craft fairs, or personal collection, allowing you to explore creativity and versatility in your crochet projects.
One common mistake when creating a rectangular crochet bag is inconsistent tension, which can cause the bag to be uneven or distorted. Practicing even tension ensures a polished, professional appearance. Overly tight stitches can make the bag stiff and difficult to handle, while loose stitches may reduce structural integrity.
Incorrect stitch counts are another common issue. Carefully counting stitches while creating the base, sides, and flower ensures symmetry and proportion. Use a stitch marker to track rounds, particularly for the round flower crochet, to maintain accuracy.
Improper handle attachment can lead to instability or even breakage. Ensure that the handle is securely sewn with reinforced stitches, and check that it is evenly centered and balanced for comfortable use.
Neglecting to weave in ends properly can result in frayed threads or a messy appearance. Take the time to secure and trim all loose ends, giving your DIY crochet bag a clean, finished look.
Choosing inappropriate yarn can also cause problems. Very stretchy or overly soft yarn may distort the bag’s rectangular shape, while very stiff yarn can make it uncomfortable to carry. Opt for a balanced yarn that offers both structure and flexibility.
Rushing through assembly is another frequent mistake. Take your time to carefully follow the crochet bag pattern, attaching the flower and handle properly, and double-checking all measurements. This ensures a durable, attractive, and functional final product.
Q1: Is this pattern suitable for beginners?
Yes, this free crochet project includes clear instructions and step-by-step guidance suitable for beginners familiar with basic stitches.
Q2: Can I use different yarn types?
Absolutely. Cotton, acrylic, or blended yarn works well. Choose a yarn that balances flexibility with durability.
Q3: How long does it take to complete this bag?
Depending on skill level and size, it may take 4–6 hours to complete a DIY crochet bag.
Q4: Can I sell the finished bags?
Check the licensing of the original pattern. Many crochet bag patterns allow commercial use with proper credit.
Q5: Can the bag size be adjusted?
Yes, you can modify the base dimensions for larger or smaller bags. Adjust the flower size proportionally.
Q6: How do I care for the crochet bag?
Spot cleaning with mild soap and water is recommended. Avoid harsh detergents or high-temperature washing.
Creating a Rectangular Crochet Bag with a Round Flower – Pattern is a fun, creative, and practical project. This DIY crochet bag combines structure, beauty, and functionality, offering endless possibilities for customization with colors, textures, and embellishments. Following this free crochet project, you can make a durable, stylish, and handmade accessory perfect for personal use or as a gift.
We hope this guide inspires you to craft your own handmade crochet bag. Share your creations, leave a sincere opinion, and suggest new patterns or designs. Your feedback helps build a creative community of crafters who enjoy making unique and beautiful crochet accessories!
Whether you are an intermediate crocheter or a confident beginner willing to try more intricate designs, this pattern offers a rewarding and enjoyable project.


