
The Babynest Set with Pink Butterfly – Pattern is a delightful and functional sewing project that combines creativity, comfort, and practicality for your baby’s early months.
This DIY babynest pattern offers a soft, cozy environment that mimics the feeling of a mother’s embrace, making it easier for infants to rest and feel secure.
Crafted with care and love, this babynest set is not only beautiful but also incredibly versatile, serving as a portable sleeping nest, changing station, or photo prop.
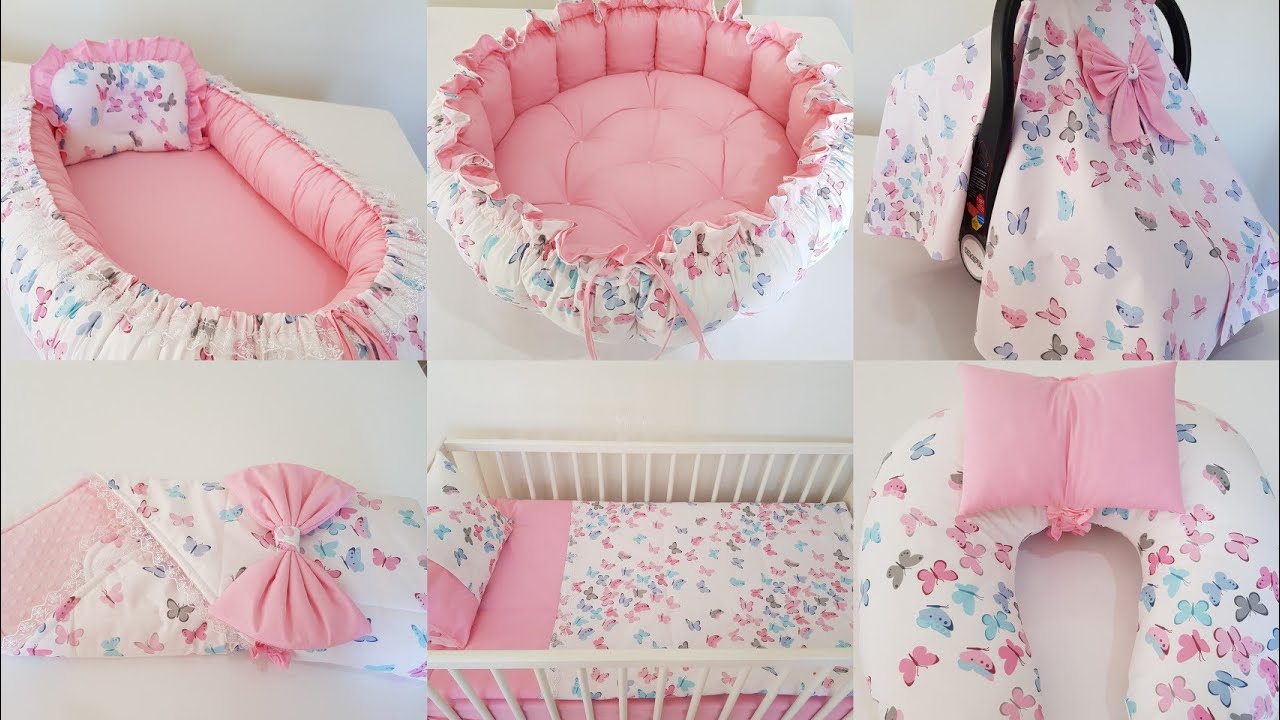
The charming pink butterfly design adds an elegant and gentle touch, making it a perfect choice for parents who love subtle, sweet aesthetics in their baby’s nursery.
Creating your own handmade baby bedding allows you to personalize every detail, from the fabric choice to the color palette. Whether you prefer pastel tones or brighter shades, the pink butterfly pattern offers timeless charm that suits various nursery themes. The project is accessible even for beginner sewists because it relies on straightforward cutting, stitching, and assembling techniques. The satisfaction of completing a baby sleep nest on your own is unparalleled, and knowing that your baby rests in something you crafted adds emotional value to the design.
In addition to being adorable, a DIY babynest is incredibly practical. It provides a dedicated, snug space that helps babies sleep better while keeping them close to their parents. The raised edges prevent rolling, enhancing safety, while the soft, padded base ensures comfort. With this free sewing pattern, you can design a babynest that matches your home’s aesthetic while saving money compared to store-bought options. The Babynest Set with Pink Butterfly – Pattern is more than a craft—it’s a heartfelt creation designed for love, comfort, and care.
Materials Needed for the Babynest Set with Pink Butterfly – Pattern
Before you start your babynest set, gather all the necessary materials to ensure a smooth sewing process. The most important item is the fabric—choose 100% cotton for breathability and softness. For the pink butterfly theme, select printed cotton featuring soft butterfly motifs paired with plain pastel fabric for balance. Cotton is ideal because it’s gentle on delicate baby skin, easy to wash, and durable enough for daily use. You’ll need two fabric layers: one for the inner nest (where the baby lies) and one for the exterior decorative shell.
Next, prepare polyester filling or soft batting, which provides structure and comfort to your baby sleep nest. This material gives the raised sides their plush feel and ensures the bottom remains cushioned yet firm enough to support the baby. You’ll also need a cord or drawstring, used to adjust the size of the nest and tighten its edges. A cord stopper can make it easier to secure the shape once adjusted.
Additional materials include bias tape or ribbon to cover raw edges, sewing thread matching your chosen colors, and pins to hold layers together while stitching. A fabric marker, measuring tape, and sharp scissors are also essential tools for precision. Don’t forget a sewing machine, which simplifies the process and ensures clean, even stitches throughout your DIY babynest. Having all your supplies ready before you begin helps you stay organized, efficient, and focused on creating a high-quality product.
Finally, consider preparing extra fabric for accessories like a matching pillow or blanket. These additions complete the babynest set, giving it a cohesive and professional appearance. The pink butterfly theme ties everything together beautifully, making your project not only functional but also visually delightful.
Step-by-Step Sewing Instructions
Start your DIY babynest by cutting out the main pieces according to your free sewing pattern. You’ll typically need two oval-shaped fabric layers for the base and long fabric strips for the outer sides. Carefully pin the two base layers together, ensuring that the right sides face inward. Stitch around the edges, leaving an opening for turning and inserting padding later.
Once the base is stitched, turn it right side out and insert the polyester filling evenly. The padding should be thick enough to provide support but still flexible. Sew the opening closed using an invisible stitch. Next, prepare the side panels. Sew the strips together lengthwise to form a long tube, then stuff it with fiberfill. Attach the stuffed side tube around the base, ensuring it forms a smooth oval shape. Stitch securely, leaving a small section open for inserting the cord.
Thread the drawstring through the outer edge using a safety pin or cord guide. Once it’s in place, pull gently to tighten the nest’s sides, shaping the baby sleep nest. Add the cord stopper to hold the desired shape and tie the ends neatly with bows or fabric knots. Finally, add bias tape or decorative ribbon around the edges to conceal seams and give a polished, professional look.
Optional embellishments include small appliqués, embroidered details, or soft bows that align with the pink butterfly theme. You can also sew a removable cover to make washing easier and extend the lifespan of your handmade baby bedding. By following these steps carefully, you’ll create a functional, safe, and elegant babynest set that your baby will love.
Tips for Customizing Your Babynest Set
One of the best aspects of the Babynest Set with Pink Butterfly – Pattern is its versatility. You can personalize it to reflect your taste and match your nursery’s decor. For instance, you can choose contrasting fabrics for the inner and outer sections—perhaps a subtle pink butterfly print on the inside with a plain blush or ivory tone on the outside. This balance creates visual interest while maintaining a calm, soothing aesthetic for your baby.
Experiment with different textures to add dimension to your DIY babynest. Pair soft minky or velvet fabric on one side with breathable cotton on the other to achieve both luxury and comfort. You can even incorporate lace trims or ruffled edges for a delicate touch. Adding small details like embroidered butterflies, name initials, or gentle quilting patterns enhances the design’s uniqueness and transforms a simple nest into a keepsake item.
Customization also allows you to modify the baby nest pattern for seasonal use. For summer, opt for lightweight cotton and minimal filling for breathability. For winter, increase the padding and choose warmer fabrics like flannel. You can also create reversible versions—one side with the pink butterfly design and another with a complementary pattern—providing flexibility and variety.
Adding matching accessories like a head pillow, baby blanket, or toy pocket completes your handmade baby bedding ensemble. These additions make your project not only beautiful but also highly functional, meeting both aesthetic and practical needs. When personalized with love and attention to detail, your babynest set becomes a meaningful, cherished item for you and your child.
Common Mistakes and How to Avoid Them
Even experienced crafters can face challenges when making a DIY babynest. One common issue is inaccurate measurements. Since the baby nest pattern depends on precise proportions, always double-check your dimensions before cutting. Using a flexible measuring tape and marking clearly with a fabric pen ensures consistency and symmetry.
Overstuffing or understuffing the sides is another mistake. Too much filling can make the nest rigid, while too little can cause it to collapse. The ideal amount provides firm yet comfortable support for the baby’s body. When sewing the edges, take care not to sew over the cord channel, as this will make it difficult to adjust the nest later.
Another common problem is uneven stitching, especially along curved seams. Using pins generously and stitching slowly around curves will help maintain even lines. If your fabric slips, consider using clips instead of pins to hold layers securely.
Finally, always prioritize safety. Avoid small decorative items that could detach and pose a choking hazard. Double-stitch any attachments, and make sure all seams are strong enough to withstand regular washing and use. By avoiding these mistakes and following the free sewing pattern closely, you’ll ensure your Babynest Set with Pink Butterfly – Pattern is both safe and stunning.
FAQ – Babynest Set with Pink Butterfly – Pattern
Q1: Is this babynest safe for newborns?
Yes, when crafted correctly using breathable fabric and firm filling, the baby sleep nest is safe for supervised use.
Q2: Can beginners make this project?
Absolutely! The DIY babynest uses basic sewing techniques and clear pattern guidelines, making it suitable for beginners.
Q3: What fabric is best?
Cotton is ideal for comfort and washability, while soft blends can add extra coziness.
Q4: Can I wash the babynest?
Yes. Machine-washable fabrics are recommended, and removable covers make cleaning even easier.
Q5: How long does it take to complete?
Depending on experience, the babynest set can be completed in 3–5 hours.
Q6: Can I sell babynests made from this pattern?
Many free sewing patterns allow personal or limited commercial use—check the license before selling.
Conclusion
Making your own Babynest Set with Pink Butterfly – Pattern is a creative and rewarding sewing experience. It combines practicality with aesthetic beauty, allowing you to craft a cozy, secure, and stylish nest for your baby. With thoughtful fabric choices, careful stitching, and a touch of personalization, your DIY babynest becomes more than just bedding—it becomes a symbol of love and craftsmanship. The delicate pink butterfly theme adds sweetness and grace, transforming your nursery into a peaceful and elegant space.
VIDEO TUTORIAL
We hope this guide inspires you to create your own handmade baby bedding using this free sewing pattern. Share your experiences, leave your honest opinion, and suggest what future designs or tutorials you’d love to see next. Your feedback helps build a warm, creative community of sewing enthusiasts who find joy in making beautiful, meaningful projects by hand.