
Crocheted house-shaped cookie for Christmas tree

The Granny Square Crochet Bag – Pattern is a timeless and versatile project that combines creativity and functionality. Whether you are an experienced crocheter or a beginner looking for a fun project, this pattern allows you to create a beautiful, handmade bag that can be used for shopping, outings, or even as a stylish accessory.
Crocheting a Granny Square Bag not only gives you a chance to express your artistic side but also provides a sustainable alternative to store-bought bags. With its colorful and unique squares, this pattern offers endless possibilities for customization.
Creating a Granny Square Crochet Bag involves learning basic crochet stitches, understanding how to assemble squares, and developing a sense of design and color coordination.
The beauty of this project is that it can be adjusted to fit your personal style, whether you prefer bold, vibrant colors or soft, pastel tones.
Moreover, making a bag with granny squares encourages creativity because each square can be treated as a mini canvas, allowing you to experiment with different textures, yarn types, and stitch patterns.
This Granny Square Crochet Bag – Pattern article will guide you through every step of the process, providing insights into the materials, techniques, and tips needed to create a professional-looking bag. By following this guide, you will not only learn how to crochet a functional and stylish bag but also improve your overall crochet skills. Whether you plan to make this bag for yourself or as a handmade gift, this pattern is designed to be easy to follow and highly rewarding.
Before starting your Granny Square Crochet Bag – Pattern, it’s important to gather the right materials. Choosing quality yarn and the correct hook size ensures that your bag will be durable and look polished. The main materials required include cotton or acrylic yarn, a crochet hook suitable for your yarn, a tapestry needle for assembly, and scissors. Some designs may also incorporate lining fabric or a zipper, depending on the level of finishing you want for your bag.
Selecting the right yarn is crucial. Cotton yarn is ideal for bags because it is strong, washable, and holds its shape well. Acrylic yarn, on the other hand, is versatile and comes in a wider variety of colors. By understanding the properties of each yarn type, you can choose the perfect material that matches your intended use and style. Additionally, using a matching or complementary yarn for joining the squares enhances the overall appearance of your Granny Square Bag.
The crochet hook size should match the yarn weight for the best results. Typically, a 4mm to 5mm hook works well for medium-weight yarns, but always check the yarn label for recommended sizes. Choosing the correct hook ensures that your granny squares have uniform tension and fit together seamlessly. Don’t forget to have a tapestry needle handy for weaving in ends and sewing the squares together.
Another optional but helpful material is bag handles. Handles can be crocheted as part of the bag or purchased separately from craft stores. This allows for additional customization and comfort. If you prefer, you can also sew a fabric lining inside your Granny Square Crochet Bag, which adds durability and a professional finish. Lining can prevent small items from slipping through gaps in the crochet stitches, making your bag more practical for daily use.
Understanding and preparing your materials before starting your Granny Square Crochet Bag – Pattern ensures a smooth crocheting experience. Taking the time to choose quality yarn, the right hook, and optional accessories like lining or handles enhances both the look and functionality of your finished bag. Proper preparation also allows you to focus on the creative aspects of assembling and designing your unique granny squares.
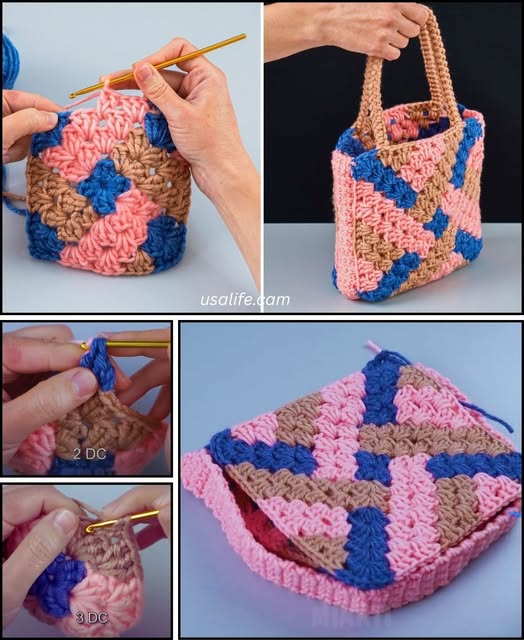
The heart of the Granny Square Crochet Bag – Pattern lies in creating the individual granny squares. A granny square is a small, crocheted motif usually made in rounds, starting from the center and expanding outward. Basic stitches like chain (ch), slip stitch (sl st), and double crochet (dc) are essential for making granny squares. Once you master these stitches, you can create squares of various sizes and patterns to suit your bag design.
Start by making a slip knot and chaining a small number, usually four to six, to form a ring. Work several double crochet stitches into the ring, separated by chain spaces to form the first round. Each subsequent round builds on the previous one, with corners created using a combination of double crochet stitches and chains. This process allows the square to expand evenly while maintaining its shape.
Granny squares can be customized with different colors, allowing you to mix and match yarns to create vibrant or subtle patterns. You can also experiment with different stitch combinations to add texture and dimension to your squares. By alternating colors and stitches, you can give your Granny Square Bag a unique and eye-catching appearance.
Pay attention to the size of your granny squares to ensure your bag is proportionate. Typically, 12 to 16 squares are enough for a medium-sized tote bag, but you can adjust the number depending on the desired size. Measuring each square as you go helps maintain uniformity and makes the assembly process easier.
Joining the squares is an important step that can affect the overall appearance of your bag. Techniques like whip stitch, slip stitch, or single crochet join are commonly used to connect granny squares. Choosing a joining method that complements your design ensures a neat and cohesive look.
Finally, adding a border around each square or the entire bag can give your project a polished finish. Borders not only enhance the visual appeal but also provide extra strength and stability to your Granny Square Crochet Bag. This final touch transforms simple squares into a beautifully crafted, professional-looking accessory.
Once all your granny squares are ready, it’s time to assemble the Granny Square Crochet Bag – Pattern. The assembly process involves arranging the squares in a pleasing layout and stitching them together. Start by laying out your squares on a flat surface and experimenting with different color combinations to achieve the best visual balance.
Joining the squares can be done using a single crochet, whip stitch, or slip stitch method. Ensure that all squares are aligned evenly and seams are secure. This step is crucial because strong, even seams make your bag durable and prevent stretching over time.
After joining the squares, you can work a border around the edges of the bag for added structure. Borders are also an opportunity to introduce new colors or stitch patterns, adding a creative flair to your project. This step not only strengthens the bag but also enhances its aesthetic appeal.
If you want extra durability and a professional finish, consider adding a fabric lining. A lining can be sewn in to prevent items from slipping through gaps in the crochet and gives the bag a more structured shape. You can choose a lining fabric that complements or contrasts with your yarn colors.
Handles are the next addition to complete your Granny Square Bag. Handles can be crocheted directly onto the bag or attached as pre-made straps. Ensure that handles are securely fastened to withstand the weight of items carried in the bag. Comfortable handles improve the bag’s usability and overall look.
Finally, check all seams, weave in any loose ends, and trim excess yarn. Taking the time to inspect your Granny Square Crochet Bag ensures a polished, professional finish that you can be proud of. Proper finishing makes your handmade bag suitable for gifting or personal use.
Creating a flawless Granny Square Crochet Bag – Pattern requires attention to detail and some practical tips. First, always keep your tension consistent while crocheting squares. Uneven tension can lead to squares that don’t align properly, making assembly difficult.
Second, experiment with color combinations before committing to a layout. Using a variety of colors can make your bag more lively and visually appealing. Consider complementary colors or contrasting shades to highlight your creativity.
Third, block your squares before assembling the bag. Blocking involves wetting and shaping the squares to ensure they are even and flat. This step helps maintain uniformity and gives your finished bag a professional look.
Fourth, use stitch markers to keep track of corners and join points. Stitch markers help maintain accuracy and make joining squares easier, especially for larger bags with many pieces.
Fifth, don’t rush the joining process. Taking time to align squares properly and secure seams ensures durability and a neat appearance. Patience during assembly is key to a polished final product.
Finally, consider personalizing your Granny Square Bag with embellishments like buttons, beads, or tassels. These additions can elevate the bag’s design and make it uniquely yours, turning a simple crochet project into a cherished handmade accessory.
Q1: How long does it take to make a Granny Square Crochet Bag?
A1: The time depends on your experience and the bag size. Beginners may take several days, while experienced crocheters can finish it in a few hours.
Q2: Can I use any type of yarn for the bag?
A2: Yes, but cotton or acrylic yarns are recommended for durability and ease of handling.
Q3: How many granny squares do I need?
A3: Typically, 12 to 16 squares suffice for a medium-sized bag, but you can adjust based on your preferred bag size.
Q4: Can I make the bag larger or smaller?
A4: Absolutely. Adjust the number of squares or their size to achieve the desired dimensions.
Q5: Do I need to add a lining?
A5: It’s optional. Lining adds durability and prevents small items from slipping through gaps in the crochet.
Q6: How do I join the granny squares neatly?
A6: Use single crochet, whip stitch, or slip stitch methods. Ensure all seams are aligned and secure.
The Granny Square Crochet Bag – Pattern is a delightful and rewarding project that combines creativity, craftsmanship, and practicality. By learning to crochet granny squares, assembling them carefully, and adding finishing touches like borders, linings, and handles, you can create a unique, handmade bag that reflects your personal style. Following the tips and techniques outlined in this article ensures a professional, durable, and visually appealing final product.
We hope this guide has inspired you to start your own Granny Square Crochet Bag. Share your creations, leave an honest opinion, and provide suggestions on how we can improve or explore new crochet projects together. Happy crocheting!


