
Hunter's Star Quilt Block - Quick & Easy Tutorial

The Churn Dash Block Pattern is one of the most classic and beloved quilt designs in the world of quilting. Its simple geometric shapes and strong visual contrast make it perfect for beginners and experienced quilters alike.
With its roots in 19th-century American quilting traditions, the Churn Dash has stood the test of time as a versatile and timeless block that fits into both vintage and modern quilts.
Whether you are learning quilting basics or refining your sewing precision, this quilt block tutorial will guide you through every step.
The beauty of the Churn Dash Block Pattern lies in its simplicity. Composed of half-square triangles, rectangles, and a central square, this block can be customized endlessly with colors, fabrics, and textures.
Its symmetrical design allows quilters to experiment with light and dark contrasts, bold prints, or subtle monochromatic schemes. This adaptability makes it a go-to beginner quilting project, teaching essential piecing skills while delivering visually stunning results. Each block you sew can tell a story through fabric choices and creative layout.
Learning the Churn Dash Block Pattern also provides a strong foundation for more advanced quilt blocks. Once you understand how to align seams, match points, and maintain consistent seam allowances, you can easily transition to more complex patterns. This block is also ideal for practice sessions or scrap fabric projects. It’s a reminder that quilting is both an art and a craft—balancing creativity with precision. Let’s dive deeper into how you can create your own Churn Dash Block step by step.
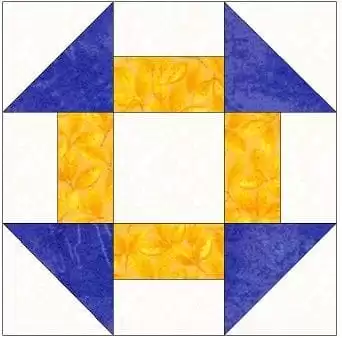
Before cutting fabric or sewing seams, it’s important to understand the composition of the Churn Dash Block Pattern. Traditionally, the block is arranged in a nine-patch grid with three rows and three columns. The center square forms the core, surrounded by four rectangles and four half-square triangles. This balanced layout is the key to its charming, dynamic look.
Each piece in this traditional quilt design contributes to the block’s overall symmetry. The half-square triangles create diagonal movement, while the rectangles and center square anchor the design. Most Churn Dash blocks are built with two contrasting fabrics: a light and a dark tone. This contrast highlights the shape and gives depth to the finished quilt. For modern variations, quilters often use bright solids or bold prints to reinterpret this classic design.
When preparing fabric, precision cutting is essential. Every piece should be cut accurately using a rotary cutter, cutting mat, and quilting ruler. Even small inconsistencies can affect how the quilt block tutorial aligns later. Pre-washing fabrics before cutting can help prevent shrinkage and color bleeding, ensuring your quilt remains vibrant and long-lasting.
The standard Churn Dash block size can vary, but a common version finishes at 12 inches square. Adjusting measurements allows you to scale up or down depending on your project. For a beginner quilting project, it’s best to start with a larger block size, as smaller pieces require more accuracy and can be challenging for new quilters.
Before assembling, label your fabric pieces and organize them by size and type. This simple preparation step helps avoid confusion during sewing. Remember, the Churn Dash Block Pattern is all about consistency and alignment, so staying organized will lead to a professional-looking result.
Finally, pressing your fabric before cutting and between each sewing step is crucial. Well-pressed seams ensure smooth assembly and crisp lines. Ironing might seem like a small detail, but in quilting, it’s the secret to flawless construction and beautiful, flat blocks that join perfectly with others.
To begin the Churn Dash Block Pattern, gather your materials: two contrasting fabrics, a rotary cutter, a ruler, and your sewing machine. Start by cutting one center square, four rectangles, and four pairs of squares for the half-square triangles. Maintaining a ¼-inch seam allowance throughout is key for accurate results.
Step one is creating the half-square triangles (HSTs). Pair a light and dark square right sides together, draw a diagonal line, and sew a seam ¼ inch from each side of the line. Cut along the center line to create two identical HST units. Press the seams open or toward the darker fabric. These triangles form the corners of your quilt block tutorial, adding visual direction and movement.
Next, sew the rectangles. Place a light and dark fabric right sides together and stitch along the long edge to create the side units. These rectangular pieces form the sides of the block and should measure the same width as the center square. Accurate piecing ensures the traditional quilt design looks balanced when all components are joined.
Lay out all your pieces in a three-by-three grid to visualize the Churn Dash layout. The center square goes in the middle, surrounded by the rectangles on each side, and the HSTs in the corners. Double-check fabric placement before sewing to ensure all directional pieces face correctly.
Assemble each row by sewing the three pieces together. Then, join the rows to form the full block. Press each seam carefully to one side or open, depending on your preference. Proper pressing reduces bulk and helps seams align neatly. This attention to detail elevates the final look of your beginner quilting project.
Once assembled, measure your block. It should be square and measure 12.5 inches unfinished (12 inches finished after sewing into the quilt). If needed, trim edges for perfect alignment. Congratulations—you’ve completed your first Churn Dash Block Pattern, ready to be part of a larger quilt masterpiece.
The Churn Dash Block Pattern may be traditional, but it offers endless opportunities for creative expression. One popular variation is the modern Churn Dash, which uses solid fabrics and bold color blocking to give the pattern a sleek, contemporary vibe. Playing with color placement can dramatically change the block’s visual effect.
Another creative idea is to combine multiple fabric prints. Mixing florals, plaids, or geometric designs adds depth and personality. For a cohesive look, keep a consistent color palette while varying textures. This modern take on a traditional quilt design adds visual interest and freshness to your project.
You can also alter proportions to create new effects. For instance, enlarging the center square and shrinking the triangles creates a more centralized look. Alternatively, using a monochromatic color scheme can emphasize texture over contrast, resulting in a subtle and sophisticated aesthetic.
Layering Churn Dash blocks with other quilt block styles creates dynamic quilts. Combine them with Log Cabin, Nine-Patch, or Ohio Star blocks for a complex and engaging layout. This technique showcases your sewing techniques for quilts and demonstrates how different patterns can harmonize beautifully.
A fun way to personalize your quilt block tutorial is by experimenting with negative space. Using background fabric as a design element allows the Churn Dash motif to “float” within the quilt, creating a modern, minimalist appearance. This approach emphasizes clean lines and bold contrast.
Finally, use quilting stitches to enhance the design. Echo quilting, crosshatching, or free-motion patterns can add texture and highlight the geometric nature of the Churn Dash Block Pattern. The quilting process brings your project to life, turning fabric pieces into a work of art.
After completing your blocks, it’s time to assemble the full quilt. Arrange the Churn Dash Block Pattern pieces in rows, balancing colors and contrast. Sew the rows together, pressing seams between each step. This structured approach keeps everything aligned and prevents distortion.
Adding borders is optional but can frame your quilt beautifully. A simple solid border complements intricate blocks, while a patterned border adds extra charm. Choose a color that ties the design together, enhancing the overall harmony of your traditional quilt design.
Quilting the layers—top, batting, and backing—is the next step. Use basting pins or spray adhesive to secure the layers before quilting. Straight-line quilting along the block seams gives a clean, modern look, while free-motion quilting adds texture and creativity. Experiment with sewing techniques for quilts to personalize your project.
Binding the quilt edges finishes the piece and gives it a polished appearance. Folded fabric binding, hand-stitched or machine-stitched, protects the edges from fraying and ensures durability. Take time with this step to create a professional finish.
Caring for your quilt is essential for longevity. Wash it gently in cold water with mild detergent and air-dry flat. Avoid bleach or harsh chemicals that can fade colors. Proper care keeps your beginner quilting project looking vibrant and soft for years.
Finally, display your quilt proudly or gift it to someone special. A handmade Churn Dash Block Pattern quilt carries warmth, creativity, and history—a timeless reminder of craftsmanship and love stitched into every block.
Q1: Is the Churn Dash Block good for beginners?
A1: Absolutely! The Churn Dash Block Pattern uses basic shapes and teaches essential quilting techniques, making it perfect for beginners.
Q2: What size should I make my Churn Dash Block?
A2: A 12-inch finished block is standard, but you can adjust dimensions depending on your quilt size or project goals.
Q3: How much fabric do I need?
A3: For one 12-inch block, you’ll need two contrasting fat quarters. For a full quilt, calculate based on the number of blocks.
Q4: How can I make my Churn Dash look modern?
A4: Use solid fabrics, bold colors, or asymmetrical layouts to update this traditional quilt design with a contemporary touch.
Q5: What’s the best quilting stitch for this block?
A5: Straight-line or echo quilting highlights the block’s geometry, but free-motion designs add texture and artistic flair.
Q6: Can I mix Churn Dash blocks with other patterns?
A6: Definitely! Combining Churn Dash Block Patterns with Nine-Patch or Star blocks creates visually engaging, custom quilts.
The Churn Dash Block Pattern is a timeless favorite that blends tradition with creativity. By mastering this quilt block tutorial, you’ve learned essential sewing techniques for quilts, from cutting and piecing to pressing and assembling. Whether you keep it classic or explore modern variations, this beginner quilting project will strengthen your skills and ignite your imagination.
We’d love to hear your honest opinions and suggestions! Share your experiences, color choices, and creative variations in the comments—your insights inspire other quilters to bring their Churn Dash masterpieces to life.


