
The Depression Block Quilt Free Pattern is a timeless and inspiring design that beautifully connects the past with the present. Originating during the Great Depression era, this quilt pattern embodies creativity, resilience, and resourcefulness.
Quilters at that time used scraps of fabric from old clothing, curtains, and household textiles to craft something both useful and beautiful.
Today, this traditional Depression Block Quilt remains a favorite among quilting enthusiasts who appreciate vintage charm and the meaningful story behind each stitch.
Creating a Depression Block Quilt allows you to merge historical quilting traditions with modern fabrics and techniques. It’s not just about sewing pieces of fabric together; it’s about preserving a legacy of perseverance and artistry.
The free pattern versions available today make it easier for quilters of all skill levels to try this classic design without needing to purchase expensive templates or kits. With patience, imagination, and a few essential tools, anyone can craft their own Depression Block Quilt masterpiece.
More than just a hobby, quilting is an expression of creativity and care. The Depression Block Quilt Free Pattern provides a perfect opportunity for beginners and experienced quilters alike to explore color balance, texture coordination, and precision stitching. Each finished quilt tells a story—a tribute to the quilters of the past who turned hardship into beauty. In this article, you’ll learn how to select the right fabrics, understand the construction process, and make your own Depression Block Quilt step by step.
The History and Meaning Behind the Depression Block Quilt
The Depression Block Quilt traces its roots back to the 1930s, a time when financial hardship forced people to be resourceful and inventive. Quilting became not only a creative outlet but also a necessity. Many families could not afford new blankets, so they repurposed old materials into warm, functional quilts. The Depression Block design reflected both simplicity and beauty, using geometric shapes and repeating blocks to maximize fabric efficiency.
Women across America gathered in quilting circles to share patterns, swap fabric scraps, and exchange sewing tips. These gatherings provided emotional support and community spirit during difficult times. The Depression Block Quilt became a symbol of resilience, showing that beauty can emerge even from scarcity. Each quilt told a story of survival, hope, and the shared experiences of families during the Great Depression.
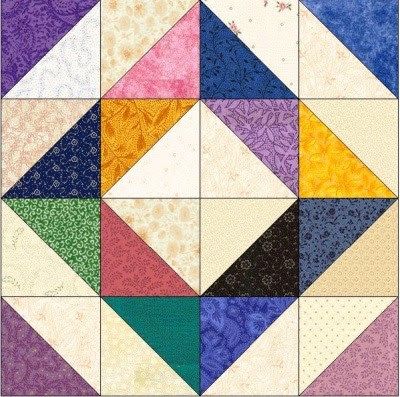
The design typically featured bold contrasts, often combining light and dark fabrics to create a strong visual impact. Many original Depression Block Quilts used solid colors or simple prints because those were the materials readily available. Today, modern quilters can replicate this effect using contemporary fabrics that maintain the nostalgic aesthetic while allowing for personal interpretation.
Preserving the history of the Depression Block Quilt also means honoring the ingenuity of past generations. By recreating these patterns today, quilters contribute to the continuation of a rich cultural craft that connects people across time. Modern patterns may adapt the design to fit new color palettes or quilting technologies, but the essence remains unchanged—crafting something meaningful from limited resources.
Using a free pattern allows modern quilters to explore this history without barriers. With digital downloads and printable templates, anyone can easily access authentic Depression-era designs. These patterns not only save time but also ensure accuracy, helping you achieve traditional results with modern ease.
Ultimately, making a Depression Block Quilt is about more than crafting—it’s about storytelling. Each block you sew is a piece of heritage, stitched with creativity, love, and a deep respect for the quilters who came before us.
Choosing Fabrics and Colors for Your Quilt
Selecting the right materials is one of the most exciting steps when working on a Depression Block Quilt Free Pattern. Fabric choice can dramatically influence the final look and feel of your quilt. During the Depression era, quilters used every scrap they could find, often mixing different textures and patterns. While you may not face the same limitations today, recreating that scrappy charm can give your quilt a warm, authentic touch.
When choosing fabrics, consider combining light and dark tones to highlight the geometric shapes of the block pattern. Traditional Depression Block Quilts often used muted colors such as soft blues, faded reds, or pale yellows. These colors reflected the available dyes of the time and contributed to the quilt’s distinctive vintage appearance. For a modern twist, you can experiment with brighter shades or contrasting prints that make each block stand out.
Cotton is the most popular choice for quilting because it’s easy to sew, durable, and breathable. However, blends or recycled fabrics can also work beautifully, especially if you want to replicate the original resourceful approach of Depression-era quilters. Pre-washing fabrics before cutting ensures they won’t shrink or bleed color later.
Texture also plays a key role in achieving the right aesthetic. Mixing smooth and textured fabrics can add depth to your Depression Block Quilt. You can incorporate small floral prints, polka dots, or checkered patterns to give your quilt more personality while staying true to the period’s style.
Once you’ve selected your fabrics, consider organizing them by value (light, medium, dark). This helps maintain visual balance in your quilt and ensures the block patterns remain distinct. The free pattern you follow will often include diagrams showing how to position your fabrics for the best effect.
Finally, don’t be afraid to make it your own. While the Depression Block Quilt carries a deep historical background, your version should reflect your personal style. Whether you opt for soft pastels, vintage florals, or bold modern contrasts, your finished quilt will carry your creative signature.
Step-by-Step Guide to Making a Depression Block Quilt
Following a Depression Block Quilt Free Pattern requires precision and patience, but the process is incredibly rewarding. Before starting, make sure you have all your materials ready: fabric, rotary cutter, cutting mat, ruler, sewing machine (or hand needle), thread, and pins.
Step 1: Cutting Your Fabric. Begin by cutting your chosen fabrics according to the measurements in your pattern. Most Depression Block Quilts use squares or triangles, which are then joined into larger repeating blocks. Accuracy is essential—uneven cuts can cause misalignment later.
Step 2: Arranging Your Blocks. Lay out your fabric pieces on a flat surface to visualize the design. Alternating light and dark sections creates the classic Depression-era contrast. This step helps you see the color flow and make adjustments before sewing.
Step 3: Piecing the Blocks Together. Sew the small pieces into block units following your free pattern instructions. Use a consistent seam allowance, usually ¼ inch, for neat and precise assembly. Press the seams flat after each step to keep your quilt top smooth.
Step 4: Joining the Blocks. Once your blocks are completed, sew them together row by row. This stage begins to reveal the full pattern of your Depression Block Quilt, transforming individual pieces into a cohesive design.
Step 5: Adding Borders and Batting. After assembling the top, add borders if desired, then layer the quilt top with batting and backing fabric. Secure the layers with pins or basting spray to prepare for quilting.
Step 6: Quilting and Binding. Quilt along the seams or use decorative stitching to enhance the pattern. Finish the edges with binding for a clean, professional look. At this point, your Depression Block Quilt is complete—ready to bring warmth and beauty into any space.
Tips for Success and Finishing Touches
To make your Depression Block Quilt stand out, pay attention to details. Small adjustments can make a big difference in the final presentation. Always take your time when pressing seams; crisp, flat seams make the quilt look polished. If you’re new to quilting, consider practicing on scrap fabric before tackling the full pattern.
Maintaining consistent stitch length is another key to a professional result. If using a sewing machine, adjust the settings for quilting weight and ensure your tension is balanced. Testing on a fabric sample before starting helps prevent issues later.
Don’t overlook the importance of labeling your quilt. Adding a small tag with your name, date, and inspiration gives your Depression Block Quilt a personal touch. This simple step transforms your creation into a piece of family history.
Photography is another fun part of the process. Once your quilt is finished, take high-quality photos to document your work. Sharing your results online or in quilting communities can inspire others to try the free pattern as well.
If you plan to gift your quilt, consider presenting it in a handmade fabric bag or wrapping it with a ribbon. Handmade gifts like the Depression Block Quilt are always cherished, especially when they carry such meaningful history.
Finally, remember that quilting should bring joy. Perfection isn’t the goal—expression is. Each stitch, even imperfect ones, contributes to the beauty and uniqueness of your Depression Block Quilt.
FAQ About the Depression Block Quilt Free Pattern
Q1: What makes the Depression Block Quilt unique?
Its historical roots and scrappy design make it special. The Depression Block Quilt represents creativity and resilience during tough times.
Q2: Is this pattern suitable for beginners?
Yes, the Depression Block Quilt Free Pattern is beginner-friendly. The geometric shapes are simple, and detailed instructions make it easy to follow.
Q3: What fabrics are best for this quilt?
100% cotton or cotton blends work best. For an authentic look, use vintage-inspired prints or leftover scraps.
Q4: How long does it take to complete?
Depending on your speed, it can take anywhere from a weekend to several weeks. Beginners should allow extra time for cutting and piecing.
Q5: Can I make a smaller version?
Absolutely. You can reduce the number of blocks to create a baby quilt or wall hanging. The free pattern can easily be scaled down.
Q6: How should I wash my Depression Block Quilt?
Use a gentle cycle or hand wash with mild detergent. Air-dry flat to preserve fabric quality and color vibrancy.
Conclusion
The Depression Block Quilt Free Pattern blends history, craftsmanship, and creativity in one timeless project. By following the steps and tips shared in this guide, you can craft a quilt that not only looks beautiful but also carries a meaningful story.
Whether you’re preserving family traditions, learning a new hobby, or simply exploring vintage quilting art, this pattern offers endless possibilities. Take your time, enjoy every stitch, and share your finished quilt with pride.