
Crocheted house-shaped cookie for Christmas tree

Easy slipper for beginners – free pattern is one of the most enjoyable and satisfying crochet projects for anyone starting their crafting journey.
Whether you are new to crochet or just looking for a quick and practical project, these easy slippers are perfect to make.
They are comfortable, warm, and stylish, making them an excellent gift or a cozy accessory for yourself. This pattern allows even beginners to create something beautiful and useful within just a few hours.
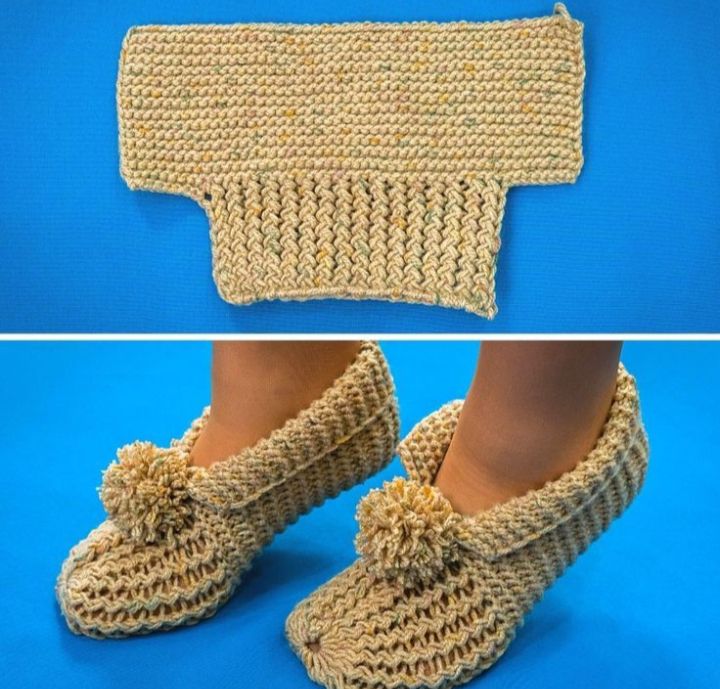
Crocheting easy slippers for beginners teaches you basic techniques such as chain stitch, single crochet, and slip stitch. These simple steps combine to form a snug, flexible, and perfectly shaped slipper.
You don’t need advanced skills or expensive materials—just some yarn, a crochet hook, and the willingness to follow a few easy instructions. With this free pattern, you’ll learn how to make slippers that look professional while being entirely handmade.
Another reason this easy slipper for beginners project is so popular is its versatility. You can make them in any size, from children to adults, and customize them with your favorite colors, buttons, or trims. The satisfaction of creating your own footwear from scratch is unmatched, and this pattern gives you the foundation to experiment, improve, and express your creativity. Let’s dive into the process and see how you can crochet your own cozy pair today.
Before beginning your easy slipper for beginners – free pattern, make sure you have all the necessary materials ready. You’ll need medium-weight yarn, a crochet hook that matches the yarn label recommendation, a pair of scissors, and a yarn needle for sewing seams. Choosing soft and durable yarn ensures that your slippers are both comfortable and long-lasting.
Start by making a simple foundation chain. The number of chains you make depends on the size of the slipper you want. For instance, smaller sizes require fewer chains, while larger ones need more. The foundation chain determines the slipper’s length, so double-check your measurements before proceeding.
Once your base chain is ready, work in single crochet rows to build the sole of your slipper. Keep the edges straight and even, as this will help your slipper maintain its shape. The sole should be slightly longer than your foot to allow room for stretching when worn.
After completing the sole, it’s time to form the body of the slipper. Fold the piece in half lengthwise and start joining the edges with slip stitches or single crochets. Leave an opening for your foot at the top, adjusting it to your comfort.
At this point, you’ll notice how the easy slipper pattern quickly takes shape. The beauty of this project is that it requires no complex shaping or advanced stitches, making it ideal for absolute beginners. Once the slipper is joined, try it on and adjust if necessary before securing the seams completely.
To finish, you can add decorative touches like a small bow, button, or edge trim using contrasting yarn. This step makes your easy slippers for beginners unique and adds a personal flair to your handmade creation.
To make your easy slippers look neat and professional, focus on maintaining consistent tension throughout your work. Uneven tension can cause your slippers to be too loose or too tight, affecting both comfort and appearance. Practice a few test stitches to find the right tension before starting the main piece.
Choosing the right yarn also plays a huge role in the outcome. Soft acrylic or cotton-blend yarns are excellent options—they’re easy to work with and feel comfortable against the skin. Avoid very thin or overly thick yarns unless you want a different texture or look.
Use a matching hook size as indicated on your yarn label. A hook that’s too large will create loose stitches, while a smaller hook may make your slipper stiff and difficult to wear. Following the right proportions ensures a well-fitted result.
Another tip is to always measure as you go. Try the slipper on periodically to ensure it fits snugly. Crocheted slippers tend to stretch slightly with use, so it’s better to make them a little tighter than too loose.
Don’t forget to weave in your yarn ends securely using a yarn needle. This step prevents unraveling and gives your slippers a clean, polished look. For extra durability, consider reinforcing the toe and heel areas with a few extra stitches.
Lastly, always block your finished easy slippers if possible. Blocking helps shape and smooth your work, giving it a store-bought appearance while still keeping that handmade charm.
One of the best parts about making easy slippers for beginners is the ability to customize them endlessly. You can experiment with different colors, patterns, and embellishments to suit your taste or match the recipient’s personality.
Try using multi-colored yarn or creating color stripes by changing yarn every few rows. This simple technique adds a playful and creative touch to your slippers without complicating the pattern.
If you prefer a more elegant look, stick to neutral tones like beige, cream, or gray. Adding a delicate trim in white or metallic thread gives the slippers a sophisticated finish.
You can also attach small decorations such as pom-poms, crochet flowers, or wooden buttons. These details make your easy slippers unique and fun to wear.
For added comfort, consider sewing a soft fabric lining inside your slippers. This not only increases warmth but also improves structure and makes the slippers more durable.
If you’re making slippers as gifts, personalize each pair by using different yarn colors or adding initials using embroidery. Small details like these make handmade slippers special and memorable.
Even with an easy slipper for beginners – free pattern, small mistakes can happen, especially for new crocheters. The good news is that they’re easy to fix once you know what to look for.
If your slipper looks uneven or one side seems longer than the other, check your stitch count at the end of each row. Adding or skipping stitches is one of the most common errors. Counting your stitches consistently ensures symmetry.
Sometimes, slippers may turn out too loose or too tight. This usually happens due to inconsistent tension or using the wrong hook size. Always test your gauge before starting and adjust your hook if necessary.
Curling edges can also be a problem. This often occurs when your stitches are too tight or your turning chains are incorrect. Relax your grip and make sure each row begins and ends properly.
Another issue beginners face is difficulty joining the sides neatly. To fix this, use a yarn needle to sew the seams with invisible stitches instead of crocheting them together. This creates a smoother and more professional finish.
If your slipper feels uncomfortable around the toe area, try adjusting the shaping slightly by adding or reducing a few stitches in that section. Customizing the fit ensures maximum comfort and wearability.
Finally, remember that practice makes perfect. The first pair might not be flawless, but with each attempt, you’ll notice improvement. Crocheting easy slippers is a learning process that builds confidence and skill over time.
Q1: Can beginners really make these slippers easily?
A1: Yes! This easy slipper for beginners – free pattern is designed with simple stitches and clear steps, making it suitable for absolute beginners.
Q2: What type of yarn should I use?
A2: Medium-weight acrylic or cotton yarn works best for this pattern, offering both comfort and durability.
Q3: How long does it take to make one pair?
A3: Most people can complete a pair in two to three hours, depending on skill level and yarn thickness.
Q4: Can I wash these slippers in a machine?
A4: Yes, if you use machine-washable yarn. Always check the yarn label and wash in cold water on a gentle cycle.
Q5: How do I adjust the size for children or adults?
A5: Simply change the length of your foundation chain and adjust the number of rows. The pattern’s flexibility allows you to fit any foot size.
Q6: Can I sell slippers made from this pattern?
A6: Absolutely! Handmade slippers make wonderful items to sell at craft fairs or online shops, as long as you credit the design inspiration when required.
The easy slipper for beginners – free pattern is the perfect starting point for anyone wanting to learn crochet while creating something practical and cozy. With simple stitches, clear instructions, and endless customization options, these slippers are fun to make and even more fun to wear. Whether you’re crocheting them for yourself, friends, or as gifts, each pair reflects your personal touch and creativity.
We hope this guide has inspired you to pick up your hook and start crocheting your own slippers today. Remember, practice is the key to perfection—don’t be afraid to make mistakes and learn as you go.
If you enjoyed this tutorial, please share your honest feedback and suggestions for future crochet guides. Your opinion helps us improve and bring more exciting patterns to life!


