
Crocheted house-shaped cookie for Christmas tree

The 3D CROCHET SQUARE – Free Pattern is a perfect way to add depth and texture to your crochet projects. Whether you are a beginner or an experienced crocheter, this pattern offers a creative twist that can enhance blankets, pillows, and even wall art.
Learning how to make a 3D crochet square not only strengthens your skills but also allows you to explore intricate designs that bring a unique flair to your handmade items. With a variety of techniques and stitches involved, this pattern will quickly become a favorite in your crochet repertoire.
Crochet enthusiasts often look for patterns that combine both beauty and functionality, and the 3D CROCHET SQUARE – Free Pattern delivers exactly that.
The three-dimensional effect adds a sophisticated look that makes your project stand out. Unlike flat squares, 3D crochet squares create shadows and textures that give your project a dynamic appearance.
Understanding the basics of crochet and following this free pattern carefully ensures that your squares turn out consistent and professional-looking.
One of the best aspects of the 3D CROCHET SQUARE – Free Pattern is its versatility. You can use it for a wide range of projects, from cozy blankets and table runners to decorative pillows and even clothing accents. This pattern encourages creativity, allowing you to experiment with different colors, yarn types, and stitch combinations. Whether you prefer soft pastels or bold, vibrant colors, the 3D crochet square can be adapted to fit your style perfectly. By mastering this free pattern, you open the door to countless unique and personalized crochet creations.
Creating a 3D CROCHET SQUARE – Free Pattern begins with understanding the basic stitches and techniques required. Most 3D crochet squares use a combination of basic stitches like single crochet, double crochet, and slip stitches to build the layers that give the design depth. Beginners should practice these foundational stitches before attempting a more complex pattern.
Choosing the right yarn and hook size is essential for achieving the desired 3D effect. Thicker yarns often create more pronounced textures, while finer yarns give a delicate, subtle look. Pairing your yarn with an appropriately sized hook ensures that your stitches are uniform and your square maintains its shape.
Color selection plays a significant role in enhancing the three-dimensional appearance. Contrasting colors or gradients can highlight the raised portions of the square, making the design pop. Using multiple colors can also help differentiate layers and add visual interest to your project.
Another critical aspect is tension control. Consistent tension ensures that each square is uniform and that the 3D effect remains prominent. Beginners may need to practice multiple times to achieve consistent tension, but the effort pays off in the final result.
Reading the pattern carefully before starting is essential. The 3D CROCHET SQUARE – Free Pattern includes instructions for stitch placement, layering, and finishing touches. Skipping steps or misreading instructions can lead to uneven squares or a flattened 3D effect.
Finally, patience is key. Creating 3D crochet squares can be more time-consuming than traditional flat squares, but the visual impact and satisfaction of completing a textured design are well worth the effort.
Starting your 3D CROCHET SQUARE – Free Pattern requires a step-by-step approach to ensure accuracy and consistency. Begin with a simple foundation chain, usually between 4 to 6 chains, joined to form a small ring. This ring serves as the center of your square.
Once the ring is established, you will work in rounds to create layers that build the 3D effect. Typically, each round consists of a combination of basic crochet stitches arranged strategically to form raised sections. Pay attention to the stitch count, as this maintains symmetry and structure.
After completing the base layers, you will work on creating the raised portions. This step often involves crocheting clusters or puff stitches, which stand out from the flat background. Adjusting the height and density of these clusters enhances the 3D appearance.
Following each round, carefully check your work. Ensure that the square remains even and that the raised sections are forming correctly. Correcting mistakes early prevents issues in later rounds and helps maintain the pattern’s integrity.
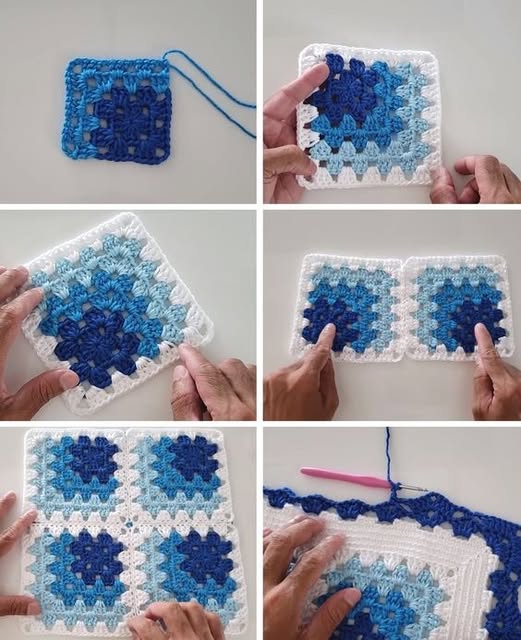
Once all layers and raised portions are complete, finish the square by securing the yarn and weaving in the ends neatly. This finishing step ensures a polished and professional-looking square that can be joined with others for larger projects.
Finally, consider blocking your 3D crochet square. Blocking shapes the square, evens out stitches, and enhances the dimensional effect. This step is especially important if you plan to assemble multiple squares into a larger blanket or quilt.
To achieve the best results with the 3D CROCHET SQUARE – Free Pattern, there are several tips and tricks that can make the process smoother and more enjoyable. One of the most important is to maintain consistent tension throughout your work. Uneven tension can distort the 3D effect and make your squares appear uneven.
Using stitch markers can be extremely helpful when working with multiple layers and complex stitch patterns. Markers allow you to track rounds and specific stitch placements, reducing errors and saving time.
Experimenting with yarn types can dramatically change the look of your squares. For example, using a soft, fluffy yarn creates a plush, cozy texture, while a smooth, tightly spun yarn produces crisp, clean lines that highlight intricate stitch patterns.
Pay attention to color combinations. Strategic use of contrasting or complementary colors emphasizes the 3D effect, making the raised sections more visually striking. Gradients and color transitions can add a professional touch.
Practice makes perfect. If you are new to 3D crochet squares, start with a small sample square to familiarize yourself with the pattern. Once you are comfortable, scale up to full-size squares for blankets or larger projects.
Finally, don’t rush. Taking your time ensures accuracy and quality. Enjoy the process of creating unique, textured crochet squares that reflect your personal style and creativity.
The versatility of the 3D CROCHET SQUARE – Free Pattern allows it to be used in a variety of creative projects. One popular option is creating a blanket composed entirely of 3D squares. The raised patterns add texture and warmth, making the blanket both functional and decorative.
Pillows and cushions are another excellent way to showcase your 3D crochet skills. Combining multiple squares with different colors and textures can result in a visually striking set of home décor items.
Wall hangings and art pieces also benefit from the 3D effect. Arranging squares in patterns or mosaics adds depth and dimension, turning simple crochet into stunning artwork.
Clothing accents, such as decorative patches on sweaters or bags, can feature 3D crochet squares to add a unique and personalized touch. This approach allows you to incorporate crochet into everyday fashion creatively.
Smaller projects, like coasters or pot holders, are perfect for practicing 3D crochet techniques. These items are functional while providing an opportunity to experiment with stitches, layers, and colors without committing to a large project.
Finally, gifting handmade 3D crochet squares or projects is always appreciated. The time, effort, and creativity involved in making a textured, dimensional piece make it a thoughtful and cherished gift.
Q1: Is the 3D crochet square suitable for beginners?
A1: Yes, beginners can try this pattern, but it is recommended to practice basic stitches first. The 3D effect adds complexity, so patience and practice are essential.
Q2: What types of yarn work best for 3D crochet squares?
A2: Both thick and fine yarns can work. Thick yarns create pronounced textures, while fine yarns offer subtle, delicate 3D effects. Choose based on your desired look.
Q3: Can I join multiple 3D squares for larger projects?
A3: Absolutely. Many crocheters combine multiple squares to create blankets, pillows, and wall hangings. Consistent tension ensures even squares.
Q4: How do I enhance the 3D effect?
A4: Using contrasting colors, puff stitches, clusters, and careful layering enhances the depth and dimensionality of the squares.
Q5: Do I need to block the squares?
A5: Blocking is recommended, especially for larger projects, to even out stitches and enhance the 3D appearance.
Q6: Can I customize the size of the squares?
A6: Yes. Adjusting the number of rounds or stitches allows you to create smaller or larger squares for different projects.
The 3D CROCHET SQUARE – Free Pattern is a versatile and creative tool for crocheters of all levels. It introduces texture, depth, and artistic flair to blankets, pillows, clothing accents, and decorative projects. By understanding the basic techniques, following the free pattern carefully, and experimenting with colors and yarn types, anyone can create stunning 3D crochet squares.
We’ve explored how to start, perfect, and apply these squares in various projects. The 3D crochet square is more than just a pattern—it’s an opportunity to elevate your crochet skills and create personalized, eye-catching handmade items.
Share your thoughts, experiences, and suggestions on using this pattern, and let others know how you’ve brought your 3D CROCHET SQUARE – Free Pattern projects to life.


