
Crocheted house-shaped cookie for Christmas tree

If you love crafting and want to make a stylish accessory, learning how to crochet a cute mini tote bag with two colors is a perfect project.
This type of bag combines creativity and practicality, allowing you to carry small items like keys, wallet, or phone, while showing off your handmade skills. Using two colors gives the bag a fun and vibrant look that can match your personal style or seasonal outfits.
Creating a two-color crochet mini tote bag is not only enjoyable but also helps improve your crochet skills. By following a step-by-step tutorial, even beginners can successfully complete this project.
Working with two colors introduces techniques such as color changes, which enhance the overall design and make your tote bag stand out from plain single-color creations.
Another great advantage of this project is that it requires minimal materials. All you need is some yarn in your chosen colors, a suitable crochet hook, and basic tools like scissors and a yarn needle. Once completed, this handmade mini tote bag becomes a unique accessory or a perfect gift for friends and family who appreciate DIY crafts.
Before starting your crochet mini tote bag, gather all necessary materials to make the process smooth and enjoyable. You will need:
Using good quality yarn ensures durability and a professional finish. You can also choose textured yarn for a playful effect. For the handles, consider making them sturdy with tighter stitches or even doubling the yarn for extra strength.
Having all materials ready before starting prevents interruptions and allows you to focus on the fun part – crocheting your mini tote bag with two colors. Proper tools and yarn choice can greatly influence the overall appearance and functionality of your finished bag.
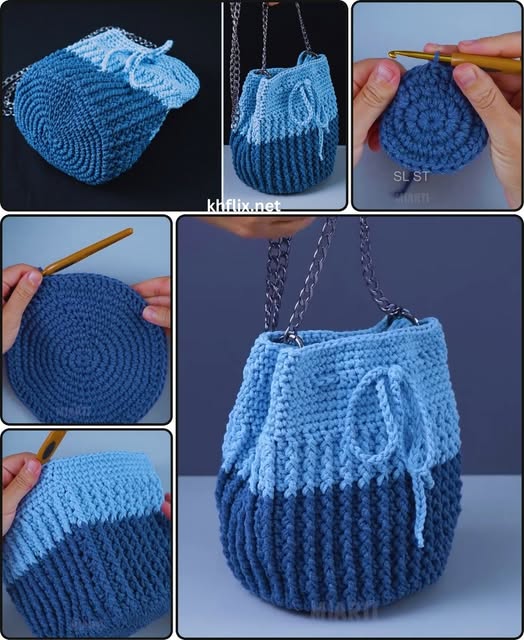
Start your mini tote bag by creating a foundation chain with the first color. The number of chains will determine the width of your bag. Make sure to crochet a few extra chains for a sturdy base.
Work in single crochet stitches for the base, ensuring that the stitches are tight and even. Once the base reaches the desired length, start building the sides by crocheting in rounds or rows. This is where you can introduce your second color, creating a beautiful contrast.
Changing colors is simple: finish the last stitch of the current color, and start the next stitch with the new color. Make sure to weave the ends neatly on the inside to avoid a messy appearance. You can also experiment with striped patterns or color blocks for a creative design.
When the sides reach your preferred height, finish the top edge with a decorative border. Simple scallops, shells, or picot edges add a professional and stylish look to your mini tote bag.
For handles, crochet straps using tight single or half-double crochets. Attach them securely to the bag, ensuring they are strong enough to hold small items. Handles can be short for a handheld tote or longer for a shoulder bag.
Finally, check all ends and weave them in properly. Give your bag a gentle block if necessary to shape it perfectly. Your two-color mini tote bag is now ready to use or gift.
The beauty of a crochet mini tote bag is the endless possibilities for customization. Try using complementary colors for a vibrant striped look, or mix neutral and bold shades for a chic appearance.
Adding appliques, flowers, or motifs can enhance the bag’s design. You could even attach small charms or buttons for extra personality. Handmade embellishments make your tote bag truly unique.
Experiment with different textures of yarn. Combining smooth and fluffy yarns adds depth and a playful effect. You can even crochet small pockets on the outside for added functionality.
Personalized bags are perfect for gifts. You can embroider initials or patterns that reflect the recipient’s style. Handmade gifts like this mini tote bag are always appreciated because they carry love and effort.
Crochet bags in varying sizes allow you to create a matching set. A small mini tote can accompany a larger bag, creating a stylish handmade collection for personal use or gifting.
Finally, documenting your creations with photos or videos can inspire others. Sharing your work and free tutorials helps the wider crafting community and encourages others to try DIY crochet projects.
Consistency in stitch tension is crucial for a polished finish. Uneven stitches can distort the bag’s shape. Practice even tension to achieve professional results.
When changing colors, carry the unused yarn along the inside to reduce loose ends. This ensures a neat appearance and strengthens the bag.
If you are a beginner, start with simpler patterns before attempting complex designs. Basic color changes and simple stitches are easier to manage.
Blocking your finished bag can improve its shape. Use a damp cloth to gently mold the bag, letting it dry in the desired form.
Keep your handles proportional. Too short or loose handles can make the bag uncomfortable or less functional.
Finally, be patient and enjoy the process. Handmade mini tote bags are not only functional but also a creative outlet that can provide satisfaction and joy with each finished project.
Q1: Is this project suitable for beginners?
Yes! Following a step-by-step tutorial with clear instructions makes it accessible even for beginners.
Q2: What types of yarn work best?
Cotton and acrylic yarns are ideal because they provide structure and durability. You can experiment with textures for creativity.
Q3: How do I change colors neatly?
Finish the last stitch of the first color, and start the next stitch with the second color. Weave ends inside for a clean look.
Q4: Can I make different sizes of mini tote bags?
Absolutely! Adjust the foundation chain and height to create larger or smaller versions of the bag.
Q5: Are these bags machine washable?
It depends on the yarn type. Most acrylic yarns are machine washable, but handwashing is recommended for delicate finishes.
Q6: Can I personalize the bag?
Yes! Add appliques, embroidery, charms, or color variations to make each bag unique.
Creating a crochet mini tote bag with two colors is a fun, rewarding project that combines creativity, skill-building, and practicality. From choosing the right yarn to following the step-by-step instructions, every part of the process allows you to craft a unique, handmade accessory. With a little patience and care, your mini tote bag becomes a stylish piece for everyday use or a thoughtful gift for loved ones.
We hope this guide inspires you to try DIY crochet projects and explore your creative potential. Don’t forget to share your experiences, leave a sincere opinion, and suggest other projects you’d like to see in the future. Your feedback helps grow the crafting community and keeps the joy of handmade creations alive!


