
Crocheted house-shaped cookie for Christmas tree

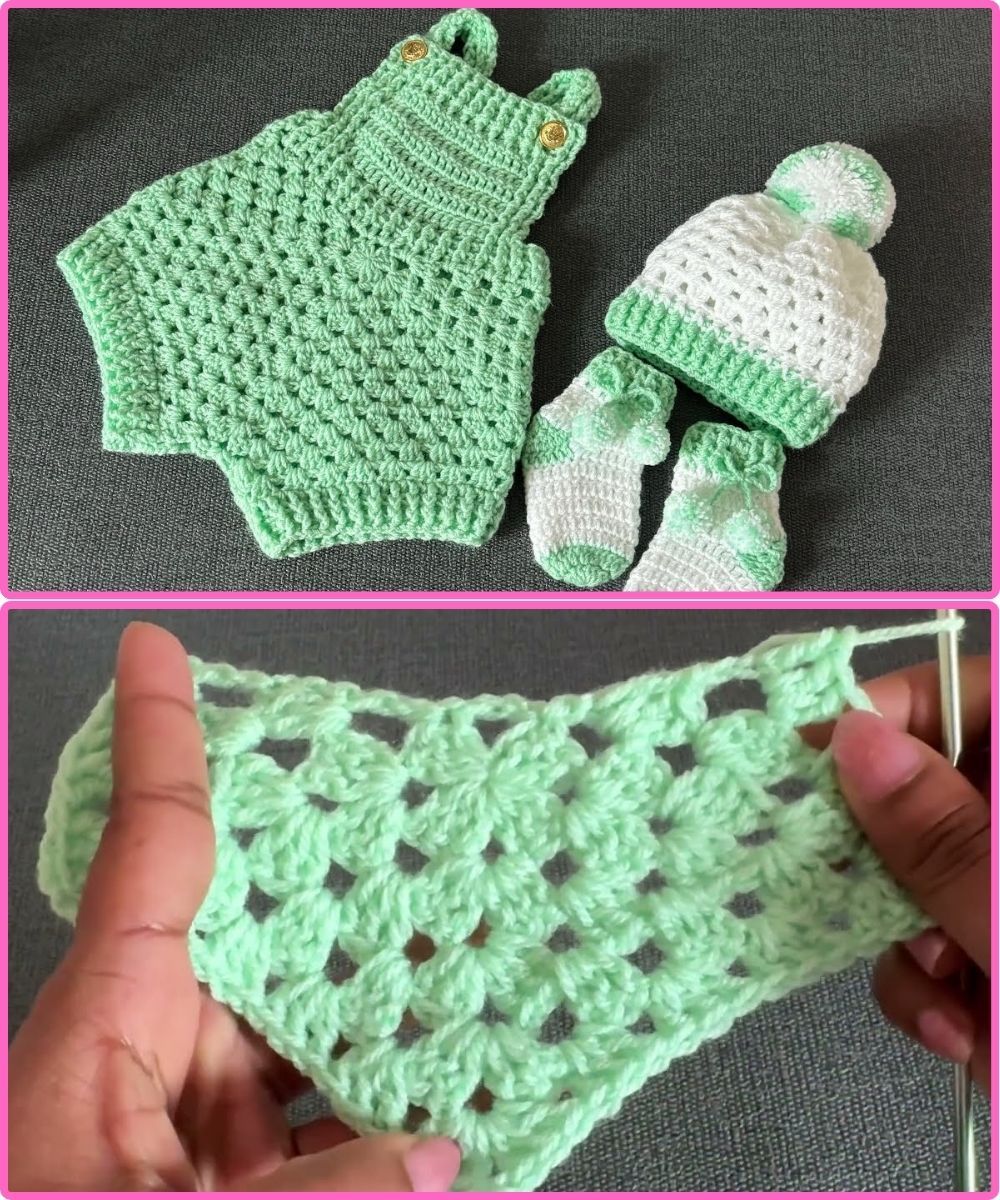
If you love creating handmade baby clothes that are both adorable and comfortable, this Easy Crochet Baby Romper – Free Pattern is the perfect project for you.
Designed with simplicity in mind, it combines elegance and practicality, making it ideal for beginners and experienced crocheters alike. A baby romper is one of the most cherished handmade gifts, and with this guide, you can create one that looks beautiful and feels soft against delicate skin.
Crocheting a baby romper is not only a relaxing activity but also a meaningful way to craft something full of love. With this Easy Crochet Baby Romper – Free Pattern, you’ll learn how to make a one-piece outfit that’s suitable for all seasons.
Whether you’re using light cotton yarn for summer or soft acrylic for winter, this romper adapts easily to your desired texture and warmth. The pattern is designed to be practical, featuring buttons or snaps for easy diaper changes and a comfortable fit for your little one.
This project also allows you to personalize your creation with endless design options. You can choose your favorite color combinations, add cute details like bows, pockets, or decorative edging, and even make matching booties or hats. The Easy Crochet Baby Romper – Free Pattern helps you craft not just a piece of clothing but a treasured keepsake that can be passed down or gifted. Let’s explore how to bring this adorable romper to life step-by-step.
The first step in making your Easy Crochet Baby Romper – Free Pattern is selecting the perfect yarn and crochet hook. Baby garments require soft, breathable materials that are gentle on sensitive skin. The best options are 100% cotton, bamboo blends, or hypoallergenic acrylic yarns. These fibers are comfortable, washable, and durable—important features for baby clothes that will be used and washed frequently.
The yarn weight should match the season and intended use. For lightweight summer rompers, choose sport or DK-weight yarn. For cooler months, you can opt for worsted weight or baby-soft acrylic. The yarn’s texture should be smooth to avoid irritation, and pastel colors or soft neutrals often work beautifully for baby garments.
When selecting a hook size, always check the yarn label for guidance. Using a slightly larger hook can make the fabric looser and airier, while a smaller hook creates a denser texture. For the Easy Crochet Baby Romper – Free Pattern, maintaining consistent tension ensures the final piece looks professional and fits well.
Before you start, crochet a small sample swatch to measure your gauge. This step prevents sizing issues later, especially when making the romper for a specific age or body size. A properly measured swatch saves time and ensures your finished romper matches the desired dimensions.
Finally, gather your additional materials: a measuring tape, scissors, tapestry needle, and buttons or snaps for closure. Preparing your supplies ahead of time keeps your crocheting process smooth and enjoyable.
The main body of the Easy Crochet Baby Romper – Free Pattern begins with creating the base section, usually worked from the top down or bottom up, depending on your preferred method. Both approaches have their advantages: top-down construction allows easier fitting adjustments, while bottom-up ensures a structured finish.
Start by chaining the foundation row according to the pattern’s size guide. This chain forms the neckline or bottom hem of the romper. Work evenly in single crochet (sc) or half double crochet (hdc) stitches to build the body, maintaining a consistent tension throughout. Remember to count your stitches carefully to avoid alignment errors as you shape the torso.
After a few rows, you’ll begin shaping the leg openings. Divide the stitches evenly, and work each leg separately in rounds or rows, depending on the pattern style. This is where the romper takes form, gradually transitioning from a flat piece to a wearable garment.
For beginners, the Easy Crochet Baby Romper – Free Pattern is designed to simplify complex steps. The instructions typically include clear stitch counts and diagrams that guide you through shaping without confusion. Following the guide closely ensures a perfect result, even if it’s your first time crocheting a baby garment.
Reinforce the crotch area and leg openings with extra stitches to make the romper sturdy. Babies move constantly, so strength and flexibility are key. A few additional rows of single crochet can make a big difference in durability.
Once you’ve shaped the main body and legs, test the piece’s size by gently stretching it. The fabric should feel soft and elastic but not too loose. Adjust by adding or removing a row if needed before moving on to the upper details.
Straps are an essential feature of your Easy Crochet Baby Romper – Free Pattern. They keep the romper secure while adding a cute, stylish touch. Depending on the design, straps can be fixed or adjustable. To create straps, attach yarn to the upper front edge and crochet a chain to your desired length. Then, work back and forth in single or double crochet rows until the straps reach the proper width.
For an adjustable fit, make buttonholes by skipping stitches in one row and securing them in the next. This simple technique allows you to customize the romper’s length as your baby grows. Alternatively, you can attach small snaps for a seamless look that’s easy to open and close.
Buttons can also be decorative. Choose ones that complement your yarn color—wooden or pastel buttons often add a charming, handmade touch. Always ensure buttons are securely sewn on to prevent choking hazards, as safety is crucial when crafting baby clothes.
Another way to personalize the Easy Crochet Baby Romper – Free Pattern is by adding edging or borders around the straps and neckline. Scalloped edges, picots, or shell stitches can give the romper a soft and elegant finish. These small details enhance the overall design while maintaining simplicity.
If you’re making a romper for special occasions, consider adding a small bow, ribbon, or applique on the front. These embellishments can make your creation stand out without complicating the pattern. However, always ensure that any decorations are firmly attached and safe for babies.
Finally, test the fastening mechanism to ensure it functions smoothly. The romper should be easy to put on and take off, especially during diaper changes. Convenience and comfort go hand in hand when designing the perfect baby outfit.
The final stage of the Easy Crochet Baby Romper – Free Pattern focuses on assembling and styling your creation. Once you’ve completed all main parts, weave in any loose ends using a tapestry needle. Trim excess yarn neatly for a clean, professional appearance.
If your romper includes multiple panels, carefully sew or crochet them together using slip stitches or invisible seams. Take your time aligning the edges to ensure symmetry and a polished finish. This step defines the quality of your final piece.
Blocking can help shape the romper and enhance stitch definition. Lightly dampen the fabric, stretch it to the desired dimensions, and let it dry naturally. This process ensures the garment maintains its shape and fits perfectly.
For styling ideas, consider creating matching accessories like booties, bonnets, or headbands using leftover yarn. These coordinated items make your handmade outfit even more adorable and gift-worthy.
You can also experiment with colors—soft pastels for a classic baby look, or bold, modern shades for a unique twist. The Easy Crochet Baby Romper – Free Pattern adapts beautifully to different palettes and themes, from vintage charm to minimalist chic.
Finally, wrap your finished romper in tissue paper or a handmade gift box if you’re presenting it as a gift. A handwritten tag or note adds a personal touch that parents will cherish forever.
Q1: Is this pattern suitable for beginners?
Yes, the Easy Crochet Baby Romper – Free Pattern is beginner-friendly. The stitches used are basic, and the instructions are simple to follow.
Q2: What type of yarn works best?
Soft cotton or bamboo blends are ideal for baby garments. They’re breathable, durable, and gentle on sensitive skin.
Q3: Can I make the romper in different sizes?
Absolutely. Adjust the number of stitches and rows according to the baby’s measurements or follow the size chart included in most free patterns.
Q4: How do I add buttons safely?
Use flat, securely sewn buttons, and double-knot your thread. Always ensure there are no loose parts that could pose a choking hazard.
Q5: Do I need special tools for this project?
No, just standard crochet tools: hook, scissors, measuring tape, yarn needle, and buttons or snaps for fastening.
Q6: Can I customize the design?
Definitely! Add decorative edges, appliques, or embroidery to make your romper unique while keeping the base structure the same.
The Easy Crochet Baby Romper – Free Pattern is more than just a crochet project—it’s an opportunity to create something heartfelt and lasting. From choosing the right yarn to adding final details, every step contributes to a handmade treasure full of warmth and care. Whether for your own baby or as a thoughtful gift, this romper will surely become a favorite keepsake.
We hope you enjoyed this guide and feel inspired to start your own Easy Crochet Baby Romper – Free Pattern today.
Don’t forget to leave a sincere opinion and suggestions below—your feedback helps other crafters and encourages creativity in the crochet community. Now grab your hook, some yarn, and bring this adorable baby romper to life!


