
Hunter's Star Quilt Block - Quick & Easy Tutorial

If you want to add a personal and heartfelt touch to your quilting projects, the Build A Heart Quilt Block Tutorial is the perfect guide.
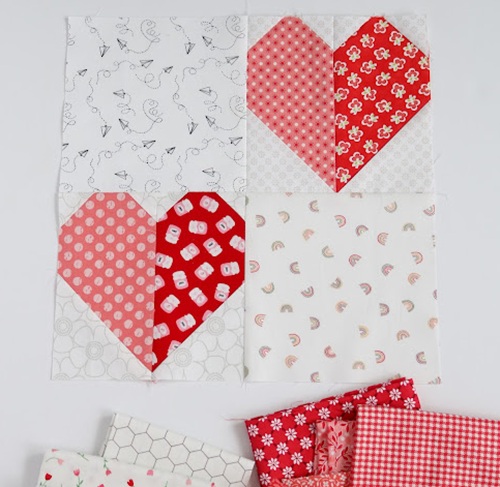
This tutorial walks you through creating beautiful heart-shaped quilt blocks that can be combined into blankets, wall hangings, or decorative pieces for your home.
Whether you’re a seasoned quilter or a beginner, this pattern allows you to craft visually stunning blocks with precise shapes and charming designs.
Quilting is a rewarding craft that blends creativity, precision, and patience. The Build A Heart Quilt Block Tutorial teaches you how to cut, piece, and sew fabric to form perfectly symmetrical hearts.
These blocks are versatile, allowing you to customize colors, fabrics, and sizes to fit your project needs. Creating heart quilt blocks is a great way to express love and care through handmade items.
The appeal of the Build A Heart Quilt Block Tutorial goes beyond decoration. Quilting strengthens skills such as measuring, cutting, and stitching accurately, while also encouraging experimentation with patterns, textures, and color schemes. A heart-themed quilt is perfect for gifts, anniversaries, or seasonal décor, making this tutorial both practical and emotionally meaningful.
The first step in your Build A Heart Quilt Block Tutorial is choosing the right fabrics, colors, and materials. Cotton is the most common choice for quilting due to its durability, ease of handling, and vibrant color retention. Pre-washed fabrics are recommended to prevent shrinking after the quilt is completed.
Color selection is crucial when building heart blocks. Red and pink shades are traditional choices for a heart motif, but you can experiment with pastel, bold, or neutral tones to match your décor or project theme. Contrasting colors for the background help the heart shape stand out and create a visually appealing design.
Additional materials include coordinating thread, fabric scissors or rotary cutters, pins, a quilting ruler, a cutting mat, and a sewing machine. Having all supplies ready ensures a smooth crafting process without interruptions. For more detailed heart designs, consider fusible interfacing or applique stabilizers to maintain shape while sewing.
Deciding the size of your heart block is also essential. Standard quilt blocks are often 12×12 inches, but you can adjust depending on the size of your final quilt or decorative project. Planning the dimensions beforehand allows you to calculate the number of blocks needed and the overall layout.
Finally, organize your workspace. A clean, well-lit area with enough room for cutting and assembling fabric pieces will make your Build A Heart Quilt Block Tutorial more enjoyable and efficient.
The next step in the Build A Heart Quilt Block Tutorial is cutting and piecing the fabric. Accurate cutting is essential to ensure all pieces align perfectly. Begin by ironing your fabric to remove wrinkles, which improves cutting precision and seam alignment.
Cut the fabric according to your heart pattern template. Typically, a heart block consists of a top triangle, two side triangles, and a bottom square. Using a rotary cutter and ruler can make the process faster and more precise. Label each piece to avoid confusion during assembly.
Arrange the pieces on your workspace before sewing. This helps visualize the final block, ensuring color balance and symmetry. Adjust the pieces if necessary to achieve the desired look before stitching. Pins or clips are helpful to secure fabric pieces in place while sewing.
When sewing, use a consistent seam allowance, usually ¼ inch, to ensure blocks fit together correctly. Press seams flat as you go for a professional finish. Matching points accurately is key to creating symmetrical hearts in your Build A Heart Quilt Block Tutorial.
After sewing the pieces together, trim any excess fabric along the edges. This step ensures blocks are uniform and makes assembly into a quilt much easier. Once your blocks are completed, check alignment and symmetry, adjusting if necessary.
Finally, arrange multiple heart blocks into your desired layout. You can create rows, alternating designs, or even a scattered pattern. Planning the placement ensures the quilt or project has a balanced and visually appealing final result.
Once your heart blocks are completed, it’s time to assemble the quilt. Begin by sewing the blocks together in rows, aligning seams carefully to maintain symmetry. Press each row after sewing to create a crisp, clean finish.
Next, join the rows to complete the quilt top. Take care to match the seams where blocks intersect, as precise alignment enhances the overall appearance. Pinning before sewing helps maintain accuracy and prevents shifting.
Adding borders is optional but recommended. A solid or complementary fabric border frames the quilt and adds stability. Borders can vary in width depending on your preference and the size of the quilt. A wider border is especially effective for larger quilts or wall hangings.
After assembling the quilt top, layer it with batting and backing fabric. Use safety pins or basting spray to secure all layers evenly. This step prepares the quilt for quilting stitches, which can be done by hand, machine, or a combination of both.
Once quilted, finish the edges with binding fabric. Fold the binding over the raw edges and stitch it in place for a neat, professional finish. Press the edges for a crisp final appearance. Your Build A Heart Quilt Block Tutorial is now ready to be admired and used.
The beauty of the Build A Heart Quilt Block Tutorial is its flexibility for customization. You can experiment with different color schemes, such as rainbow hearts, monochromatic designs, or seasonal themes. Mixing patterns like polka dots, stripes, or floral prints adds a playful and unique touch.
Adjust the size of your blocks to create varied textures and visual interest. Smaller heart blocks combined with larger blocks can create depth and a more dynamic quilt design.
Consider adding embellishments such as embroidery, appliqué, or fabric paint for additional personalization. These details can highlight the heart motif and add a handmade, heartfelt touch.
You can also use your heart blocks in projects other than quilts. Table runners, pillow covers, or wall hangings benefit from the charming heart design, making this Build A Heart Quilt Block Tutorial versatile and practical.
Finally, think about gifting. Handmade heart quilts are perfect presents for weddings, anniversaries, Valentine’s Day, or birthdays. The love and care put into each block make your gift truly meaningful.
Q1: Can beginners follow this tutorial?
Yes, the Build A Heart Quilt Block Tutorial is beginner-friendly. It uses basic cutting and sewing techniques with step-by-step instructions.
Q2: What fabrics work best?
Cotton fabrics are ideal for durability and ease of handling. Pre-washing is recommended to prevent shrinking.
Q3: How do I make symmetrical hearts?
Use a template for precise cutting and sew with consistent seam allowances. Press seams flat for accuracy.
Q4: Can I adjust the size of the blocks?
Yes, you can make smaller or larger heart blocks depending on the project or quilt size.
Q5: How do I assemble the quilt top?
Sew blocks into rows first, then join rows together. Press seams flat and use borders for a polished finish.
Q6: Can I use these blocks for projects other than quilts?
Absolutely. Heart blocks can be used for table runners, pillows, wall hangings, or other decorative items.
The Build A Heart Quilt Block Tutorial is a creative, fun, and rewarding project that allows you to craft personalized and charming quilt blocks. From selecting fabrics and colors to cutting, piecing, and assembling the quilt, each step offers an opportunity to showcase your skills and creativity.
We hope this guide inspires you to create your own Build A Heart Quilt Block Tutorial. Don’t forget to leave a sincere opinion and suggestions in the comments, as your feedback encourages others and helps improve future tutorials. With patience, creativity, and attention to detail, you can craft a beautiful quilt that spreads love and warmth for years to come.


