
Hunter's Star Quilt Block - Quick & Easy Tutorial

If you’ve ever wanted to create a stylish and functional accessory, learning how to sew a quilted makeup bag – step-by-step is the perfect project.
Quilted makeup bags are not only practical but also allow you to showcase your creativity with fabrics, colors, and patterns. This guide will walk you through every stage of the process, from selecting materials to finishing touches, so you can confidently craft a professional-looking bag.
Sewing a quilted makeup bag is an excellent way to practice and improve your sewing skills. With the how to sew a quilted makeup bag – step-by-step instructions, even beginners can achieve impressive results.
Quilted bags provide durability, extra padding for delicate items, and a polished finish that makes them suitable as gifts or personal accessories. Plus, handmade bags allow for endless customization in terms of size, fabric patterns, and decorative touches.
Using a quilted technique adds a unique texture and elegance to your makeup bag. Following this how to sew a quilted makeup bag – step-by-step guide ensures that your finished bag will not only look professional but also be durable enough to withstand daily use. Quilted bags are perfect for organizing makeup, skincare products, or small personal items, making them a versatile addition to your collection.
The first step in how to sew a quilted makeup bag – step-by-step is selecting the right fabrics and materials. Cotton fabric is a popular choice because it is easy to sew, widely available, and comes in countless patterns and colors. For a more luxurious feel, consider cotton blends or decorative fabrics with texture.
Batting is essential for quilting. It adds thickness and padding to protect makeup and other items. Lightweight fusible batting is ideal for smaller bags, while a thicker batting provides more structure. Using fusible batting simplifies the quilting process, as it can be ironed onto your fabric to hold it in place.
Zippers are another crucial component. A sturdy zipper, preferably matching the bag’s color, ensures smooth operation and durability. Consider the length of the zipper based on the width of your bag, and always choose quality zippers to avoid frustration during assembly.
Additional materials include thread that matches your fabric, scissors or rotary cutters, pins or clips, measuring tape, and a sewing machine. Having all materials prepared before starting your how to sew a quilted makeup bag – step-by-step project ensures a smooth workflow and avoids interruptions.
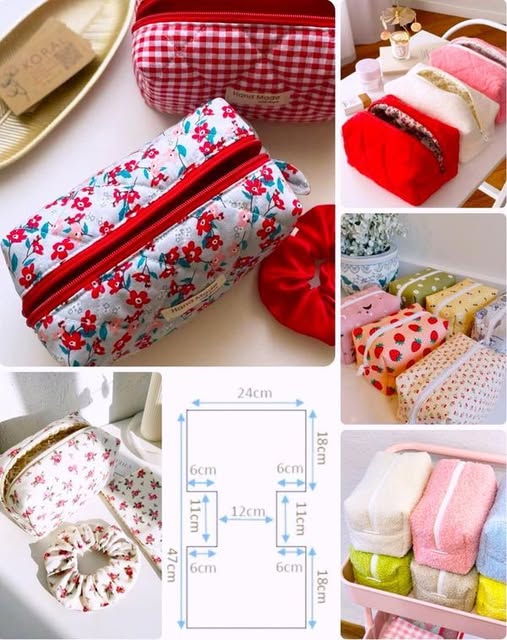
Finally, plan your bag’s design. Decide on dimensions, pocket placement, or any decorative quilting patterns. Thoughtful planning at this stage saves time and guarantees a polished result once your quilted makeup bag is complete.
Once your materials are ready, the next step in how to sew a quilted makeup bag – step-by-step is cutting and preparing the fabric. Start by measuring and cutting your main fabric, lining, and batting to the same size. Accurate cuts are essential for a neatly finished bag.
Layer the fabric pieces with the batting in the middle, ensuring all edges align. Pin or clip the layers together to prevent shifting while quilting. Proper preparation helps maintain straight lines and prevents uneven stitching during the quilting process.
Next, decide on a quilting pattern. Simple straight lines, diagonal grids, or more intricate designs can be used depending on your skill level and desired style. Mark guidelines lightly with a fabric pen or chalk to ensure uniformity and precision.
Quilting the layers together is the heart of the how to sew a quilted makeup bag – step-by-step method. Stitch along the marked lines using a straight stitch on your sewing machine. Keep stitches even and consistent, as this contributes to the bag’s professional appearance and durability.
After quilting, trim any excess fabric or batting along the edges. This step ensures clean, straight edges and prepares your pieces for assembly. Proper preparation at this stage makes the following sewing steps easier and results in a neat final product.
Finally, double-check your layers for alignment and smoothness. Any wrinkles or misaligned edges can be corrected before moving on to sewing the bag’s sides and zipper. A well-prepared quilted piece ensures a flawless makeup bag once complete.
With your quilted pieces ready, you can begin assembling your bag as part of how to sew a quilted makeup bag – step-by-step. Start by pinning the zipper to the top edges of the quilted fabric. Using a zipper foot on your sewing machine makes this process easier and ensures a neat attachment.
Next, attach the lining to the zipper in the same manner. Make sure the lining and outer fabric are aligned evenly, creating a smooth finish. Stitch carefully along the zipper edges to secure all layers together.
Once the zipper is attached, sew the sides and bottom of the bag. Keep the seams straight and consistent to maintain the bag’s rectangular shape. Reinforce corners with extra stitching for added durability, especially if the bag will carry heavy or sharp items.
Check the bag’s shape after sewing the sides. Minor adjustments or seam corrections can be made to ensure it sits flat and looks balanced. Accurate assembly is a key part of how to sew a quilted makeup bag – step-by-step, contributing to a polished and professional result.
Finally, turn the bag right side out through the zipper opening. Push out the corners gently for a crisp, defined shape. Your quilted makeup bag should now resemble the intended design, complete with a secure zipper and smooth seams.
The final step in how to sew a quilted makeup bag – step-by-step is adding finishing touches and personalization. Topstitching along the edges can enhance the bag’s durability and give it a professional look. Ensure stitches are straight and even for the best appearance.
Consider adding interior pockets or dividers to organize your makeup items. Small stitched pockets can keep brushes, lipsticks, or tools in place, making the bag functional and user-friendly. Customization allows your quilted makeup bag to suit your personal needs perfectly.
Decorative elements such as embroidered initials, buttons, or fabric appliqués can further personalize your bag. These creative touches elevate a simple quilted bag into a unique accessory that reflects your style.
Trim any loose threads and press the bag lightly with an iron if needed. Proper finishing ensures a neat, polished appearance. Your quilted makeup bag is now ready for everyday use, travel, or as a handmade gift.
Finally, store your bag properly when not in use to maintain its shape and structure. Avoid overstuffing, and clean gently according to fabric care guidelines to ensure it lasts for years. The attention to detail in finishing is essential for a professional and durable quilted makeup bag.
Q1: Is this project suitable for beginners?
Yes! The how to sew a quilted makeup bag – step-by-step method is beginner-friendly with clear instructions.
Q2: What fabric is best for quilting?
Cotton or cotton blends work best for structure and ease of sewing. Use fusible batting for added stability.
Q3: Can I make the bag different sizes?
Absolutely! Adjust the measurements of the fabric and zipper to create small, medium, or large bags.
Q4: How do I attach the zipper neatly?
Use a zipper foot on your sewing machine and align the fabric and lining carefully. Pinning helps keep everything in place.
Q5: Can I add interior pockets?
Yes, small stitched pockets or dividers can be added for better organization and functionality.
Q6: How should I care for my quilted makeup bag?
Hand wash gently or use a delicate machine cycle. Air dry and avoid overstuffing to maintain shape.
Learning how to sew a quilted makeup bag – step-by-step allows you to create a stylish, functional, and durable accessory. From selecting fabrics to quilting, assembling, and finishing, each step ensures a polished and professional result. Quilted makeup bags are perfect for personal use, travel, or gifting, and can be customized to suit any style or preference.
We hope this guide inspires you to try your own how to sew a quilted makeup bag – step-by-step project. Don’t forget to leave a sincere opinion and suggestions in the comments—your feedback helps others and encourages more creative sewing projects.
With patience, attention to detail, and creativity, you can craft a beautiful quilted makeup bag that will be cherished for years.


