
Hunter's Star Quilt Block - Quick & Easy Tutorial

If you’re looking for a fun and practical sewing project, How to Make DIY Make a Stylish Zipper Bag Easily and Simply in One Go is a perfect guide for both beginners and experienced crafters.
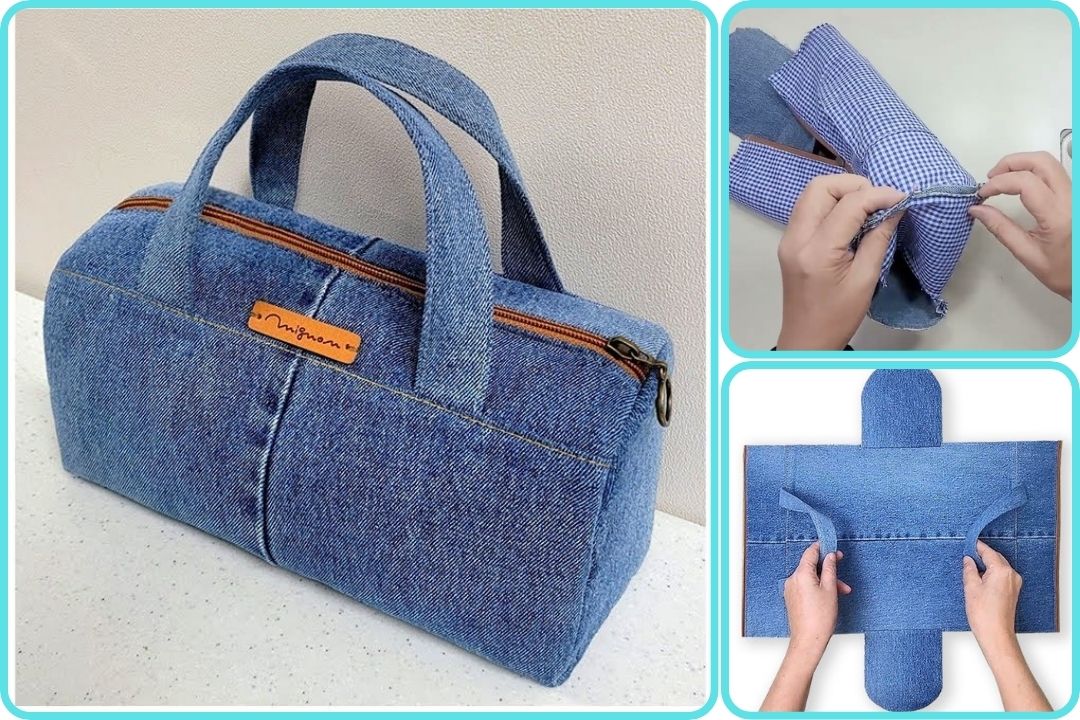
Zipper bags are not only functional for storing cosmetics, stationery, or small accessories, but they also allow you to showcase your creativity. With this DIY method, you can create a stylish and professional-looking bag in a single session without complicated steps.
Creating your own zipper bag can be an empowering experience. Learning How to Make DIY Make a Stylish Zipper Bag Easily and Simply in One Go teaches you essential sewing skills, such as handling zippers, stitching straight lines, and finishing edges neatly.
These skills are transferable to many other sewing projects. Additionally, making your own bag ensures you have a unique design that reflects your personal style.
The appeal of this project lies in its simplicity and customization. With the right materials, tools, and instructions, anyone can complete a zipper bag in one sitting. The DIY approach also saves money compared to purchasing ready-made bags while giving you the satisfaction of crafting something entirely yourself. Plus, it’s an eco-friendly way to repurpose leftover fabric or scraps, contributing to a sustainable lifestyle.
The first step in learning How to Make DIY Make a Stylish Zipper Bag Easily and Simply in One Go is selecting the right materials and tools. The type of fabric you choose will affect the bag’s appearance, durability, and ease of sewing. Cotton, canvas, or denim are ideal options because they are sturdy yet easy to handle. Lighter fabrics can be used for smaller or decorative bags, while thicker fabrics offer more structure.
Your zipper choice is equally important. A high-quality metal or nylon zipper will ensure smooth operation and longevity. Measure your zipper according to your desired bag size, allowing a little extra length for easier sewing. Matching or contrasting zipper colors can create different visual effects, adding to the bag’s style.
Other essential tools include scissors or a rotary cutter, pins, measuring tape, chalk or fabric markers, and a sewing machine or needle for hand sewing. Having everything ready before starting helps maintain workflow and reduces mistakes. Using a ruler or grid mat for precise measurements ensures that your bag turns out symmetrical and professional-looking.
Consider additional materials for customization. Lining fabric, interfacing, or decorative trims can enhance both the aesthetics and durability of your zipper bag. Lining prevents seams from fraying and adds a polished finish, while interfacing strengthens the fabric for a more structured look. Accessories like buttons or embroidery can further personalize your bag.
Once your materials are ready, the next step in How to Make DIY Make a Stylish Zipper Bag Easily and Simply in One Go is cutting and preparing the fabric. Measure and mark your fabric carefully according to the desired bag size. Precision at this stage is crucial for symmetry and ease of assembly.
Cut two main pieces for the front and back of the bag, ensuring they are identical in size. If you’re using lining, cut two additional pieces of the same dimensions. Using pins or clips to secure fabric layers can prevent shifting during cutting. Always add seam allowances, typically around 0.5 to 1 inch, to allow for stitching.
Prepare the zipper by trimming to the correct length if necessary and pressing it flat to make sewing easier. Mark the zipper placement on the fabric using chalk or fabric markers, ensuring it is centered and straight. Accurate placement avoids crooked zippers or uneven edges in the final bag.
If adding interfacing, cut pieces to match your fabric and attach them according to the manufacturer’s instructions. Interfacing adds stability and helps the bag hold its shape, especially for thinner fabrics. Press the fabric before sewing to eliminate wrinkles and improve accuracy.
Organizing your fabric pieces and tools before starting assembly streamlines the process. With everything in place, you’re ready to move on to sewing your zipper bag in a single, efficient session.
The core step in How to Make DIY Make a Stylish Zipper Bag Easily and Simply in One Go is assembling and sewing the bag. Start by attaching the zipper to the top edge of the front piece, aligning it carefully. Use pins or clips to hold it in place, then sew slowly and evenly, ensuring the stitching is straight.
Next, attach the back piece of the bag to the other side of the zipper using the same technique. Double-check that both pieces are aligned and that the zipper opens smoothly. A properly sewn zipper ensures functionality and prevents frustration when using the bag.
Once the zipper is secured, sew the sides and bottom of the bag. If using lining, place the outer fabric and lining together with the right sides facing in and sew around the edges, leaving a small opening to turn the bag inside out. After turning, press the seams flat for a neat finish and sew the opening closed with a hidden stitch.
Reinforce corners and stress points with extra stitching to increase durability. Optional topstitching along the zipper edge adds both strength and a professional appearance. This single-session approach ensures that your bag is completed efficiently without compromising quality.
Finally, check all seams, remove pins, and trim any loose threads. Your How to Make DIY Make a Stylish Zipper Bag Easily and Simply in One Go project should now be fully functional, polished, and ready to use or gift.
Customization allows your How to Make DIY Make a Stylish Zipper Bag Easily and Simply in One Go to reflect your personality and specific needs. You can change the fabric pattern, add pockets, or use decorative stitches to make your bag unique. Contrasting fabrics or trims create a visually appealing effect, while pockets improve organization and usability.
Adding lining or interfacing changes the texture and sturdiness of the bag. Soft lining makes it feel luxurious, while firm interfacing ensures it holds its shape for heavier items. Decorative touches like embroidery, buttons, or appliqués give your zipper bag a one-of-a-kind appearance.
Adjust the bag size to suit its intended purpose. Smaller bags are perfect for cosmetics or stationery, while larger designs can hold tablets, books, or crafting supplies. Flexible sizing allows this DIY method to accommodate various needs efficiently.
You can also experiment with zipper placement or style. Hidden zippers, diagonal zippers, or double zippers create different looks and functions. Combining creativity with practicality ensures your DIY zipper bag is both beautiful and functional.
Finally, think about gifting. Handmade zipper bags make thoughtful presents, and personal touches like monograms or favorite color schemes make them extra special. Sharing your How to Make DIY Make a Stylish Zipper Bag Easily and Simply in One Go with others spreads the joy of crafting.
Q1: Is this project suitable for beginners?
Yes! This DIY method is designed to be simple and beginner-friendly while still producing professional results.
Q2: What type of fabric works best?
Cotton, canvas, or denim is ideal for durability, but lighter fabrics can be used for small or decorative bags.
Q3: Can I make the bag in different sizes?
Absolutely! Adjust fabric measurements and zipper length to create small, medium, or large bags.
Q4: How do I ensure the zipper is straight?
Mark placement with chalk and use pins or clips to hold it in place before sewing slowly and evenly.
Q5: Can I add pockets or lining?
Yes, both options enhance functionality and give your bag a polished, customized look.
Q6: How do I clean the finished bag?
Spot clean with mild detergent or hand wash depending on the fabric type to maintain shape and quality.
Learning How to Make DIY Make a Stylish Zipper Bag Easily and Simply in One Go allows you to create functional, stylish, and personalized bags in a single session. From selecting materials to sewing and customizing, each step ensures a professional-looking result. Handmade zipper bags are practical, customizable, and perfect for gifting or personal use.
We hope this guide inspires you to try your own DIY zipper bag. Don’t forget to leave a sincere opinion and suggestions in the comments—your feedback motivates others and helps improve future crafting guides. With creativity and a few simple tools, you can make a unique zipper bag easily and in one go.


