
Crocheted house-shaped cookie for Christmas tree

Flower, Sepals and Assembly – Free Patterns have become a popular choice for craft enthusiasts who want to create beautiful floral designs without spending too much time or money.
Whether you are a beginner or an experienced crafter, understanding the structure of a flower, including its sepals and how to assemble them, is crucial to achieving professional-looking results.
These free patterns allow anyone to explore their creativity while learning the fundamentals of floral crafting. From handmade decorations to personalized gifts, the possibilities are endless when you know how to work with these essential elements.
Creating a flower using free patterns involves more than just stitching petals together. Each flower consists of various parts, and understanding the role of sepals is essential.
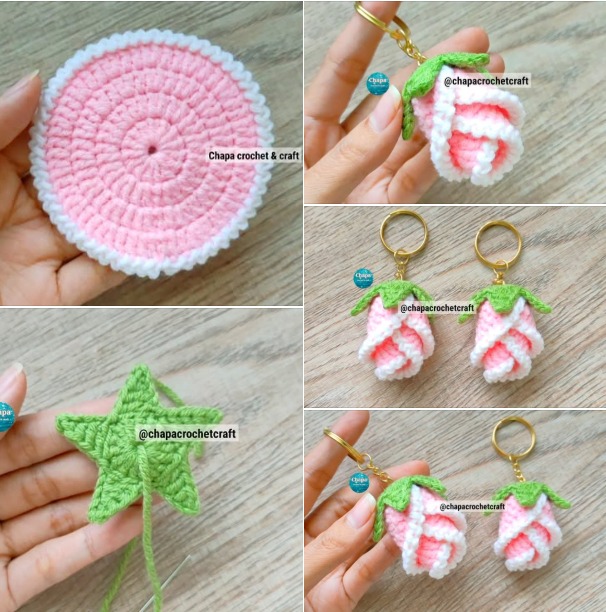
Sepals are the green leaf-like structures at the base of a flower that protect the budding petals before they bloom. In crafting, replicating sepals accurately enhances the flower’s realism and gives it a complete, polished look. Following a proper assembly process ensures that the flower holds its shape and remains durable over time, making it ideal for decorations, bouquets, or wearable accessories.
Using free patterns not only saves money but also provides step-by-step guidance that helps crafters avoid common mistakes. Many free tutorials emphasize the importance of assembling the flower in layers, starting from the sepals, adding petals gradually, and finally securing everything together. This method helps maintain symmetry and ensures that the final product looks balanced and visually appealing. By practicing with free patterns, crafters gain confidence in their skills, opening the door to more complex projects and personalized designs in the future.
To create realistic flowers, it’s essential to understand their anatomy. Sepals form the outermost layer of a flower and play a protective role for the delicate petals inside. In crafting, these can be replicated using various materials like fabric, paper, or yarn. Sepals are usually green, but depending on your design, they can be colored to complement the petals. Learning how to craft sepals accurately sets the foundation for creating lifelike floral arrangements.
In flower patterns, sepals often serve as the first step in the assembly process. By attaching the sepals properly, you ensure that the petals have a stable base to rest upon. The number of sepals varies depending on the flower type, and free patterns usually specify this detail. Observing real flowers or high-quality images can help crafters replicate the correct shape and size, enhancing the authenticity of their creations.
Crafting sepals also involves learning techniques such as folding, stitching, or shaping materials to mimic the natural curves found in real flowers. Attention to detail at this stage makes a significant difference in the final appearance. Some free patterns provide templates that can be traced and cut, simplifying the process for beginners.
Proper sepal placement ensures that the flower maintains its structure during assembly. Misaligned sepals can make the flower look unbalanced or incomplete. Practicing the positioning before gluing or stitching permanently is recommended, especially for intricate designs.
Additionally, understanding the relationship between sepals and petals is key. Sepals support the petals and help them fan out naturally, giving the flower a fuller and more appealing look. Neglecting this detail can result in a flat or awkward final piece.
Lastly, working with sepals enhances creativity. While they traditionally appear green, experimenting with colors, patterns, or textures can give your handmade flowers a unique twist. Free patterns often encourage this type of personalization, making your craft both educational and enjoyable.
Selecting the right materials is crucial when working with flower, sepals and assembly – free patterns. Common choices include fabric, felt, paper, and yarn. Each material has its advantages and affects the flower’s texture, durability, and overall appearance. Understanding which material best suits your project ensures professional results and a satisfying crafting experience.
Fabric is popular for realistic flowers because it can be shaped and dyed easily. Felt offers a sturdy option for beginners, as it holds its form well and requires minimal sewing. Paper is ideal for decorative projects like wall art or event decorations, while yarn is commonly used in crochet or knitting projects. Free patterns often specify which materials work best for each flower type.
Tools also play an important role in creating flowers. Scissors, glue, wire, and needles are essential, depending on the chosen material. High-quality tools make the assembly process smoother and reduce the likelihood of mistakes. Investing in the right tools pays off in the final product’s durability and appearance.
When selecting colors, consider both realism and aesthetic appeal. Sepals are typically green, but petals can vary widely. Coordinating shades to match the desired flower type enhances the craft’s visual impact. Many free patterns include color guides to simplify this choice.
Understanding material properties helps in achieving realistic textures. For instance, fabric petals can be curled or layered to mimic natural movement, while paper petals can be creased for dimension. Following pattern instructions carefully ensures each piece fits together seamlessly during assembly.
Finally, experimenting with different materials encourages innovation. Free patterns often provide the basics, but creative crafters can mix textures and colors to produce unique designs that stand out. Mastering material selection is key to growing your floral crafting skills.
Following a structured assembly process is essential when working with flower, sepals and assembly – free patterns. This ensures that all parts, from sepals to petals, align correctly and the flower maintains its intended shape. Free patterns provide detailed instructions, but understanding the logic behind each step enhances your crafting efficiency and results.
Start with the sepals, as they form the foundation for the flower. Position them evenly around the base, ensuring symmetry. Depending on your material, attach sepals using glue, stitches, or wire. This stage sets the tone for the entire assembly and is critical for stability.
Next, add petals one layer at a time. Begin with the inner petals and work outward, following the shape and size indicated in the pattern. Overlapping petals slightly helps create a natural, full appearance. Free patterns often include diagrams to guide proper placement.
Pay attention to spacing and orientation. Uniform spacing avoids overcrowding and ensures the flower looks balanced from all angles. Adjusting petals slightly before securing them permanently can prevent mistakes.
Secure the flower’s center, which may involve adding a small ball, bead, or rolled material depending on the pattern. This finishing touch completes the flower’s core and enhances its realistic look.
Finally, review the completed flower and make minor adjustments. Slight bending of petals, trimming, or repositioning sepals can improve the overall appearance. Following these steps ensures your handmade flower looks professional and durable.
Free patterns for flower, sepals and assembly are excellent resources, but using them effectively requires attention and patience. Carefully reading instructions before starting allows crafters to anticipate challenges and prepare materials in advance. Keeping your workspace organized prevents mistakes and streamlines the assembly process.
Practice makes perfect. Trying a smaller flower first helps you understand the steps without wasting materials. Free patterns often encourage experimentation, making this trial phase both educational and enjoyable.
Take advantage of illustrations and diagrams included in free patterns. Visual aids provide insight into proportions, positioning, and assembly techniques that words alone may not convey. Studying these carefully improves accuracy and reduces frustration.
Personalization is encouraged. While free patterns provide a base, adding your unique touch—such as alternative colors, textures, or decorative elements—enhances creativity and allows you to produce one-of-a-kind flowers.
Patience is key. Some patterns involve intricate steps, and rushing can result in misaligned petals or damaged materials. Working slowly ensures precision and a polished final product.
Finally, store completed flowers properly to maintain their shape. Avoid crushing or folding delicate petals, and consider using storage boxes or containers for protection. Free patterns often suggest ways to preserve your creations, extending their longevity.
Q1: What are sepals in a flower craft?
A1: Sepals are leaf-like structures at the flower base that protect petals before blooming. In crafts, they provide a foundation and support for petals.
Q2: Can I use any material for these free flower patterns?
A2: Yes, common materials include fabric, felt, paper, and yarn. The choice depends on the desired texture, durability, and project type.
Q3: Are these patterns suitable for beginners?
A3: Absolutely. Free patterns usually provide step-by-step instructions, making them accessible to beginners and advanced crafters alike.
Q4: How do I make my flower look realistic?
A4: Pay attention to sepal and petal placement, layering, spacing, and texture. Using proper materials and following patterns carefully enhances realism.
Q5: Can I customize the colors of the petals and sepals?
A5: Yes. While traditional sepals are green, you can experiment with colors, textures, and designs to create unique flowers.
Q6: How do I preserve handmade flowers?
A6: Store them in a safe, dry place, avoid crushing petals, and consider using boxes or containers for protection.
In conclusion, mastering flower, sepals and assembly – free patterns allows crafters to create stunning, realistic floral designs while developing valuable skills. By understanding flower anatomy, selecting suitable materials, following step-by-step assembly instructions, and using patterns effectively, anyone can produce professional-quality flowers. These free patterns not only save money but also encourage creativity, experimentation, and continuous learning.
We hope this guide has provided clear insights and practical tips for crafting your flowers. Don’t hesitate to leave your honest opinion and suggestions—your feedback helps improve future tutorials and inspires other crafters to explore the beauty of handmade floral art.


