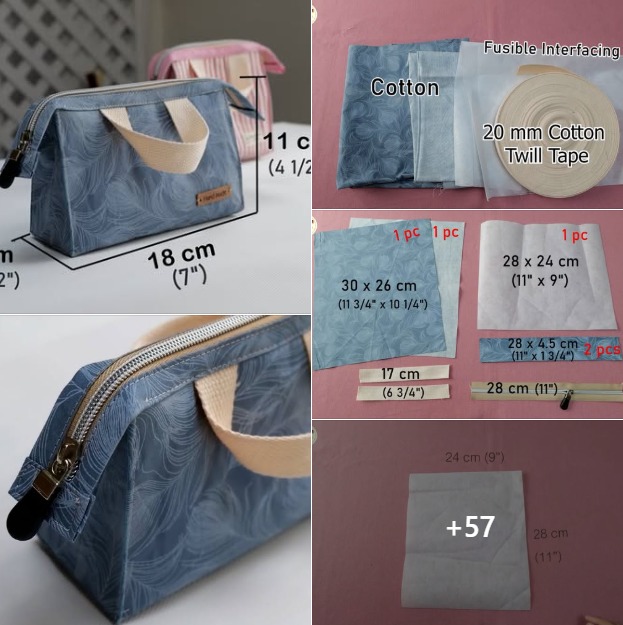
How to make a zipper pouch bag is one of the most rewarding beginner sewing projects you can start with. A zipper pouch bag is versatile, functional, and stylish, making it perfect for organizing small items like cosmetics, stationery, or accessories.
Learning this simple yet valuable skill allows you to personalize your pouch in countless ways, from fabric patterns to zipper colors. With just a few tools and materials, you can create something that’s both practical and beautiful — even if you’re new to sewing.
When you understand the process of making a zipper pouch, you gain confidence in handling sewing tools and materials. This project teaches essential techniques such as installing a zipper, sewing straight seams, and finishing edges neatly.

It also helps beginners learn how to work with fabric layers and align corners precisely. Once you master this, you’ll be able to apply these techniques to other sewing projects like tote bags, wallets, or cosmetic cases.
Another great reason to learn how to make a zipper pouch bag is its customizability. You can choose your favorite fabric prints, add inner linings, include pockets, or experiment with decorative stitching. It’s also a sustainable way to repurpose fabric scraps and old zippers. Whether you sew by hand or use a machine, the process remains enjoyable and accessible. Plus, handmade pouches make thoughtful and personalized gifts for friends and family.
Before starting the project, it’s important to gather all necessary materials and tools for your zipper pouch bag. Using the right supplies ensures a smoother sewing experience and a more professional-looking result. For this project, you will need fabric for the outer layer, lining fabric, a zipper, thread, scissors, pins, and a sewing machine (or a hand needle if sewing manually).
The outer fabric can be cotton, canvas, denim, or any material that holds its shape. Choosing a sturdy fabric helps the pouch maintain structure, especially if you plan to store heavier items. For a soft and flexible design, you can opt for quilting cotton or linen.
The lining fabric is equally important, as it gives the pouch a clean interior finish. Lightweight cotton or polyester lining works best. You can even use waterproof fabric if you want to create a makeup or travel pouch that resists moisture.
The zipper is the star of this project. Select a zipper that is slightly longer than the top edge of your pouch — usually about 1 inch longer. Nylon coil zippers are ideal for beginners because they are easy to sew and adjust. Metal zippers also work well but require extra care when stitching near the teeth.
You will also need thread that matches or complements your fabric, a measuring tape or ruler, and pins or clips to hold the layers together. Having an iron nearby helps press seams flat and gives your final product a neat, professional look.
Lastly, make sure your sewing machine needle suits your fabric type. Use a universal needle for cotton or linen, and a heavier needle for canvas or denim. Using the right needle prevents skipped stitches and helps achieve smooth seams.
Now that you have all your materials ready, let’s go through the process of how to make a zipper pouch bag step by step. Following these instructions carefully ensures accuracy and a beautiful result.
Step 1: Cut your fabric pieces.
Decide the size of your pouch. A good standard size is 9 inches wide by 6 inches tall. Cut two pieces of outer fabric and two pieces of lining fabric using these measurements. Make sure all edges are even and square.
Step 2: Attach the zipper.
Place one piece of outer fabric right side up. Align the zipper along the top edge, face down. Then, place one lining piece on top of the zipper, face down. Pin or clip them together. Sew along the zipper edge using a zipper foot to keep the stitching close and even. Repeat the same for the other side with the remaining pieces.
Step 3: Press and topstitch.
After sewing both sides of the zipper, open the fabric layers and press them flat with an iron. Topstitch close to the zipper edge — this not only keeps the fabric from catching in the zipper teeth but also gives your pouch a professional finish.
Step 4: Sew the sides and bottom.
Open the zipper halfway (this step is crucial to turn the bag right-side out later). Align the outer fabric pieces together and the lining pieces together. Pin around the edges, leaving a small opening (about 3 inches) at the bottom of the lining for turning. Sew all the way around.
Step 5: Box the corners (optional).
If you want your pouch to have depth, pinch the corners and sew a short straight line across each one, about 1 inch from the tip. Trim off the excess fabric.
Step 6: Turn and finish.
Turn the pouch right-side out through the lining opening, then stitch the opening closed by hand or with your sewing machine. Push out all corners neatly, and press the entire pouch with an iron for a crisp look. Congratulations — your zipper pouch bag is complete!
One of the best parts of learning how to make a zipper pouch bag is customizing it to reflect your style. There are countless ways to personalize your pouch once you understand the basic construction.
You can start by choosing unique fabric combinations. Mixing patterns, colors, or textures adds character. Try pairing floral prints with solid tones or using contrasting zippers to make your design pop.
Adding decorative stitching or embroidery enhances visual appeal. Simple stitches along the seams or personalized initials turn your pouch into a signature item. If you have an embroidery machine, you can add names or motifs before sewing the pouch together.
You can also experiment with pockets and compartments. Adding small inner pockets makes your pouch more functional for carrying accessories or makeup brushes. Use leftover fabric from the main project to keep everything coordinated.
Another fun option is to add interfacing between the outer fabric and lining. Interfacing gives the pouch more structure and helps it maintain its shape over time. It’s especially useful if you plan to carry heavier objects.
For a more creative approach, try using recycled materials. Old jeans, fabric scraps, or even worn-out bags can be repurposed into stylish zipper pouches. This not only saves money but also supports sustainability and reduces fabric waste.
Finally, consider adding decorative elements like tassels, charms, or fabric labels. These small details elevate your handmade pouch from simple to stunning. Every choice you make reflects your creativity and craftsmanship.
Even though making a zipper pouch bag is simple, a few tips can help you achieve professional-quality results every time. Paying attention to small details makes a big difference in how your finished pouch looks and feels.
First, always press your fabric before sewing. Ironing removes wrinkles and ensures clean, even seams. Pressing after each step also helps your project lay flat and look polished.
Second, use a zipper foot on your sewing machine. This tool allows you to sew close to the zipper teeth without breaking your needle or creating uneven lines. It’s one of the most important accessories for projects involving zippers.
Third, measure carefully before cutting. Even a small mistake in measurement can cause uneven edges or misaligned seams. Double-check your measurements to ensure both sides of the pouch match perfectly.
Fourth, secure your stitches at the beginning and end of each seam by backstitching. This prevents seams from unraveling, especially near the zipper where tension is higher.
Fifth, avoid sewing with the zipper fully closed during side seams — always leave it halfway open. Otherwise, you won’t be able to turn the pouch right-side out after sewing.
Lastly, take your time. Rushing can lead to crooked seams or skipped steps. Patience and precision are key to creating a pouch that looks clean, symmetrical, and durable.
Q1: Can I make a zipper pouch bag without a sewing machine?
A1: Yes, you can sew it by hand using a backstitch, though it takes longer. The process is the same, just slower.
Q2: What size zipper should I use?
A2: Choose a zipper slightly longer than the top of your pouch. You can always trim excess length after sewing.
Q3: Do I need interfacing for every pouch?
A3: No, interfacing is optional. It adds structure but isn’t required for soft or flexible pouches.
Q4: How can I make my pouch waterproof?
A4: Use waterproof lining fabric like nylon or vinyl to protect against spills.
Q5: Can I wash my handmade pouch?
A5: Yes, most fabric pouches can be hand-washed or machine-washed on a gentle cycle. Always check the fabric type first.
Q6: What are some uses for zipper pouches?
A6: They’re great for storing cosmetics, stationery, cables, sewing supplies, or even small travel essentials.
Learning how to make a zipper pouch bag is a fun, creative, and practical sewing project suitable for all skill levels. With just a few materials, you can create a personalized pouch that reflects your taste and style. By following the step-by-step guide, understanding how to install a zipper, and experimenting with fabrics and decorations, you can make endless variations of this simple accessory.
We hope this tutorial has inspired you to start your own sewing project today! If you enjoyed it, please share your honest opinion and suggestions — your feedback helps us improve and encourages others to explore the joy of handmade crafting.
