
Crocheted house-shaped cookie for Christmas tree

How to Crochet a Turban or Headband – Turban with a Big Bow Step by Step is a practical and stylish project that lets you make a cozy accessory with personality.
If you’ve ever wanted to learn how to crochet a turban, create a flattering crochet headband, or master a turban with a big bow that becomes the focal point of any outfit, this guide walks you through the process in clear, friendly steps.
You’ll get material recommendations, stitch explanations, a step-by-step pattern, and finishing and styling tips so your final piece looks polished and professional.
Throughout this article I’ll emphasize the main crochet pattern and crochet tutorial keywords so search engines understand your intent while readers get a natural, helpful tutorial.
Making a turban or headband is a great first intermediate project for anyone who knows basic stitches and wants to create something wearable. This tutorial covers everything from yarn selection and hook size to shaping, adding a decorative big bow, and caring for your finished piece. Whether you’re doing a quick beginner crochet practice or preparing handmade gifts, learning how to crochet a turban will expand your skillset and give you a lovely accessory to wear or give. I’ll also explain the important terms like crochet stitches, crochet pattern, and turban with a big bow so you feel confident at every stage.
This article balances friendly, humanized guidance with SEO best practices: clear headings, repeated but natural keyword use, and helpful explanations. Read on for four focused sections—Materials & Tools, Key Terms and What They Mean, the Step-by-Step Pattern for a turban with a big bow, and Finishing, Care & Styling Tips—each section written so you can follow along easily. By the end you’ll know not only how to crochet a turban or headband but why each choice matters, from texture to technique.
Start with the right materials to make your crochet headband comfortable and long-lasting. Choose a soft, washable yarn—worsted weight or DK are common choices for turbans—because they drape nicely and are easy to work with. A smooth acrylic-wool blend or a soft cotton blend works well for both structure and comfort. If you want a luxurious finished product choose a merino or alpaca blend, but those can be pricier.
Next, select the correct hook size for your yarn and tension. The pattern below is written for a hook size between 4.0 mm and 5.5 mm depending on gauge; always check your gauge square. Using a hook that’s too small makes the turban stiff, while a hook too large will give a too-loose fabric. Match hook size to yarn label recommendations and your own tension.
You’ll also need a measuring tape, scissors, stitch markers, and a yarn needle for weaving in ends. A stitch marker helps when counting rows or marking the center for your bow placement. A blunt-ended tapestry needle makes finishing neater and faster. Keep these tools within reach to avoid interrupting your flow.
For optional embellishments, gather a small amount of contrasting yarn for the bow center or a few decorative buttons. If you plan to add a lining for warmth, select a thin, soft knit fabric that won’t bulk up the turban. Lining can improve comfort for sensitive scalps and help maintain shape over time. Choose embellishments that are securely attached to avoid catching on hair.
Think about color and texture while selecting materials because they determine the visual impact of your turban with a big bow. Solid colors highlight stitch texture while variegated yarns give a lively, blended look. Consider wardrobe colors so your new accessory will be easy to wear. Also consider seasonal yarns—lighter fibers for spring/summer, warmer for fall/winter.
Finally, prepare a small swatch to test your gauge before starting the full crochet pattern. A 10cm x 10cm (4″ x 4″) square will reveal your stitch density and help you adjust hook size as needed. Swatching saves time later and ensures the final headband fits as intended.
How to crochet a turban — This phrase refers to the process and pattern used to make a turban-style head covering by crocheting. It encompasses choosing yarn, executing a sequence of stitches, shaping the headband to fit snugly, and adding decorative features like a big bow. Understanding this phrase helps you find tutorials and patterns that are specifically focused on wearable turban designs.
Crochet headband — A narrower, often looped accessory that sits around the head and ears. A crochet headband can be simple or embellished, worn for warmth or style. In this article the headband version and turban version share base techniques, but the turban often includes a central twist or bow for more volume and fashion-forward shape.
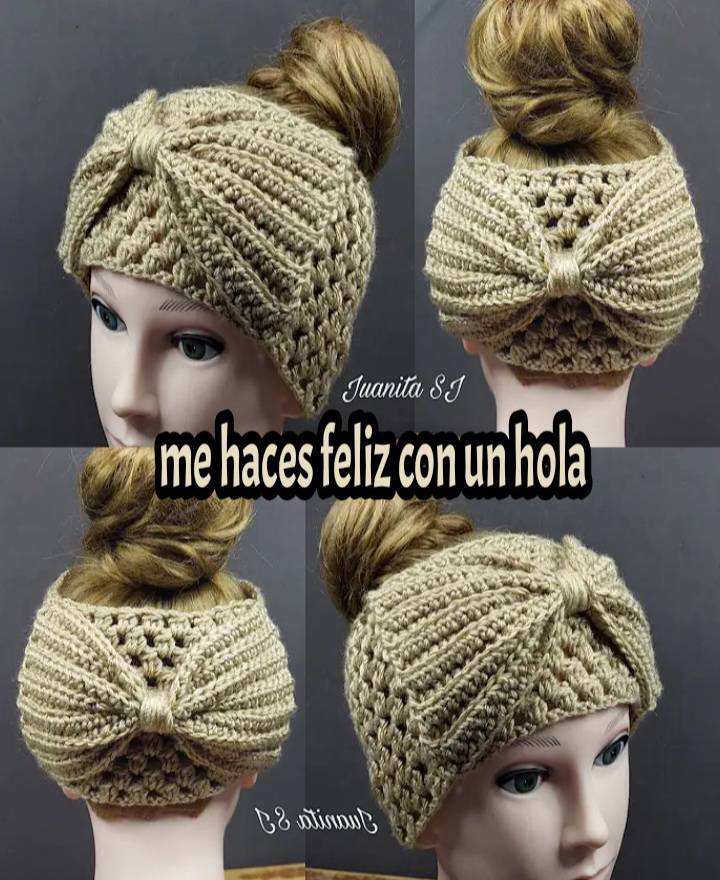
Turban with a big bow — A specific style of turban that includes a prominent bow or knot on the front or side as the design’s focal point. The turban with a big bow can be constructed as an integrated part of the headband or as an add-on piece sewn to the base; both approaches are covered here so you can choose your preferred technique.
Crochet pattern — The step-by-step written instructions that explain stitch counts, row sequences, and shaping. A crochet pattern might include gauge information, materials, abbreviations, and finishing instructions. Learning to read a pattern makes it easy to adapt sizes or substitute yarns in future projects.
Crochet tutorial — A more instructional resource that often includes photos, diagrams, or videos showing each step. A crochet tutorial is helpful for visual learners and can complement the written crochet pattern when learning a new technique or stitch.
Beginner crochet — Refers to techniques and projects suited for those new to crocheting. A beginner crochet project emphasizes simple stitches—like chain, single crochet, half double crochet—and clear instructions. The turban pattern here is approachable for motivated beginners who are comfortable with basic stitches.
Yarn selection — Choosing the right fiber, weight, and color for your project. Yarn selection affects drape, warmth, and appearance. For turbans and headbands, yarn that holds shape while remaining soft against the skin is ideal.
Crochet stitches — The basic building blocks such as chain (ch), single crochet (sc), double crochet (dc), half double crochet (hdc), slip stitch (sl st), and special techniques like increasing or decreasing. Knowing your crochet stitches lets you follow patterns and modify them for fit, texture, and design.
Gauge and size note: make a small swatch of crochet stitches to match gauge; the headband should fit a typical adult head circumference of 53–58 cm (21–23 in). Adjust stitch count for larger or smaller sizes. The pattern below uses worsted weight yarn and a 5.0 mm hook as a starting point; modify as needed for your yarn and tension.
Row 1 (foundation): Chain enough to reach about 48–52 cm (19–20.5 in) when stretched slightly—this will form a comfortable loop. Join with a slip stitch to form a ring without twisting. Count your chains and mark the beginning with a stitch marker to keep track of rounds.
Row 2–6 (base band): Work in rounds using half double crochet (hdc) or your preferred stitch to create a dense, warm fabric. Maintain even tension and place a stitch marker every 8–10 stitches if your stitch count is large. Continue until the band is about 10–12 cm (4–4.7 in) tall, depending on whether you want a narrow headband or a taller turban.
Shaping the twist: To create the turban’s central twist, fold the band in half widthwise and align the two long edges. You can either flat seam them together with slip stitches along one short edge, then twist the band once before joining the ends, or create a separate bow panel to cinch the middle. For an integrated twist, twist once and seam the ends together with slip stitches so the twist sits centered when worn.
Making the big bow: Crochet a rectangular panel roughly 20 cm x 12 cm (8 in x 4.7 in) using double crochet (dc) or half double crochet for a soft, full bow. Fold the rectangle into accordion-like pleats or wrap it tightly around the center of the twisted band to form the bow. Secure by sewing the wrap piece through all layers and weave in ends neatly with a yarn needle.
Attach and finish: Position the bow so it covers the seam or the twist center; sew it securely through all layers. For extra hold, run a few stitches through the headband base. Finally, block lightly if your yarn requires it to even out stitches and set the shape. Trim any stray threads, and your turban with a big bow is ready to wear.
Finishing details elevate a handmade crochet headband into a polished accessory. Weave in ends carefully, burying them into the fabric’s reverse with a yarn needle to keep the front tidy. Use matching thread for invisible joins or contrasting thread for a decorative touch that enhances your turban with a big bow.
Care instructions depend on yarn fiber—always follow the yarn label. For most acrylic or machine-washable blends, use a gentle cycle and reshape the headband while damp before air drying. For delicate fibers like wool or alpaca, hand wash in cool water and lay flat to dry to avoid felting or stretching.
Styling ideas: wear the bow centered for a classic turban look, or shift it to the side for a more modern, asymmetrical vibe. Pair neutral-colored turbans with bold outfits or choose bright, patterned yarn for playful statement pieces. A textured stitch pattern complements simple outfits, while a sleek single-color bow matches formal wear.
If you want a snugger fit for windy days, add a lining or sew a narrow elastic band inside the back of the headband to maintain shape without restricting comfort. An inner lining also protects delicate yarn from oils and makeup. For a reversible option, make the base in a muted color and the bow in a contrasting color for two looks in one.
To make variations, try different bow sizes, use braided wraps instead of a flat bow, or incorporate beads along the bow center for sparkle. Keep safety and wearability in mind—securely attach all embellishments and avoid small pieces that could detach.
Maintenance tip: store your crochet headband flat or gently rolled to avoid crushing the bow. If traveling, pack it between soft garments. Regularly inspect seams and re-sew any loosening stitches to extend the life of your handmade accessory.
Q: Is this turban pattern suitable for complete beginners?
A: Yes, the project is accessible to motivated beginners who are comfortable with basic crochet stitches like chain, single crochet, and half double crochet. The bow and twist are simple finishing techniques that you can practice on scrap yarn first.
Q: What yarn weight is best for a turban with a big bow?
A: Worsted weight (medium) or DK weight yarns are ideal because they provide enough structure for the bow while remaining soft against the skin. Yarn selection depends on the look you want—choose heavier yarn for a chunky turban, lighter for a sleeker headband.
Q: How do I adjust the size for a child or larger adult?
A: Measure head circumference and adjust foundation chain length accordingly. Keep the height proportionate—children’s bands are usually 5–8 cm tall while adult turbans are often 10–12 cm. Check gauge to maintain consistent sizing.
Q: Can I make the bow detachable?
A: Absolutely. Sew a small loop or attach a removable snap so you can switch bows or wash the base separately. A detachable bow makes the crochet headband more versatile.
Q: What if my band is too loose or too tight?
A: Check your gauge and adjust hook size—use a smaller hook for a tighter fabric or a larger hook for a looser fabric. You can also alter the initial chain length to fine-tune circumference.
Q: How do I read a crochet pattern and follow stitch abbreviations?
A: Most patterns use common abbreviations like ch (chain), sc (single crochet), hdc (half double crochet), and dc (double crochet). Keep a cheat sheet nearby, and refer to the crochet tutorial videos or diagrams if you’re unsure—practice makes it easier.
This guide on How to Crochet a Turban or Headband – Turban with a Big Bow Step by Step covered materials and tools, key terms and their meanings, a clear step-by-step pattern to make a stylish turban with a big bow, and practical finishing, care, and styling tips. You learned how to choose yarn, match a hook size, execute essential crochet stitches, shape a twist, and construct or attach a prominent bow. If you followed the instructions and adjusted for gauge and fit, you should now have a wearable, polished accessory.
I’d love to hear your honest opinion and suggestions—tell me how your turban turned out, what yarns you tried, or which part you’d like more detail on. Your feedback helps me make future patterns and tutorials clearer and more useful for everyone.


