
Crocheted house-shaped cookie for Christmas tree

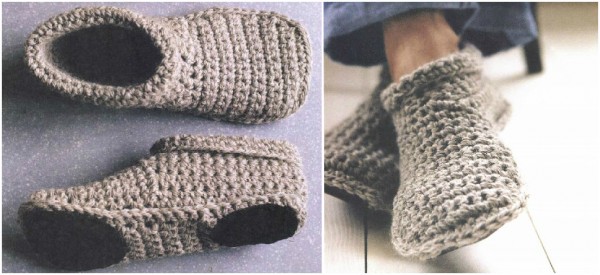
If you love cozy and stylish footwear, the Slipper Boots Free Crochet Pattern is the perfect project for you. This pattern allows crafters to create warm and comfortable boots that can be worn around the house or given as thoughtful handmade gifts. Combining ease of use with a professional finish, this free crochet pattern is ideal for beginners and experienced crocheters alike.
The Slipper Boots Free Crochet Pattern provides detailed instructions, helping you craft boots that fit perfectly and look polished.
The pattern emphasizes comfort, style, and durability, ensuring that your handmade slippers are both practical and visually appealing. This makes them a fun and rewarding project for anyone passionate about DIY crochet projects.
Creating your own Slipper Boots also offers endless customization possibilities. You can choose your favorite yarn colors, add embellishments, and adjust sizes to suit family members or friends.
The versatility of this pattern allows you to experiment with textures and stitches, making each pair unique and personalized.
Creating your own Slipper Boots Free Crochet Pattern not only provides a cozy and stylish footwear option but also allows you to experiment with colors, textures, and yarn types. You can customize the boots to match your favorite outfits, add decorative elements such as buttons or pom-poms, and adjust the size to perfectly fit your feet or those of a loved one.
To begin the Slipper Boots Free Crochet Pattern, gather all the necessary materials. Being prepared helps ensure a smooth crafting process and prevents interruptions.
The essential materials include medium-weight yarn, a suitable crochet hook, scissors, a yarn needle, and stitch markers. High-quality yarn enhances comfort and durability, while the correct hook ensures consistent tension for a professional finish.
Optional materials include buttons, decorative patches, or embroidery thread for added embellishments. These can make your crochet slipper boots more personalized and visually striking.
Measuring tape is crucial for checking foot size and ensuring your slippers fit comfortably. Accurately measuring before starting will save time and prevent sizing issues.
For beginners, choosing a soft and flexible yarn is recommended. This makes it easier to crochet and allows for a snug, comfortable fit.
Finally, having a printed or digital copy of the pattern is helpful for guidance. Following a step-by-step template ensures your slipper boots come out evenly shaped and professionally finished.
Start the Slipper Boots Free Crochet Pattern by making the sole. Use a sturdy stitch, such as single crochet or half double crochet, to create a durable base. This ensures your slippers can handle regular wear while remaining comfortable.
Next, work on the sides of the boot. Build up the height gradually, adjusting the number of rows to achieve the desired boot length. This step allows customization for ankle, calf, or knee-length designs.
Add the foot opening and shape the toe area carefully. Proper shaping ensures comfort and a neat, rounded finish. Avoid rushing this step, as it determines the overall fit of your slippers.
After completing the basic structure, add decorative stitches or edging around the top of the boots. This can include scalloped edges, ribbed textures, or contrasting yarn colors for a stylish look.
Attach any optional embellishments, such as buttons or embroidered designs, to enhance the boots’ appearance. Small details can make the slippers feel unique and personalized.
Finally, weave in all loose ends and check the fit. Reinforce areas that may stretch or wear quickly, ensuring that your slipper boots are both durable and comfortable for long-term use.
Personalizing your Slipper Boots Free Crochet Pattern is one of the most enjoyable parts of the project. Choosing different yarn textures and colors can completely change the look and feel of your boots.
You can create matching pairs for family members or friends, using unique color combinations for each pair. This makes them perfect as thoughtful handmade gifts.
Consider adding extra height or width to the boots for added comfort. Some designs allow for an adjustable cuff, making them more versatile for various foot sizes.
Incorporating different stitch patterns, like ribbing or puff stitches, adds texture and visual interest. This can make your slippers stand out from simple, store-bought versions.
Adding embellishments like buttons, small crochet flowers, or even beads can give your boots a playful or elegant look. Personal touches make the slippers uniquely yours.
Finally, don’t forget about the soles. Using a thicker yarn or adding a soft lining improves comfort and durability, especially if you plan to wear your crochet slipper boots frequently.
Even experienced crafters can encounter issues with the Slipper Boots Free Crochet Pattern. Knowing common mistakes can help you avoid frustration and achieve professional results.
One common error is improper sizing. Always measure the foot carefully and adjust the pattern as needed to prevent boots from being too tight or too loose.
Skipping the reinforcement of the sole can lead to wear and tear. Make sure to crochet a firm and sturdy base for long-lasting slippers.
Misaligning stitches or uneven tension can affect the overall appearance and fit of your slippers. Take your time and check your work frequently.
Neglecting to add edging or finishing touches can make the boots look incomplete. Adding decorative edges or ribbing improves both style and durability.
Rushing the project may lead to missed rows or uneven shaping. Following the pattern step by step ensures a polished, professional result.
Finally, failing to test the fit before final finishing can result in discomfort. Always try on your slipper boots and make adjustments if needed before weaving in ends or adding embellishments.
Q1: Are these slippers suitable for beginners?
Yes, the Slipper Boots Free Crochet Pattern is beginner-friendly. The instructions are clear and easy to follow, allowing even novice crocheters to create stylish slippers.
Q2: What materials are needed?
You need medium-weight yarn, a crochet hook, scissors, yarn needle, and optional embellishments like buttons or embroidery thread.
Q3: How long does it take to make a pair?
Completion time varies depending on skill level. Beginners may take 3–5 hours, while experienced crocheters can finish in 2–3 hours.
Q4: Can I customize the size?
Absolutely. You can adjust the width, height, and cuff length to fit any foot size, making these slippers perfect for adults and children alike.
Q5: Can these boots be worn outside?
These slippers are designed for indoor use. Adding a non-slip sole or lining may allow light outdoor use, but they are primarily intended for cozy indoor wear.
Q6: Can I gift these slippers?
Yes! Handmade crochet slipper boots make thoughtful, personalized gifts for family and friends, especially when customized with favorite colors and designs.
The Slipper Boots Free Crochet Pattern is a fun and rewarding project that combines comfort, style, and creativity. By following the step-by-step instructions, you can create boots that are both functional and visually appealing. Personalization options, such as yarn color, stitch texture, and embellishments, make each pair unique and special.
Creating your own crochet slipper boots allows you to express your creativity while producing a practical, handmade accessory. By avoiding common mistakes and experimenting with designs, you can craft durable, stylish slippers that will be enjoyed for years.
We hope this guide inspires you to start your Slipper Boots Free Crochet Pattern project. Share your creations, offer suggestions, and leave your honest feedback — your experiences help inspire the crafting community and spark new ideas!


