
Crocheted house-shaped cookie for Christmas tree

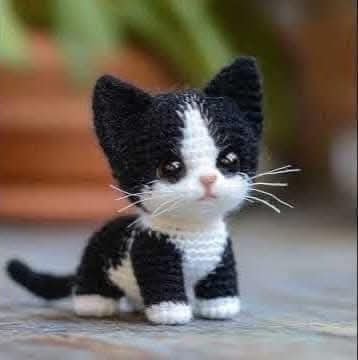
If you are looking for a free amigurumi little cat pattern, you’ve come to the right place. Amigurumi is the Japanese art of crocheting small stuffed animals and toys, and creating a little cat is one of the most rewarding projects for both beginners and experienced crafters.
With this free amigurumi little cat pattern, you can bring your creativity to life while making an adorable toy that can be a gift, decoration, or even a collectible.
Crocheting a little amigurumi cat is not only fun but also a way to improve your crafting skills. By following a free amigurumi little cat pattern, you learn how to shape different parts of the toy, stitch them together, and give personality to your creation.
Even if you are new to amigurumi, this pattern is designed to be beginner-friendly while still allowing room for customization and personal touches.
This free amigurumi little cat pattern also provides a chance to experiment with different yarns, colors, and techniques. Choosing the right materials can make a significant difference in the final look and feel of your amigurumi cat. Whether you want a soft, cuddly toy or a more structured figure, this pattern guides you through each step, ensuring that your little cat turns out perfect every time.
To start creating your amigurumi little cat, you will need some essential materials. These tools and supplies are standard for most amigurumi projects but selecting the right ones can enhance your crafting experience. First, choose a yarn that is soft yet durable. Cotton or acrylic yarns are excellent options because they hold the shape well and are easy to work with.
Next, you will need a crochet hook suitable for your chosen yarn. Typically, a smaller hook than what is recommended on the yarn label is ideal for amigurumi since it creates tighter stitches and prevents stuffing from showing through. Additionally, you’ll need polyester fiberfill to stuff your cat and give it a soft, huggable shape.
Other important materials include a tapestry needle for sewing parts together, stitch markers to track your rounds, and safety eyes or embroidery thread to add facial features. Optional accessories like ribbons or tiny bells can also be added to give your little cat more personality.
Crocheting your amigurumi little cat requires patience and attention to detail. Each part of the cat, including the head, body, legs, tail, and ears, is made separately and then sewn together. Following the free amigurumi little cat pattern step by step ensures your finished toy looks professional and well-crafted.
One of the joys of this amigurumi little cat pattern is the opportunity to customize it. You can create a realistic tabby cat with stripes or a whimsical rainbow-colored cat. The pattern gives you the framework, but your creativity decides the final result.
Lastly, having a comfortable workspace with good lighting and a few small containers to organize your materials makes crocheting much easier. Keeping everything within reach ensures a smooth crafting session as you follow the free amigurumi little cat pattern.
The free amigurumi little cat pattern is divided into parts for easy assembly. Starting with the head, crochet in continuous rounds, gradually increasing and decreasing stitches to create a round shape. Pay attention to the stitch count to keep your little cat symmetrical and cute.
Once the head is complete, the body is crocheted separately. Typically, the body is slightly larger than the head and tapered at the bottom to allow your little cat to sit upright. Stuff the body with fiberfill as you go to ensure even shaping.
Next, crochet the legs and arms, which are usually small cylindrical pieces. These can be sewn onto the body with a tapestry needle, making sure they are positioned evenly. Using stitch markers can help maintain symmetry.
The tail is another essential part of the little cat. You can crochet it as a long tube and lightly stuff it or leave it flat for a flexible, playful look. Attach the tail securely to the back of the body, as this will help balance your cat when it stands or sits.
Finally, the ears are small triangles sewn onto the top of the head. After attaching all parts, add safety eyes or embroider the eyes, nose, and mouth to bring your amigurumi little cat to life. A little blush with fabric paint or pastel chalk can also add charm.
Once all pieces are attached, check your stitches and ensure all parts are secure. This completes your free amigurumi little cat pattern, leaving you with a beautiful handcrafted toy that can be cherished for years.
When working on your free amigurumi little cat pattern, there are several tips that can help you achieve a polished result. First, maintain consistent tension in your stitches. Uneven tension can make your cat look lopsided or affect how stuffing distributes within the body.
Another useful trick is to stuff small amounts at a time rather than all at once. This prevents lumps and gives your amigurumi little cat a smooth, rounded appearance. Using a chopstick or blunt pencil can help push the stuffing into small areas like ears and limbs.
Always count your stitches carefully, especially when increasing or decreasing rounds. This ensures that each part of your little cat is symmetrical and proportionate. Using stitch markers at the beginning of each round can make this process much easier.
Choosing the right yarn color is also crucial. Soft pastels are perfect for a cute, whimsical look, while natural colors like gray, white, and brown give your cat a more realistic appearance. Mixing yarn textures can also add a unique touch to your project.
If you’re making multiple little cats, try experimenting with different facial expressions. A simple smile, closed eyes, or tilted head can make each amigurumi little cat feel like a unique character. Personalizing your cat adds an emotional connection to your work.
Finally, practice patience and enjoy the process. The charm of amigurumi lies in the handmade imperfections that make each toy special. Following this free amigurumi little cat pattern will improve your skills and leave you with a delightful creation.
Once your amigurumi little cat is complete, there are countless ways to use and display it. These little toys make excellent gifts for children, friends, or fellow crafters. Handmade gifts are always appreciated for their thoughtfulness and personal touch.
You can also use your amigurumi little cat as a decorative item. Place it on a shelf, desk, or nursery to add a cozy, playful vibe to your space. Small accessories like bows or scarves can make your cat even more charming.
If you enjoy photography, amigurumi little cats are perfect subjects for cute photo shoots. You can create themed settings, seasonal backgrounds, or even mini adventures for your cats and share them on social media or craft communities.
These little cats can also be part of a collection. Many amigurumi enthusiasts love making different animals, colors, and sizes to build a miniature world of handmade creatures. Each free amigurumi little cat pattern can inspire countless variations.
For educational purposes, amigurumi toys can be used in classrooms or therapy sessions. They help children learn about animals, develop fine motor skills, and provide comfort. A well-made amigurumi little cat can be both a toy and a teaching tool.
Finally, if you sell handmade crafts, amigurumi little cats are popular items in online shops or craft fairs. Following this free amigurumi little cat pattern allows you to create professional-looking products that customers will love.
Q: Is this free amigurumi little cat pattern suitable for beginners?
A: Yes! The pattern is designed to be beginner-friendly, with clear step-by-step instructions and simple shapes.
Q: What type of yarn is best for amigurumi?
A: Cotton or acrylic yarn is ideal because it holds its shape well and is easy to work with.
Q: How do I make my amigurumi little cat stand?
A: Stuff the body firmly and attach the legs securely. You can also add a flat base inside the body for extra stability.
Q: Can I customize the little cat?
A: Absolutely! You can change the colors, facial expressions, and even add accessories like bows or scarves.
Q: What size crochet hook should I use?
A: Usually, a smaller hook than recommended on the yarn label is best for tight stitches that keep the stuffing inside.
Q: How do I attach the parts securely?
A: Use a tapestry needle and yarn to sew each part carefully. Reinforce joints for durability.
Creating a free amigurumi little cat is a fun, rewarding, and creative experience. This article has provided you with a detailed guide, including materials needed, step-by-step instructions, tips for perfection, and ideas for using your finished toy. Following this pattern will give you a beautiful, handcrafted cat that can be a gift, decoration, or collectible.
Now that you have completed your amigurumi little cat, take a moment to admire your work and share it with friends or family. Don’t forget to experiment with colors, shapes, and expressions to make each cat uniquely yours. Leave your honest opinion and suggestions on the pattern to help others improve and enjoy this wonderful craft.


