
Hunter's Star Quilt Block - Quick & Easy Tutorial

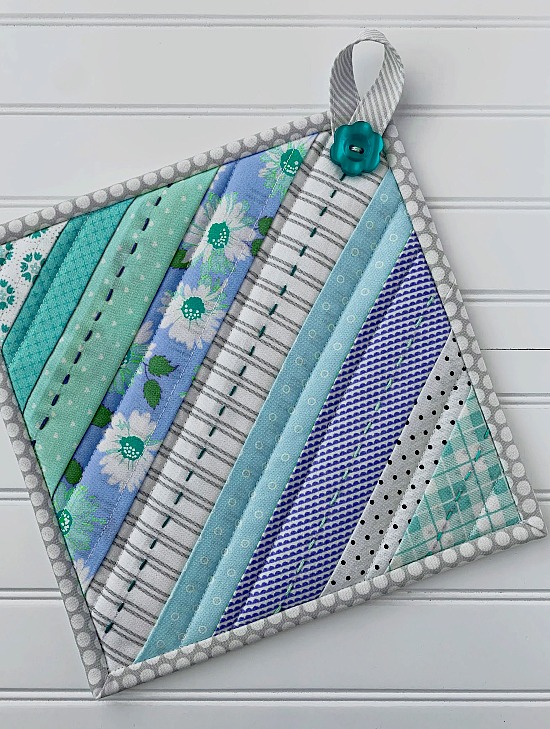
Turn thin strips into charming potholders – free quilt pattern is a creative and engaging way to breathe new life into your leftover fabric scraps.
Quilting enthusiasts and beginners alike can transform simple thin strips of fabric into functional and beautiful potholders that add charm to any kitchen.
Whether you are looking to repurpose fabric scraps, create thoughtful gifts, or simply enjoy a relaxing crafting project, this pattern offers a perfect solution.
With a step-by-step approach, even those new to quilting can achieve stunning results without needing bulky materials or complicated techniques.
Using thin strips of fabric is not only economical but also environmentally friendly. Instead of discarding leftover fabric pieces, you can transform them into something useful and delightful. This approach allows for incredible creativity, combining different colors, textures, and patterns to make each potholder unique. Beyond aesthetics, working with strips encourages precision and planning, helping you improve your quilting skills while producing a practical item for your home.
Additionally, creating potholders from thin strips is ideal for quilters looking for small, manageable projects. Unlike larger quilts that may take weeks to complete, these charming potholders can be made in just a few hours. The free quilt pattern simplifies the process, making it accessible to all skill levels. By following the instructions carefully, you can ensure that your potholders are both durable and visually appealing, making them perfect for personal use or gifting to friends and family.
When you aim to turn thin strips into charming potholders, selecting the right fabric is essential. The first step is to gather cotton fabrics because they are heat-resistant and easy to sew. Quilters often have scraps leftover from previous projects, which are perfect for this purpose. By mixing and matching different prints and colors, you can create visually stunning patterns that are entirely your own.
The width of the strips matters for achieving the best results. Typically, strips measuring between 1.5 and 2 inches work well for potholders. Narrower strips can be used for intricate designs, while slightly wider ones are ideal for a more straightforward, geometric look. Consider the balance between variety and harmony in your color choices to make your potholders visually appealing.
Texture is another key factor. Although cotton is most commonly used, you can experiment with quilted or textured fabrics for added interest. Just ensure that all pieces are heat-resistant, as potholders need to withstand hot surfaces. Combining smooth and textured strips can result in a tactile and visually engaging finished product.
Mixing patterns can elevate your potholder design. Stripes, florals, and geometric prints can be combined to create a modern or vintage aesthetic. Pay attention to color contrast; darker strips next to lighter ones make patterns pop, while complementary tones create a cohesive look. This careful selection enhances the overall charm of your finished piece.
Durability is critical for functional potholders. Opt for tightly woven fabrics that will hold up to repeated use. Additionally, consider pre-washing your fabrics to prevent shrinkage and color bleeding. This preparation ensures that your free quilt pattern project lasts for years without fading or warping.
Finally, always have a variety of strips available before starting your project. Having multiple options lets you experiment with layouts before stitching. By planning the design in advance, you can achieve a harmonious and attractive pattern, transforming simple scraps into something truly special.
Starting your turn thin strips into charming potholders project is easier than you might think. Begin by arranging your strips in the desired pattern. This step allows you to visualize the finished product and make adjustments for color balance and symmetry. Take your time to ensure that the layout feels cohesive and visually pleasing.
Next, sew the strips together using a straight stitch. Press the seams open to reduce bulk and create a smooth surface. Accuracy in sewing ensures that the finished potholder maintains its shape and integrity. It also helps the pattern look professional and polished.
Once the strips are sewn into a panel, add batting for heat resistance. Cotton batting works best because it provides the necessary protection without adding excessive thickness. Layering ensures your potholder is safe to use with hot pots and pans while maintaining flexibility.
Attach a backing fabric to complete the sandwich. The backing should be smooth and sturdy, ideally matching or complementing the front strips. Pin the layers together carefully to prevent shifting during quilting, which ensures a neat finish and durable construction.
Quilt your potholder by stitching through all layers, either following the strip seams or creating a custom pattern. Quilting not only secures the layers but also adds a decorative element. Experiment with straight lines, diagonal stitching, or more intricate designs to add personality to your project.
Finally, trim the edges and attach binding. The binding completes the look while reinforcing the edges to prevent fraying. With careful attention to finishing touches, your free quilt pattern potholder will be both functional and charming, ready for daily kitchen use.
To truly turn thin strips into charming potholders, consider experimenting with different color schemes. Monochromatic palettes create an elegant look, while contrasting colors add energy and fun. Using seasonal colors or thematic patterns can also make your potholders perfect gifts for holidays or special occasions.
Incorporate different shapes and layouts into your designs. While traditional strips are straight, you can cut strips on the bias for a dynamic diagonal effect. Alternating strip widths can create a visually interesting texture, enhancing the overall appeal of the potholder.
Personalization adds sentimental value. Consider adding initials, small embroidered motifs, or applique designs to make each potholder unique. This technique allows you to create custom gifts that will be cherished by family and friends.
For additional durability, double-stitch along the seams of your strips. This small step prevents wear and tear over time, especially for potholders that will see frequent use. Reinforced stitching ensures your charming creation remains functional for years.
Play with fabric orientation to achieve different visual effects. Horizontal and vertical strips create a structured pattern, while diagonal or chevron arrangements bring a modern, dynamic appearance. Trying different orientations can help you discover a signature style for your potholder projects.
Finally, consider adding hanging loops for convenience. Small fabric loops attached to the corner of your potholder make storage easy and keep them accessible. This practical addition enhances the usability of your charming, handmade creations.
Even experienced quilters can make mistakes while attempting to turn thin strips into charming potholders. One common error is choosing fabrics that are too thin or flimsy. Ensure that the fabrics you select are durable and heat-resistant for safety and longevity.
Skipping the pressing step can also cause problems. Unpressed seams result in uneven surfaces and a less professional finish. Always press your seams as you go to maintain the structure and appearance of your potholder.
Incorrect strip alignment is another frequent issue. Misaligned strips can distort the final pattern, making your design appear chaotic. Take your time to measure and arrange strips precisely before stitching.
Overloading your potholder with too many layers of fabric can make it stiff and difficult to use. Stick to one or two layers of strips with proper batting to maintain flexibility and usability. Balance aesthetics with practicality for the best results.
Neglecting edge finishing can lead to fraying. Binding is essential to secure edges and add a polished touch. Ensure the binding is stitched evenly around all sides to achieve a professional and durable finish.
Finally, forgetting to pre-wash fabrics may cause shrinkage and color bleeding. Always pre-wash to prevent unexpected changes in size and color that could ruin your carefully designed potholders. Proper preparation is key to success.
Q: What fabric is best for making potholders from thin strips?
A: Cotton fabrics are ideal due to their heat resistance and ease of sewing. Avoid synthetic fabrics that may melt or catch fire.
Q: Can beginners make these potholders?
A: Yes! The free quilt pattern is designed for all skill levels, with step-by-step instructions for easy creation.
Q: How wide should the strips be?
A: Strips between 1.5 and 2 inches work best, but narrower or wider strips can be used depending on your design preference.
Q: Do I need special tools?
A: Basic sewing tools like a sewing machine, rotary cutter, ruler, and pins are sufficient. No specialized quilting tools are required.
Q: Can I use scraps from other projects?
A: Absolutely! This project is perfect for repurposing leftover fabric, turning scraps into functional and charming potholders.
Q: How long does it take to make one potholder?
A: Depending on complexity, a potholder can be completed in a few hours, making it a quick and satisfying project.
Learning how to turn thin strips into charming potholders – free quilt pattern is a wonderful way to combine creativity, functionality, and sustainability. From selecting the right fabrics to arranging strips, sewing, quilting, and finishing, each step offers an opportunity to improve your quilting skills while producing a practical item for everyday use. These charming potholders are perfect for gifting, decorating, or simply enjoying in your own kitchen.
We hope this guide has inspired you to start your own project. Please share your honest opinions and suggestions in the comments – your feedback helps create better guides and encourages others to embrace the joy of quilting.


