
Crocheted house-shaped cookie for Christmas tree

Before diving into the technique, it’s important to understand why the mini check plaid stitch stands out. It combines simplicity with versatility. You can easily customize the colors, block size, and yarn weight to suit your personal style or match your home décor. The result is a fabric that looks complex yet remains lightweight and durable. Plus, this stitch pattern is beginner-friendly — if you can work single and double crochet stitches, you already have the skills needed to make it.
Now that we’ve introduced the concept, let’s explore how to make the mini check plaid stitch from scratch, what materials to use, and some helpful tips for achieving clean, professional results in your crochet projects.
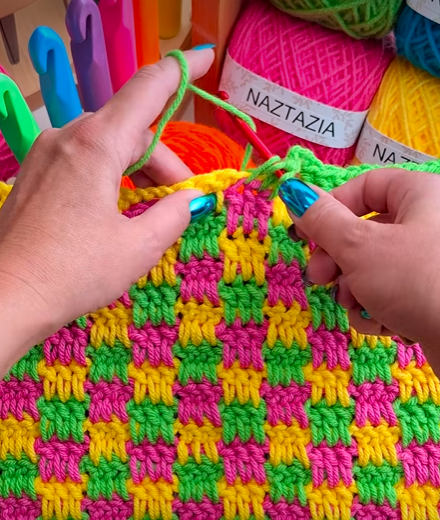
The mini check plaid stitch is essentially built from small blocks that alternate between two or more colors, creating a checkerboard or plaid pattern. Each block is made using a combination of basic stitches — usually single crochet (sc) and double crochet (dc) — arranged in a way that forms the illusion of interwoven threads.
One of the best aspects of this stitch is how simple the repeat pattern is. Once you complete a few rows, the rhythm becomes second nature. You’ll find yourself naturally counting the stitches and switching colors effortlessly. For many crafters, this repetition is not only relaxing but also meditative — making the mini check plaid stitch a perfect project for unwinding after a long day.
When selecting yarn, it’s a good idea to choose contrasting colors so that the plaid effect stands out clearly. Classic color combinations include black and white, red and gray, or soft pastels for a subtle, modern look. The texture of the yarn also matters; smooth, medium-weight yarns (like worsted weight cotton or acrylic) tend to show off the stitch definition beautifully.
You’ll also want to pay attention to tension and gauge. Keeping an even tension throughout is key to maintaining uniform blocks. If your tension varies, the plaid pattern can become uneven. Practicing a few sample swatches before starting your full project will help you achieve consistency.
Lastly, remember that finishing techniques make a huge difference. Weaving in the color-change ends neatly and blocking your finished piece will give your project a polished, professional look. With these basics in mind, you’re ready to begin crocheting your own mini plaid masterpiece.
To start, gather your materials: two or three colors of yarn, an appropriately sized crochet hook (as recommended on your yarn label), scissors, and a yarn needle for weaving in ends. Once you have your supplies ready, follow these general steps to crochet the mini check plaid stitch:
As you continue, you’ll notice the distinctive checkerboard design emerging row by row. The key to achieving crisp color changes is to switch yarns before finishing the last stitch of the color you’re working with — that way, the new color starts cleanly on the next stitch.
Keep in mind that crocheting mini check plaid stitch projects often involves managing multiple strands of yarn. To prevent tangles, keep your yarn balls separated or use yarn bobbins. This will make color transitions smoother and your workspace tidier.
One extra tip: if you’re using more than two colors, plan your sequence carefully. Creating a balanced plaid look involves repeating colors evenly throughout the pattern. Sketching out your design or following a chart can be helpful if you’re new to colorwork crochet.
Once you’ve mastered how to crochet mini check plaid stitch, you can apply it to a variety of projects. This stitch’s unique texture and visual appeal make it a great choice for both home décor and fashion accessories.
For cozy home projects, try making a crochet throw blanket or cushion cover. The checkered pattern instantly adds warmth and style to any living space. Pairing earthy tones like beige and brown gives a rustic, cabin-inspired look, while pastel or monochrome palettes create a more modern, minimal vibe.
If you prefer smaller projects, the mini check plaid stitch is ideal for dishcloths, table runners, or placemats. These make practical and thoughtful handmade gifts, especially when crafted in custom color combinations that match the recipient’s kitchen or dining area.
Fashion lovers can also incorporate the plaid stitch into scarves, hats, or handbags. A plaid crochet scarf, for example, adds a stylish pop to winter outfits. Because the stitch creates a slightly thicker texture, it offers warmth without being too heavy — perfect for chilly weather.
For a creative twist, experiment with gradient or variegated yarns. These yarns automatically shift colors, allowing you to achieve a plaid-like effect without manually changing yarns as often. Although the pattern may look more abstract, it still maintains the signature checkered charm.
Finally, don’t be afraid to combine this stitch with other crochet techniques. Adding a border, fringe, or even overlay stitches can elevate your project and make it truly one-of-a-kind.
Even though the mini check plaid stitch is an easy block stitch pattern, attention to detail can make a big difference in your final results. Here are a few tips to help you achieve the best possible outcome:
First, maintain consistent tension throughout your work. Uneven tension can distort the plaid blocks and affect the overall symmetry of the pattern. If you notice the fabric pulling too tightly, try using a slightly larger hook or relaxing your grip.
Second, choose high-quality yarn that holds its shape. Acrylic yarn is often recommended for beginners because it’s affordable and easy to work with, but cotton yarn provides excellent stitch definition for plaid designs. Avoid overly fuzzy or textured yarns, as they can obscure the pattern.
Third, practice color changes before starting your main project. Switching yarns cleanly is key to achieving professional-looking colorwork. Always twist yarns in the same direction to prevent holes or uneven joins between color blocks.
Fourth, block your finished piece using steam or water to help even out stitches and smooth the surface. Blocking enhances the stitch definition, making the check pattern stand out more distinctly.
Fifth, weave in ends neatly. Because this stitch involves frequent color changes, you’ll have multiple yarn tails. Weaving them carefully into the same color section hides them effectively and prevents unraveling.
Finally, don’t rush the process. Crocheting the mini check plaid stitch is meant to be both relaxing and rewarding. Take your time, enjoy the color changes, and watch your pattern develop beautifully row by row.
1. What level of crochet skill is needed for the mini check plaid stitch?
This stitch is perfect for beginners and intermediates. If you’re comfortable with single and double crochet stitches, you can easily learn it.
2. How many colors should I use for the plaid pattern?
Typically, two contrasting colors are ideal, but you can experiment with three or more for a more complex plaid design.
3. Can I use this stitch for baby blankets?
Yes! The mini check plaid stitch makes a soft and visually appealing texture for baby blankets. Just be sure to use gentle, washable yarns.
4. What type of yarn works best?
Worsted weight or DK yarns in smooth textures are best for showing off the block pattern clearly.
5. How do I prevent yarn tangling when switching colors?
Keep each color on a separate bobbin or container and untwist them regularly to avoid knots.
6. Can I use this stitch for clothing items?
Absolutely. The mini check plaid stitch works beautifully for vests, scarves, and even handbags, offering both warmth and style.
7. How do I make the plaid pattern larger or smaller?
Adjust your foundation chain in multiples of four to create bigger or smaller check blocks.
8. Do I need to block my project?
Blocking is optional but highly recommended. It enhances the texture and makes the pattern more uniform.
Learning how to crochet mini check plaid stitch opens the door to countless creative possibilities. With its simple repetition and bold visual appeal, this easy block stitch can transform ordinary projects into standout pieces. Whether you’re making home décor items, fashion accessories, or heartfelt gifts, the plaid stitch provides both style and substance.
We’ve covered everything from the basics of the pattern to practical tips and creative project ideas. Now it’s your turn to grab your hook, choose your favorite colors, and start crocheting your own plaid masterpiece.


