
Crocheted house-shaped cookie for Christmas tree

DIY crochet mini bag keychains are a fun and creative way to combine your love for crochet with practical everyday items. These tiny accessories not only allow you to showcase your crafting skills but also make perfect gifts for friends, family, or even for personal use.
Whether you’re an experienced crocheter or a beginner eager to try new projects, creating these mini bag keychains is a delightful and rewarding experience.
By following this guide, you’ll learn how to make stylish and functional miniature bags that can hold small essentials or simply serve as charming decorations.
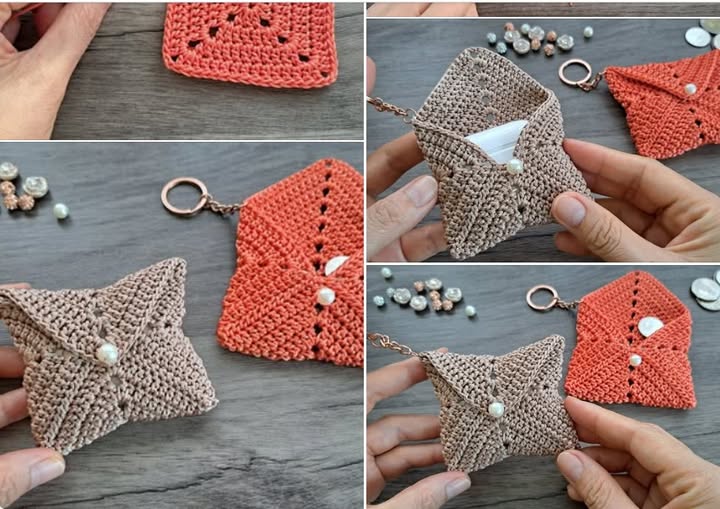
The beauty of DIY crochet mini bag keychains lies in their versatility. They can be designed in countless shapes, sizes, and colors, allowing you to tailor each piece to your personal taste or the preferences of the recipient.
These miniature bags can also serve as practice pieces for trying out new crochet stitches, techniques, or patterns without committing to a larger project. Additionally, the portability of these keychains ensures that your creative work can be admired wherever you go, adding a unique flair to keys, backpacks, or handbags.
Creating DIY crochet mini bag keychains also offers numerous mental and emotional benefits. The repetitive nature of crocheting can be calming, reduce stress, and improve focus. Each completed mini bag provides a sense of accomplishment and pride, making the crafting process both enjoyable and fulfilling. Moreover, sharing these handmade items with others fosters a sense of connection and thoughtfulness that is hard to achieve with store-bought gifts. By learning the essential techniques outlined in this article, you can turn a simple yarn and hook into a functional and adorable piece of art.
When starting your DIY crochet mini bag keychains, the first step is gathering the right materials. Quality materials will make your mini bags look more polished and durable. Begin with a small skein of yarn; cotton or acrylic yarn works best due to their sturdiness and range of colors. Using the correct hook size ensures your stitches are tight enough to hold the shape but loose enough to work comfortably. A basic keychain ring is also necessary, along with optional decorative beads or charms to enhance the final look.
Understanding your tools is crucial. A yarn needle will help with sewing pieces together and weaving in ends neatly. Scissors are essential for cutting yarn cleanly without fraying. Some crafters also use stitch markers to keep track of rounds, especially when making circular or intricate patterns. Choosing the right combination of colors and textures can elevate the aesthetic of your DIY crochet mini bag keychains, giving each piece a unique personality that reflects your creativity.
Starting with the right materials sets the stage for a successful project. A well-prepared workspace can make the process smoother and more enjoyable. Ensuring good lighting and a comfortable seating arrangement will help prevent fatigue while crocheting. By planning your project before starting, including selecting yarn colors and deciding on bag dimensions, you are more likely to create mini bags that are both attractive and functional. This preparation is the first step toward mastering DIY crochet mini bag keychains.
To make your DIY crochet mini bag keychains, you’ll need to master a few basic crochet techniques. The most commonly used stitches are the chain stitch, single crochet, and slip stitch. The chain stitch forms the foundation of your bag, while single crochet creates the main structure. Slip stitches are typically used to join rounds or add finishing touches. These fundamental skills are essential for creating neat, durable, and aesthetically pleasing mini bags.
Understanding stitch tension is also important. Too tight, and your mini bag may be difficult to shape; too loose, and the structure may sag. Practicing consistent tension ensures your DIY crochet mini bag keychains hold their intended shape and appear professional. Additionally, learning how to increase and decrease stitches will allow you to craft different shapes, such as round, square, or triangular bags, giving your mini keychains variety and charm.
Another technique worth mastering is joining separate parts. Many mini bags include straps, flaps, or pockets that need to be sewn on. Using a yarn needle to attach these elements securely ensures durability while maintaining a polished appearance. With practice, combining these techniques will allow you to create an endless variety of DIY crochet mini bag keychains, making each project an exciting opportunity to refine your skills and express your creativity.
Once you’re comfortable with the basic techniques, you can explore creative designs for your DIY crochet mini bag keychains. Consider adding decorative elements like tiny buttons, beads, or embroidered patterns. These small details can turn a simple mini bag into a unique accessory that stands out. Experimenting with color combinations and textures also adds personality to each piece, making your keychains memorable gifts or personal treasures.
Mini bag shapes can be customized to match themes or personal preferences. Some popular designs include tiny tote bags, backpacks, or messenger bags. You can even create seasonal designs, such as Christmas-themed or floral mini bags, that reflect different times of the year. Incorporating a small pocket or flap adds functionality, allowing the mini bag to store coins, keys, or tiny trinkets while maintaining its charm.
For a more advanced challenge, you can experiment with different crochet patterns, like the granny square or shell stitch, to give your DIY crochet mini bag keychains a textured look. Combining multiple techniques in a single project enhances its complexity and beauty, making it a rewarding experience. By exploring these creative possibilities, you’ll ensure your mini bags remain fresh, exciting, and highly personalized.
Proper finishing and maintenance are crucial for durable DIY crochet mini bag keychains. After completing your mini bag, ensure all ends are securely woven in to prevent unraveling. Blocking the bag, if the yarn allows, can help shape it perfectly and give it a professional finish. Attaching the keychain ring firmly ensures it can withstand regular use without detaching.
Maintaining your mini bag is simple but important. Gently hand wash with mild soap when needed and reshape it while drying to keep its form intact. Avoid overloading the mini bag to prevent stretching or distortion. By following these care guidelines, your DIY crochet mini bag keychains can remain beautiful and functional for years to come.
Additionally, storage matters. Keeping your mini bags in a cool, dry place away from direct sunlight prevents color fading. For collectors or sellers, presenting them neatly in gift boxes or small pouches enhances their appeal. Paying attention to these finishing touches not only extends the lifespan of your creations but also showcases your attention to detail and craftsmanship.
Q1: How long does it take to make a DIY crochet mini bag keychain?
A1: The time varies based on skill level and complexity of the design. Beginners may take 2–3 hours, while experienced crocheters can finish in under an hour.
Q2: What type of yarn is best for mini bag keychains?
A2: Cotton or acrylic yarn is ideal due to their durability and wide range of colors. Avoid very soft or fuzzy yarns that may not hold the shape well.
Q3: Can I sell DIY crochet mini bag keychains?
A3: Yes! These handmade keychains are popular in craft markets and online shops. Ensure quality, durability, and appealing designs to attract buyers.
Q4: Do I need advanced crochet skills to make them?
A4: No, beginners can start with basic stitches and simple patterns. As skills improve, more complex designs can be attempted.
Q5: How do I prevent the keychain from breaking?
A5: Secure the keyring attachment carefully and avoid overloading the mini bag. Reinforcing stress points during construction can also help.
Q6: Can I customize mini bag designs for gifts?
A6: Absolutely! You can choose colors, add charms, or create themed bags to make them unique and personalized for the recipient.
In this guide, we’ve explored how DIY crochet mini bag keychains combine creativity, functionality, and fun. From gathering materials and mastering basic stitches to experimenting with creative designs and ensuring proper finishing, each step allows you to express your personal style while crafting adorable, practical accessories. These mini bags are perfect for gifting, personal use, or even starting a small handmade business.
We encourage you to try making your own mini bag keychains and share your experiences. Leave your honest opinion and suggestions to inspire other crafters and help improve the DIY community. Your feedback could spark new ideas, designs, and innovations, ensuring the joy of crocheting continues to spread.


