
Crocheted house-shaped cookie for Christmas tree

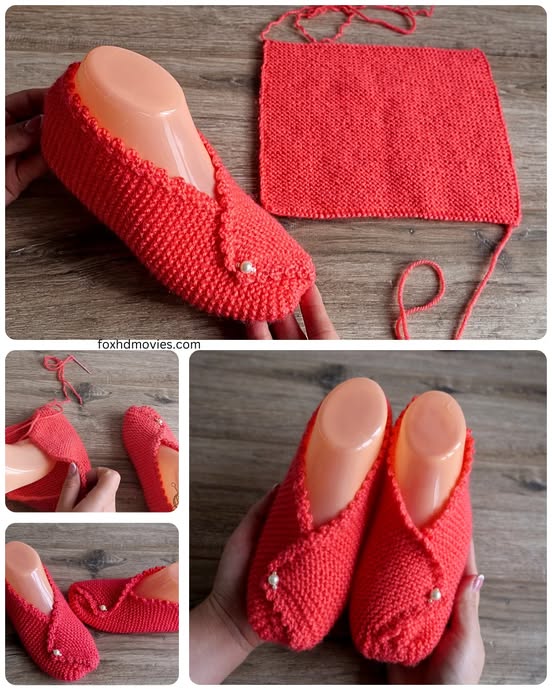
Knitted slippers made of rectangles are a surprisingly simple yet creative way to make cozy, stylish footwear using nothing more than basic knitting skills.
In this article, we’ll explore how to create beautiful rectangle slippers, explain what makes this method so appealing, and share tips to make your knitted projects comfortable, durable, and professional-looking.
Whether you’re a beginner or a seasoned crafter, you’ll be amazed by how versatile a simple rectangle can be when transformed into a snug pair of slippers.
Knitting is an art form that blends creativity with practicality. When you make knitted slippers from rectangles, you’re taking one of the easiest shapes in knitting and turning it into something useful and beautiful.
Many beginners find rectangular projects less intimidating than socks or shaped footwear, and that’s one reason this approach has become so popular. The simplicity of the pattern makes it perfect for gift-giving, craft fairs, or personal comfort at home.
Another reason rectangle knitted slippers are loved by so many is their customization potential. You can play with colors, textures, yarn weights, and stitch patterns to create unique designs. Even though the base is a simple rectangle, the end result can look incredibly elegant or charmingly rustic depending on your style. Plus, since the process is quick and requires minimal shaping, it’s a great way to use leftover yarns from other projects — reducing waste while making something practical.
Before diving into the actual knitting, it’s important to understand what makes knitted slippers made of rectangles such a genius idea. Essentially, the concept is that you knit a rectangular piece of fabric — sometimes two, sometimes just one — and then fold and sew it in a specific way to form the toe, heel, and sides of a slipper. It’s a beginner-friendly project that combines simplicity with functionality.
The first step is choosing the right yarn. For slippers, warmth and comfort are key. Wool and acrylic blends are often recommended because they’re soft, stretchy, and hold shape well. If you live in a warm climate, cotton yarn can also be a great alternative since it breathes well and feels light on the feet. The yarn weight will determine how thick your slippers feel — bulky yarns create plush, warm slippers, while lighter yarns result in a thinner, more breathable version.
Next, consider the stitch pattern. Most knitters prefer the garter stitch, which is created by knitting every row. It lays flat, has great stretch, and gives a cushiony texture perfect for slippers. However, you can experiment with ribbing, seed stitch, or even stockinette if you plan to line your slippers later. The beauty of this method is that any rectangular piece can be adapted to form a slipper with a little creativity.
When it comes to sizing, measure your foot length and width, then knit your rectangle slightly smaller to ensure a snug fit — the fabric will stretch when worn. Typically, a rectangle about twice the width of your foot and just slightly longer than your foot length will fold into a nice slipper shape. Adjustments are easy, making this pattern suitable for all ages and sizes.
Finally, assembly is where the magic happens. Once your rectangle is knitted, you’ll fold it lengthwise and stitch the edges together strategically. Usually, one end is sewn partially for the toe, and the other end is shaped into the heel. It’s a satisfying moment when a flat piece transforms into a three-dimensional slipper before your eyes.
The process of creating rectangle slippers can be divided into simple steps, each requiring minimal tools. You’ll only need knitting needles, yarn, a yarn needle, and scissors. This makes the project not only easy but also budget-friendly.
Start by casting on enough stitches to match the width of your foot. For most adult sizes, this might be around 30–40 stitches using medium-weight yarn. Keep in mind that your gauge matters — so if you knit loosely, reduce the stitch count slightly. Always test with a small swatch first.
Work your rows in the chosen stitch pattern until your piece measures long enough to cover your foot from toe to heel. Beginners often choose garter stitch because it’s simple and lies flat. If you want a denser slipper, you can double the yarn or use smaller needles for a tighter weave. The flexibility of the rectangle design allows endless customization.
Once your rectangle is finished, bind off your stitches loosely. It’s important not to make this edge too tight, or your slipper might feel uncomfortable when worn. After binding off, weave in any yarn tails neatly — this keeps your work clean and professional.
Now comes the assembly part. Fold your rectangle in half lengthwise, with the wrong sides facing out. Use your yarn needle to sew the top portion closed — this will form the toe of your slipper. Then, stitch the back portion to create the heel, leaving a small opening at the ankle. Flip it right-side out, and you’ll instantly see your knitted rectangle slipper come to life.
For extra comfort, consider adding a lining made of felt or fleece. This adds warmth and durability. You can also decorate your slippers with small details like buttons, pom-poms, or embroidery. Each little addition gives your creation more personality and charm.
If you plan to walk around in your slippers often, you might want to add a non-slip sole. You can use fabric paint, rubber dots, or even a thin layer of leather on the bottom. This small step greatly improves safety and extends the life of your slippers.
The great thing about knitted slippers made of rectangles is how adaptable they are. You can modify the basic concept to produce dozens of unique styles and fits. Whether you want ankle-high slippers, booties, or open-heel designs, the rectangle can do it all.
One fun variation is the color block design, where you knit your rectangle using two or more contrasting yarn colors. This gives a modern and playful look to the slippers. Stripes, gradient yarns, or ombré effects can also make them visually striking without any complex pattern work.
Another idea is experimenting with texture. By alternating different stitch patterns, like ribbing or basket weave, you can add depth and stretch to the fabric. Textured slippers not only feel more comfortable but also look more refined. For example, knitting the toe section in a tighter stitch helps reinforce the area that experiences the most wear.
You can also add embellishments for a personal touch. Crocheted flowers, buttons, bows, or even small knitted patches can turn a simple pair into a stylish statement. These creative touches make your slippers perfect for gifts or small handmade business projects.
For those who prefer luxury, try using soft, natural fibers like merino wool or alpaca yarn. These materials feel incredibly soft on the skin and regulate temperature beautifully. On the other hand, if you want durability and easy care, acrylic blends are practical since they’re machine-washable and hold shape over time.
If you’re knitting for kids, you can have fun with bright colors or character themes. Adding small ears or eyes can transform your rectangle slippers into animal-themed footwear, which children absolutely love. The versatility of this design means there’s no limit to creativity.
Lastly, consider seasonal variations. Thicker yarns are perfect for winter, while lighter cotton or bamboo yarns make breathable slippers for summer use. With one simple base pattern, you can create slippers for every season and every family member.
Even though knitted slippers made of rectangles are beginner-friendly, there are a few tips that can elevate your results. The first is mastering your gauge. Knit a small swatch before starting, and measure how many stitches you get per inch. This ensures your slippers fit properly instead of turning out too loose or too tight.
Another important point is to block your rectangles before sewing. Blocking means gently wetting and shaping your knitted piece so it dries evenly. This step smooths the stitches, aligns the edges, and gives your slippers a more polished look. It also helps prevent uneven seams.
When sewing, use the mattress stitch or a similar invisible seam technique. It creates a smooth, flat join that’s both durable and comfortable against the skin. Avoid over-tightening your stitches — a flexible seam allows the slipper to stretch naturally.
If you want your slippers to last, reinforce high-wear areas like the toe and heel. You can do this by doubling the yarn during those sections or adding a felt insert after sewing. This extra support keeps your rectangle knitted slippers from wearing out too quickly.
Maintenance is also key. Handwashing is ideal, especially for wool slippers. Use lukewarm water and gentle detergent to preserve softness and prevent shrinking. Lay them flat to dry to maintain their shape. For synthetic yarns, check the label — many can be machine washed on a gentle cycle.
Finally, don’t forget to enjoy the process. Knitting is meant to be relaxing and rewarding. Every pair you make will improve your skills and creativity. The more you practice, the more ways you’ll discover to make your knitted slippers from rectangles uniquely your own.
1. Can beginners make knitted slippers using rectangles?
Yes! This is one of the easiest slipper patterns for beginners. Since it uses only rectangular shapes, no complex shaping or special techniques are needed.
2. What’s the best stitch pattern for rectangle slippers?
The garter stitch is ideal for most beginners because it lies flat and adds extra stretch and texture. However, you can experiment with other stitches once you’re more confident.
3. How do I make sure the slippers fit properly?
Measure your foot and knit your rectangle slightly shorter than your foot length. Knitted fabric naturally stretches, ensuring a snug but comfortable fit.
4. What yarn should I use?
Wool or acrylic blends are perfect for warmth and durability. Cotton works better for summer or lightweight versions.
5. Can I wash my knitted slippers?
Yes, but always check your yarn label. Handwashing is safest for natural fibers, while acrylic blends can often go in the washing machine.
6. How can I make my slippers non-slip?
Apply small dots of fabric paint or glue to the soles, or attach a thin rubber or suede sole for better grip and safety.
Creating knitted slippers made of rectangles is an enjoyable, creative, and practical craft that combines simplicity with endless customization. You’ve learned how to choose the right yarn, stitch patterns, and assembly techniques to make cozy slippers that fit perfectly and look beautiful. From colorful designs to durable soles, there’s no limit to what you can achieve with this pattern.
If this guide helped you, share your experience below! Leave your honest opinion and suggestions — your feedback helps improve future articles and inspires more crafters to enjoy the art of knitting.


