
Crocheted house-shaped cookie for Christmas tree

The Classic Lace Crochet Square – Tutorial is a timeless guide for crochet enthusiasts who appreciate delicate textures and vintage-inspired designs.
This pattern brings together the elegance of lacework with the structured form of a crochet square, allowing you to create beautiful pieces that can be joined into blankets, garments, or decorative home items.
The versatility of this project makes it perfect for both beginners looking to practice their stitches and advanced crocheters searching for a relaxing yet rewarding pattern.
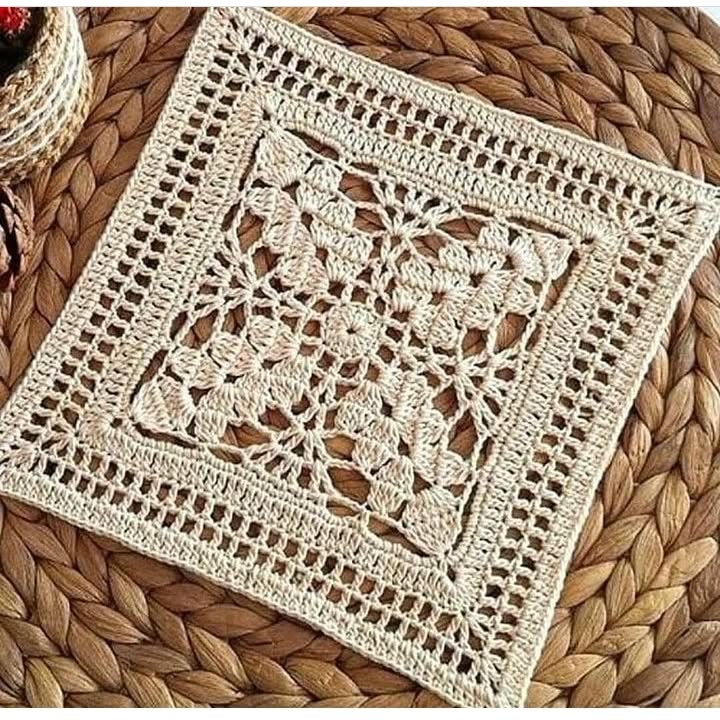
Creating a classic lace crochet square involves learning the balance between openwork and stability. The open spaces of the lace design allow the pattern to breathe, while the square format ensures that the finished piece is easy to combine with others.
Whether you’re crafting an heirloom blanket, a cozy throw, or a delicate table runner, this tutorial will walk you through the essential steps and techniques required to achieve a perfect result.
In this crochet square tutorial, we’ll explore materials, stitches, joining techniques, and styling ideas. You’ll also discover helpful tips on how to adjust the pattern to different yarn weights and project types. By the end, you’ll have all the knowledge you need to confidently make your own classic lace crochet squares that reflect both tradition and personal creativity.
Before starting your Classic Lace Crochet Square – Tutorial, it’s important to gather the right materials. Choosing quality yarn and the correct hook size ensures that your lacework remains neat, durable, and visually stunning.
First, select a lightweight yarn such as cotton or a soft acrylic blend. These fibers hold their shape well and show off the lace pattern beautifully. Cotton, in particular, enhances stitch definition, which is crucial when creating lace details.
Second, choose a crochet hook that complements your yarn thickness. For most lace crochet projects, sizes ranging from 2.5 mm to 3.5 mm work perfectly. Always check your yarn label for recommendations, but feel free to experiment to achieve your preferred tension.
You’ll also need stitch markers to help identify corners and pattern repeats, especially when working on multiple squares. This simple tool makes your work cleaner and prevents mistakes in counting stitches or chains.
A tapestry needle is another must-have for weaving in loose ends. It ensures a neat finish and prevents your stitches from unraveling after washing. Lastly, keep scissors and a blocking board nearby — blocking helps shape your crochet square into a perfect, professional-looking piece.
Having your materials organized before you start allows you to focus on the creative process rather than searching for tools midway. Preparation is one of the keys to a relaxing crochet experience.
To begin your classic lace crochet square, make a magic ring or chain four and join to form a loop. This will serve as your foundation circle, the heart of your lace pattern. Starting from the center allows you to create symmetrical lacework that expands evenly.
Work a set of chain stitches and double crochets into the center loop to establish the first round. This round typically forms a floral or star-like shape, which becomes the focal point of your design. Count carefully, as precision in the first round affects the symmetry of the entire square.
In subsequent rounds, alternate between open chain spaces and solid stitch groups. This combination forms the characteristic lace texture — airy yet structured. The key is maintaining consistent tension so the lace sections remain even and balanced.
Each new round should increase your square’s size while maintaining its shape. Use corner chains strategically to keep the square format intact. These are usually made by chaining two or three stitches at each corner before turning to work along the next side.
As your lace crochet square grows, you’ll begin to see intricate patterns emerge — delicate loops, fans, and shells that add visual depth. Don’t rush this stage; take your time to appreciate the design unfolding beneath your hands.
Once your square reaches the desired size, finish the last round with a clean edge using single crochet or slip stitches. This border not only strengthens the structure but also gives your piece a polished appearance, ready to be joined or displayed.
After completing several lace crochet squares, proper finishing is essential for achieving a uniform look. Blocking is a process where you shape your squares to exact measurements by lightly stretching and pinning them onto a foam or corkboard.
Start by gently dampening each square with water or steam. Use stainless steel pins to secure the corners and edges, aligning them to a perfect square shape. Once pinned, allow them to dry completely. This step ensures that each piece is identical in size, making the joining process much easier.
When joining your classic lace crochet squares, you have several beautiful options. The slip stitch join creates a clean and nearly invisible seam, ideal for a seamless finish. Alternatively, the join-as-you-go method is perfect if you prefer connecting squares while crocheting the final round of each one.
For a more decorative touch, you can use the whip stitch or a lace join, which adds an elegant border between squares. Choose the method that best matches your project’s aesthetic and intended use — for example, a delicate lace join looks stunning in tablecloths, while a tighter seam suits blankets better.
As you connect your squares, remember to weave in ends securely using a tapestry needle. Trim any excess yarn to maintain a tidy look. Taking your time with this process pays off with a refined and professional result.
Once all squares are joined, you may want to add a final border around the entire project. A simple scallop or picot edging enhances the lace effect and ties the design together beautifully.
The Classic Lace Crochet Square – Tutorial isn’t just about making one design — it opens up endless creative possibilities. Once you master this square, you can adapt it into various projects for yourself or as thoughtful handmade gifts.
One of the most popular applications is crafting crochet blankets or throws. By joining multiple lace squares, you can create stunning pieces that add warmth and elegance to any room. Choose colors that complement your decor for a personalized touch.
You can also use lace squares to make table runners, doilies, or even wall hangings. The open lace design allows light to pass through, giving these creations a delicate and artistic appearance. They work beautifully as centerpieces for weddings, special events, or everyday home styling.
Fashion enthusiasts often incorporate lace squares into clothing. Think of summer tops, boho vests, or skirts made from joined lace motifs. With lightweight yarns, these garments become breathable and stylish, offering both comfort and sophistication.
Another wonderful idea is turning your lace squares into pillow covers or bag panels. These items combine functionality with beauty, showcasing your crochet skills in everyday accessories. A lace bag, for example, instantly stands out as a unique, handmade statement piece.
For gift-giving, consider making coasters, placemats, or small framed lace art. Handmade crochet items always carry emotional value, making them meaningful presents for friends and family.
Finally, the versatility of the classic lace crochet square allows endless customization. Experiment with different yarn textures, hook sizes, and colors to make each piece distinct and reflective of your style.
1. What is a lace crochet square?
A lace crochet square is a pattern that combines open stitches and solid areas to form a delicate, airy design. It’s often used in blankets, garments, and decorative crafts.
2. Is the Classic Lace Crochet Square beginner-friendly?
Yes. While the lace look appears intricate, this pattern mainly uses basic stitches like chain, double crochet, and slip stitch. Beginners can master it with a bit of patience.
3. What type of yarn works best for lace crochet?
Lightweight cotton yarn is ideal because it highlights the lace pattern and maintains shape. Fine acrylic blends are also great for soft, durable results.
4. How do I make sure all my squares are the same size?
Blocking is essential. After finishing each square, lightly dampen and pin it to a specific size until dry. This ensures consistency across all pieces.
5. Can I use different colors in one project?
Absolutely. Using multiple colors adds visual interest and depth. Just make sure the shades complement one another for a cohesive look.
6. What projects can I make with lace crochet squares?
You can make blankets, table runners, clothing, accessories, and home décor pieces. The possibilities are nearly endless once you learn the basic square.
In this Classic Lace Crochet Square – Tutorial, you learned how to select materials, crochet intricate lace patterns, block and join squares, and explore creative applications for your work. Whether you’re crafting for yourself or others, this timeless design allows endless artistic expression through texture, pattern, and color.
If this guide helped you understand the beauty and versatility of the classic lace crochet square, please share your honest opinion and suggestions below. Your feedback inspires future tutorials and helps the crochet community grow with creativity and passion.


