
Crocheted house-shaped cookie for Christmas tree

If you love crocheting adorable sea creatures, then this Amigurumi Turtle Free Pattern is the perfect project for you! With just a bit of yarn, a hook, and your creativity, you can bring to life a tiny turtle that’s as cute as it is fun to make.
Whether you’re a beginner or an experienced crocheter, this project will fill your crafting time with joy and relaxation. The best part is that this amigurumi turtle is completely customizable—change the colors, size, or decorations to make it uniquely yours.
The Amigurumi Turtle Free Pattern combines soft textures and gentle shapes, resulting in an irresistibly huggable plush toy.
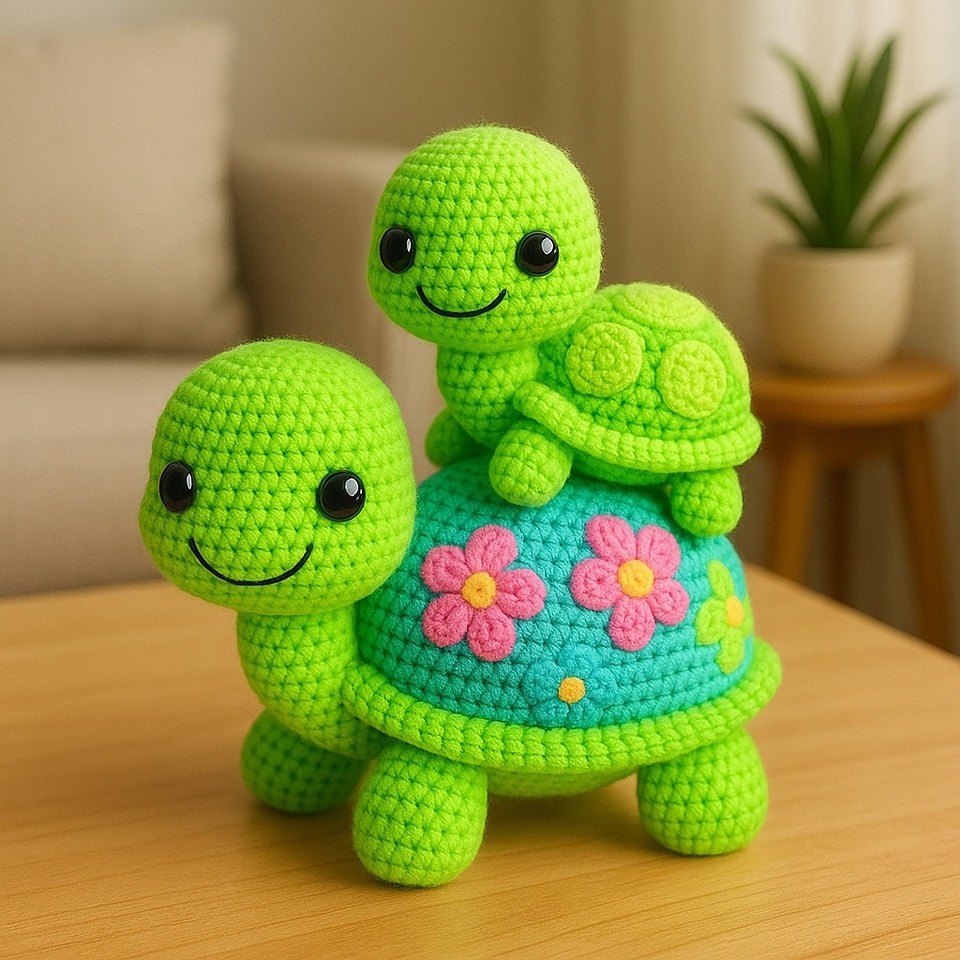
It’s an ideal handmade gift for children, friends, or even as a decorative piece for your home. Imagine a small family of crocheted turtles resting on your shelf or a single mini turtle hanging as a keychain—it’s simply adorable.
Plus, making your own turtle helps you practice essential amigurumi techniques, from working in the round to shaping limbs and assembling parts neatly.
Crochet turtles are also perfect for leftover yarn projects. You don’t need much material, and you can mix and match colors to make fun combinations—green shells, pink fins, or even rainbow patterns. With this Amigurumi Turtle Free Pattern, you’ll learn how to bring a tiny ocean friend to life using simple stitches and lots of creativity. Let’s dive in and discover how to make your own cute crochet turtle!
Before starting your Amigurumi Turtle Free Pattern, it’s essential to prepare all your materials. The right supplies will help your turtle come out perfectly shaped and well-finished. For this project, you’ll need medium-weight cotton or acrylic yarn in at least two colors—one for the shell and another for the body. Classic green and brown are traditional, but feel free to experiment with fun combinations like mint and cream or turquoise and coral.
Choose a crochet hook that matches your yarn thickness—usually between 2.0 mm and 3.5 mm. Smaller hooks help keep the stitches tight, which is ideal for amigurumi since you don’t want stuffing to peek through. You’ll also need polyester fiberfill for stuffing, a yarn needle for sewing parts together, scissors, and stitch markers to keep track of rounds.
For extra cuteness, you can add safety eyes or embroider your own using black yarn. If you’re making this for a baby, embroidery is a safer option. Small details like a smile or rosy cheeks can add personality to your crochet turtle amigurumi.
Optional materials include blush for a soft cheek tint and felt for additional decorations, like small stars or hearts on the shell. Once everything is ready, it’s time to start crocheting your sea friend step by step!
The main part of your Amigurumi Turtle Free Pattern is the body and shell. Begin by crocheting the shell with your chosen color—usually darker or brighter than the body. Start with a magic ring, then work single crochets in the round, increasing gradually to create a circular shape. Continue until you reach your desired shell size, then add a few rounds without increases to give it some depth.
Next, switch to a contrasting yarn color for the body. Crochet another circular piece slightly smaller than the shell’s diameter. This will be the turtle’s belly. Once both pieces are done, stuff them lightly with fiberfill and sew them together neatly, leaving space for the head and limbs.
For the head, start with a small magic ring and crochet in rounds, increasing evenly. When the shape starts forming into a ball, stop increasing and continue straight to give it a rounded appearance. Before closing, stuff it firmly but not too tight. Attach the safety eyes between rounds and embroider a cute little mouth underneath.
The legs and tail are made separately using smaller rounds. Crochet four identical limbs and one small triangle-shaped tail. After finishing, stuff them slightly and sew them in place around the body. The goal is to position everything symmetrically so your turtle looks balanced and adorable.
Finally, attach the head to the front of the body. Take your time with this step to ensure a clean join. You can use pins to hold it in position before sewing. Once done, you’ll see your amigurumi turtle coming to life—an irresistible little friend ready to swim into your heart!
Now comes the fun part—decorating! This is where you can add personality and creativity to your Amigurumi Turtle Free Pattern. The shell is a great place to showcase your imagination. Try crocheting small flower motifs or geometric shapes to stitch on top of the shell. You can also embroider patterns directly using yarn in contrasting colors.
If you want your turtle to have a playful look, consider adding tiny accessories—a crocheted bow, a mini hat, or even a baby turtle companion. Using pastel colors gives your creation a soft and gentle vibe, while bright shades make it more cheerful and vibrant.
You can also make a set of turtles in different sizes—a big one as the “parent” and smaller ones as “babies.” This looks adorable as a home decoration or gift set. If you’re feeling adventurous, try using variegated yarn to create a naturally patterned shell without extra effort.
Adding a bit of blush on the cheeks or some shiny thread detailing can make your turtle stand out. Some crafters even attach their mini crochet turtles to keychains or bag charms, turning them into portable pieces of handmade art.
The best part about amigurumi is that there are no strict rules—each turtle can be unique. Whether realistic or fantasy-inspired, your amigurumi turtle will carry your personal touch, making it a one-of-a-kind treasure.
Finishing your Amigurumi Turtle Free Pattern carefully is just as important as crocheting the pieces. Start by checking that all parts are stuffed evenly and securely sewn. The head should be firmly attached, with the neck area blending smoothly into the body. Use invisible stitches when joining pieces for a professional look.
When sewing limbs, make sure they are symmetrical. Uneven placement can affect the turtle’s balance. You can lightly pin the parts before sewing to ensure correct positioning. The same goes for the tail—center it properly on the back for a neat finish.
If your turtle looks slightly uneven after assembly, adjust the stuffing or gently reshape it with your hands. Amigurumi figures are flexible, so minor corrections are easy to make. Once all parts are secure, weave in the yarn ends tightly to prevent unraveling.
For added texture, you can surface-crochet or embroider small hexagon-like designs on the shell to mimic a real turtle’s pattern. This gives a charming touch and adds realism.
Finally, give your creation a final inspection—smooth out any bumps, trim excess yarn, and adjust the details. If you plan to gift it, you can wrap it with a cute ribbon or place it in a small box for presentation. The result? A perfectly finished crochet amigurumi turtle that looks professional and full of personality!
1. Is the Amigurumi Turtle Free Pattern suitable for beginners?
Yes! This pattern is great for beginners. It uses basic stitches like single crochet, increase, and decrease. If you’re new to amigurumi, it’s a fantastic way to practice shaping and sewing parts together.
2. What kind of yarn should I use?
Cotton or acrylic yarn works best. Cotton gives a firm texture and clear stitch definition, while acrylic provides softness and elasticity.
3. Can I make the turtle larger or smaller?
Absolutely. You can adjust the size by changing your hook or yarn thickness. Thicker yarn and larger hooks make bigger turtles, while thinner yarn makes mini ones.
4. How can I make my turtle’s shell more detailed?
Try adding textured stitches or embroidering shapes. You can also use multicolored yarn to create a gradient effect.
5. Can I wash my crochet turtle?
Yes, but gently! Hand wash in cold water with mild soap and air dry. Avoid wringing to keep the stuffing in shape.
6. How long does it take to make one turtle?
A small turtle can be completed in about 3–4 hours. Larger or more detailed versions may take longer depending on your pace.
Making your own Amigurumi Turtle Free Pattern is more than just a crochet project—it’s a joyful experience that combines creativity, patience, and love. From crafting each tiny part to assembling and decorating, every step brings your little sea friend to life. These turtles make thoughtful gifts, charming decorations, and delightful collectibles for anyone who appreciates handmade art.
Now that you’ve learned how to make your own crochet turtle, it’s your turn to create one! Experiment with colors, add unique details, and most importantly—have fun while crocheting.
Once finished, share your experience, leave an honest opinion, and suggest what kind of amigurumi pattern you’d love to see next!


