
Crocheted house-shaped cookie for Christmas tree

If you love DIY Granny Square Flower Crochet Crossbody Bag projects, then you are in the right place. Crochet bags are not only stylish and versatile but also allow you to express creativity while making something unique for yourself or as a gift.
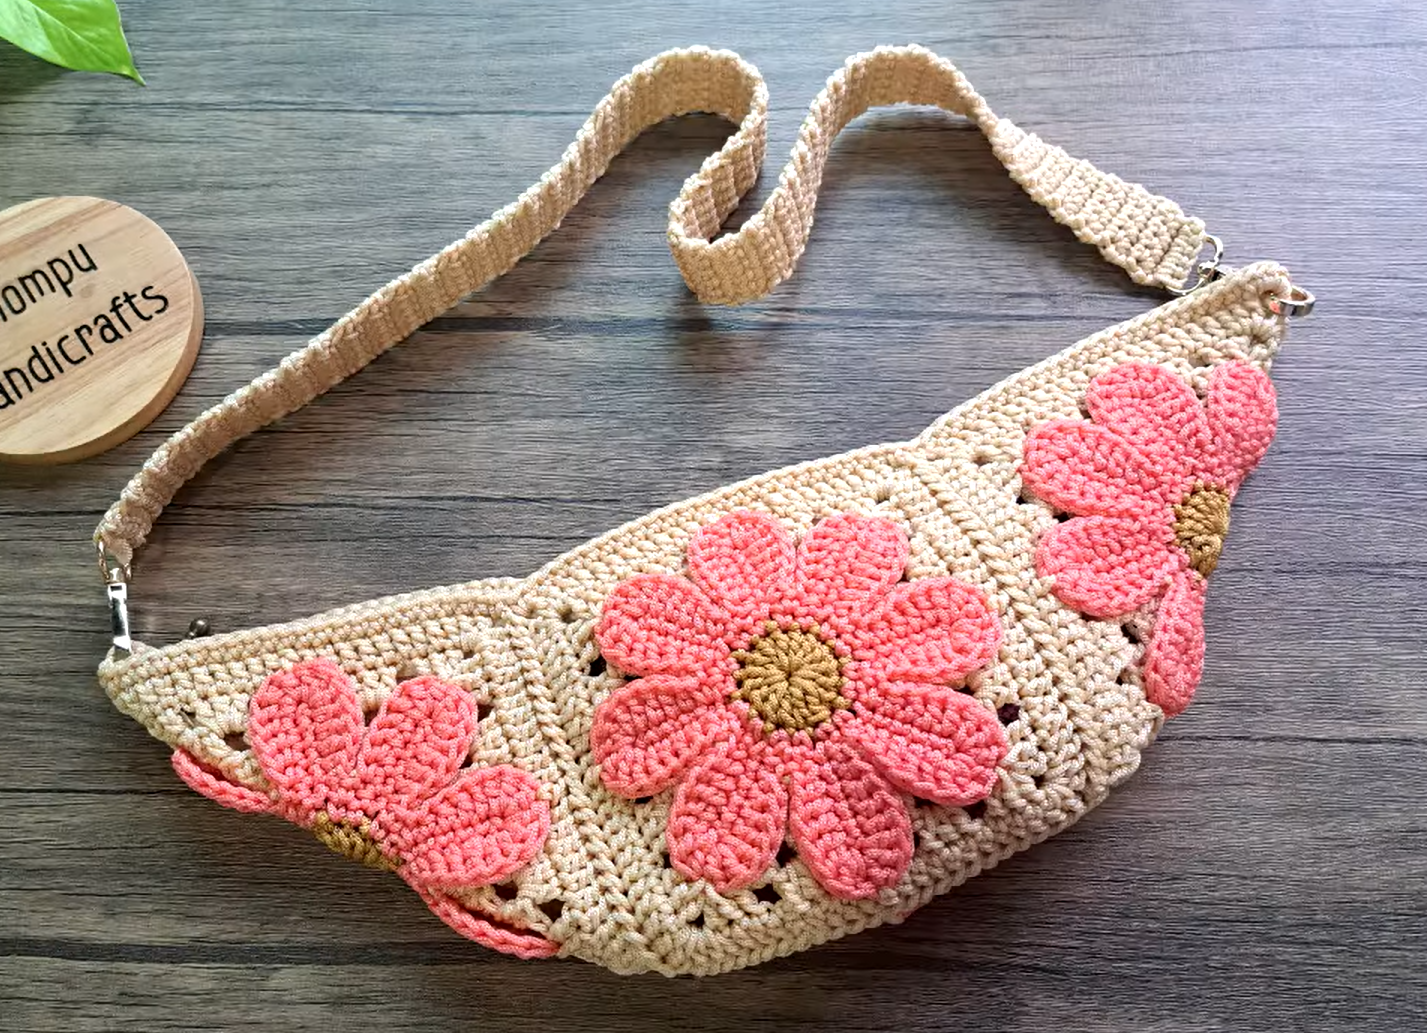
The DIY Granny Square Flower Crochet Crossbody Bag is a perfect example of combining traditional crochet techniques with modern fashion needs.
By using granny squares, vibrant colors, and floral patterns, you can create a bag that stands out while being practical. Whether you are an experienced crocheter or a beginner, this project is manageable and rewarding.
Creating a DIY Granny Square Flower Crochet Crossbody Bag is more than just making an accessory; it is an opportunity to explore textures, colors, and design styles.
Each granny square can be customized to reflect personal taste, allowing endless possibilities. Using quality yarn and the right crochet hooks ensures durability, making the bag not only attractive but functional. Additionally, the flower motif adds a touch of elegance and charm to this timeless craft. By following simple steps, you can turn your handmade squares into a chic crossbody bag suitable for everyday use.
The beauty of a DIY Granny Square Flower Crochet Crossbody Bag lies in its adaptability. You can adjust the size, color scheme, and strap length to suit your needs. Many crafters enjoy experimenting with different combinations, mixing bold and pastel colors, or creating gradient effects. Furthermore, this project encourages sustainability, as leftover yarn from other projects can be repurposed to make the granny squares. By investing time and effort into this project, you create a unique piece that reflects personality and style.
To start your DIY Granny Square Flower Crochet Crossbody Bag, you need the right materials. First, select high-quality yarn that complements your style. Cotton yarn is a popular choice for its durability, softness, and easy maintenance. Acrylic yarn is another option, offering affordability and a wide range of colors. Using the correct yarn ensures that your granny squares maintain their shape and structure.
Next, you will need crochet hooks appropriate for your yarn. The hook size affects the tension and overall look of your bag. For beginners, medium-sized hooks are easier to handle. Experienced crocheters may choose smaller hooks for tighter stitches or larger hooks for a looser, airy effect. Selecting the right hook ensures consistent results across all granny squares.
In addition to yarn and hooks, consider stitch markers, scissors, and a yarn needle. Stitch markers help track rows and maintain accurate patterns. Scissors are essential for cutting yarn cleanly, while a yarn needle allows for easy assembly and weaving in loose ends. These basic tools are indispensable for a seamless DIY Granny Square Flower Crochet Crossbody Bag project.
Choosing colors for your granny squares is an important step. Pick at least three complementary colors to create visually appealing flowers. Experiment with different combinations to achieve the desired contrast and balance. The right color palette enhances the floral motifs, giving your bag a professional and polished look.
Optional materials include a lining fabric and a zipper or magnetic snap closure. Lining the bag adds strength and prevents small items from slipping through holes in the crochet. Closures provide security and make the bag more practical for everyday use. These additions elevate the functionality of your handmade DIY Granny Square Flower Crochet Crossbody Bag.
Finally, prepare a comfortable workspace. Good lighting, a flat surface, and a calm environment help you crochet more efficiently. Staying organized with your yarn and tools reduces frustration and makes the project enjoyable. With these materials ready, you are fully prepared to create your unique DIY Granny Square Flower Crochet Crossbody Bag.
Crocheting granny squares is the core of the DIY Granny Square Flower Crochet Crossbody Bag. Start by learning the basic granny square pattern. Each square typically begins with a small circle or chain ring, followed by a series of clusters, chains, and turns. Understanding the sequence of stitches is crucial for creating uniform squares.
Once you master the basics, add flower motifs to each square. Crochet a small flower in the center using contrasting colors to make it pop. The flower adds a decorative element and sets your bag apart from ordinary granny squares. Consistency in stitch count ensures the squares fit together perfectly.
Practice tension control to keep your squares even. Uneven tension can lead to misshapen squares and a distorted bag. Take your time, and do not rush through the process. Even experienced crocheters benefit from paying attention to stitch consistency when creating a DIY Granny Square Flower Crochet Crossbody Bag.
You can also experiment with different patterns for variety. Some squares may feature multi-layered flowers, while others have simpler designs. Combining different patterns creates a dynamic, eye-catching bag. This approach allows your DIY Granny Square Flower Crochet Crossbody Bag to reflect your personal creativity.
Joining granny squares requires careful planning. Lay out all squares in a grid pattern before stitching them together. This step ensures the color arrangement and flower motifs are balanced. Seamless joining techniques enhance the overall appearance and durability of the bag.
Finally, block the squares before assembly. Blocking helps the squares maintain their shape, making it easier to sew or crochet them together. A neatly blocked square contributes to a professional finish for your DIY Granny Square Flower Crochet Crossbody Bag.
After creating the granny squares, it’s time to assemble the DIY Granny Square Flower Crochet Crossbody Bag. Start by arranging the squares according to your desired design. Ensure symmetry and balance in color placement for a visually appealing result.
Sew or crochet the squares together, using either a whip stitch or slip stitch. Take care to align edges perfectly to prevent gaps or misalignment. A neat assembly creates a polished and sturdy bag. Each seam should be secure, as it supports the bag’s weight when filled.
Adding a lining enhances the bag’s structure. Cut fabric to match the bag’s dimensions and sew it inside. The lining reinforces the crochet work and protects delicate items carried inside. Lining also improves longevity, making your DIY Granny Square Flower Crochet Crossbody Bag more practical.
The strap is another important element. Crochet a long chain strap or repurpose a sturdy cord. Attach the strap securely to the bag’s top corners. Adjustable straps add versatility, allowing you to wear the bag across the body or over the shoulder.
Consider adding closures such as buttons, zippers, or magnetic snaps. A secure closure ensures the safety of your belongings. Choose closures that complement the bag’s style without detracting from the decorative granny squares.
Finally, inspect the bag for loose ends or irregular stitches. Weave in any leftover yarn, trim excess threads, and make minor adjustments for a flawless finish. The attention to detail transforms your DIY Granny Square Flower Crochet Crossbody Bag into a professional-looking accessory.
Creating a DIY Granny Square Flower Crochet Crossbody Bag can be even more enjoyable with helpful tips. First, maintain consistent tension while crocheting. This ensures uniform squares and a polished final product.
Experiment with yarn textures for added dimension. Combining cotton, wool, or textured yarn can make the floral motifs pop. Textured yarn adds depth and a tactile appeal to your bag.
Color planning is crucial. Use a color wheel or swatches to find complementary colors. Avoid clashing hues, and aim for harmony to create an aesthetically pleasing DIY Granny Square Flower Crochet Crossbody Bag.
Take breaks to prevent hand fatigue. Crocheting large projects can strain your hands and wrists. Regular breaks improve focus and accuracy, resulting in a higher-quality finished bag.
Keep track of your progress. Numbering squares or taking photos of your layout helps maintain the design plan. This prevents mistakes and ensures a smooth assembly process.
Finally, personalize your bag. Add charms, buttons, or embroidery to make it unique. Custom touches enhance the appeal of your DIY Granny Square Flower Crochet Crossbody Bag, turning it into a cherished accessory.
Q1: How long does it take to make a DIY Granny Square Flower Crochet Crossbody Bag?
The time depends on your experience level and the bag size. Beginners may take several days, while experienced crocheters can finish in a few hours to a couple of days.
Q2: What yarn is best for this project?
Cotton yarn is ideal for durability and softness, while acrylic yarn is budget-friendly and offers a wide range of colors. Blend yarns for texture and unique effects.
Q3: Can I machine wash the bag?
It depends on the yarn type. Cotton yarn is usually machine washable on a gentle cycle, while delicate or specialty yarns may require hand washing. Always check yarn care instructions.
Q4: How many granny squares do I need for a standard crossbody bag?
Typically, 12–16 squares are sufficient, but the number varies based on your bag size and design preferences. Measure and plan your layout before starting assembly.
Q5: Can I add a lining to the bag?
Yes, adding a lining strengthens the bag, prevents small items from falling through, and increases durability. Choose a fabric that complements your crochet work.
Q6: Can I customize the colors and patterns?
Absolutely! Mixing colors, textures, and flower designs is encouraged. Personalization makes your DIY Granny Square Flower Crochet Crossbody Bag unique and reflective of your style.
Making a DIY Granny Square Flower Crochet Crossbody Bag is a fun and rewarding project that combines creativity, style, and functionality. By learning the basics of granny squares, adding floral motifs, and assembling them thoughtfully, you can create a beautiful accessory perfect for everyday use or gifting. This guide provided detailed steps, tips, and answers to frequently asked questions to ensure your success.
Now it’s your turn: experiment with colors, patterns, and textures to create a bag that reflects your personality. Share your experiences, leave a sincere opinion, and offer suggestions for improvement. Your feedback inspires future projects and encourages creativity in the crafting community.


