
Crocheted house-shaped cookie for Christmas tree

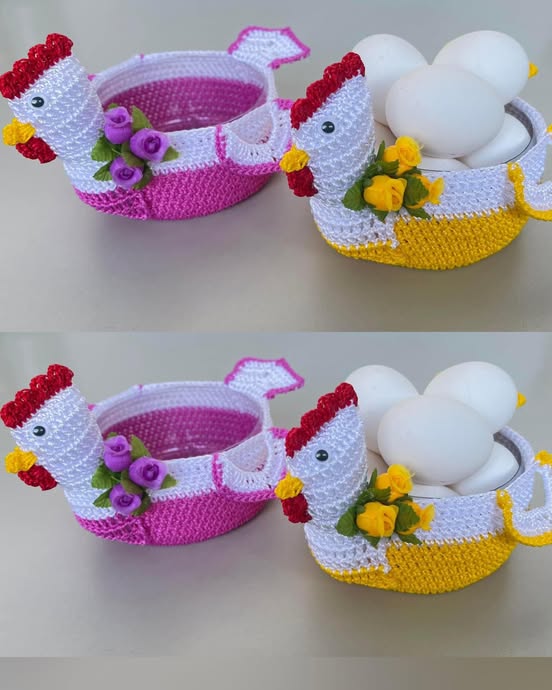
If you are looking for a charming and practical craft, the Crochet Egg-Carrying Chicken – Free Pattern is exactly what you need. This delightful project is perfect for both beginners and experienced crocheters who want to create a functional yet adorable decoration for their kitchen or dining area.
With its unique design, this crochet chicken is not just cute—it can also carry eggs, making it a conversation starter and a practical addition to your home.
The Crochet Egg-Carrying Chicken – Free Pattern allows you to explore various crochet techniques, including basic stitches, shaping, and assembly.
Crocheting this egg-carrying chicken can be a relaxing and rewarding activity, providing not only a handmade item but also a sense of accomplishment. Plus, it’s an excellent project for gifting during holidays or special occasions.
In addition to being a fun craft, this pattern can also serve as a way to enhance your home décor. Its playful appearance brings a touch of whimsy, while the functional aspect of carrying eggs makes it practical. Whether you are looking to start a new hobby, make handmade gifts, or decorate your kitchen creatively, the Crochet Egg-Carrying Chicken – Free Pattern is a perfect choice.
Creating the Crochet Egg-Carrying Chicken – Free Pattern requires some basic materials that most crocheters may already have at home. First, you will need yarn in several colors, usually yellow for the body, red for the comb, and brown or other colors for additional accents. Using cotton or acrylic yarn works best, as they provide durability and structure for the chicken to carry eggs effectively.
Next, you will need a suitable crochet hook. The size of the hook should match your chosen yarn, which ensures that the stitches are tight enough to maintain the chicken’s shape while still being soft. Other essential materials include a pair of scissors, a yarn needle for sewing parts together, and stuffing to give the chicken its plush, rounded look.
Some crafters also add small embellishments such as safety eyes or embroidered features for the beak and wings. These details can enhance the overall appearance and make the Crochet Egg-Carrying Chicken – Free Pattern even more lifelike and engaging. Remember, having all materials ready before starting will help make the crocheting process smoother and more enjoyable.
Learning about the right yarn tension and stitch technique is critical when making this egg-carrying chicken. Proper tension ensures that the chicken is not too loose, which could make it unable to hold eggs securely, nor too tight, which might make stitching difficult. The balance between firmness and flexibility is key to achieving a successful final product.
The main body of your Crochet Egg-Carrying Chicken – Free Pattern begins with a simple foundation ring, often using a magic circle. This technique allows you to start crocheting in the round, creating a seamless and smooth body. From there, you will gradually increase stitches to form a rounded shape, which will serve as the chicken’s torso.
Once the basic body shape is established, you will begin shaping the lower part to allow it to hold eggs. Careful increases and decreases in stitches give the chicken its characteristic plump and functional design. The positioning of these stitches is crucial, as it ensures stability when the chicken carries eggs, making it both cute and practical.
Next, attention is given to attaching the wings and tail. These parts are often crocheted separately and sewn onto the body later. Using contrasting colors can make these features stand out, adding charm to the Crochet Egg-Carrying Chicken – Free Pattern. Small decorative stitches or loops can also give the wings more detail and texture.
The chicken’s head is typically made separately as well, often starting with another magic circle to create a rounded shape. Proper alignment of the head with the body ensures that the chicken looks balanced and natural. A stuffed head gives it volume, while careful stitching ensures that it stays securely in place.
Adding the comb and beak is the final step for the head. These small details bring personality to your chicken, making it expressive and delightful. The comb is usually crocheted with a bright red yarn, while the beak can be a contrasting color such as orange or yellow. This attention to detail makes the Crochet Egg-Carrying Chicken – Free Pattern truly special.
Finally, assemble all parts together using a yarn needle and secure them firmly. Take time to check for loose threads and reinforce areas that might experience more stress when the chicken is used to carry eggs. With careful finishing touches, your chicken will not only look adorable but also remain functional for daily use.
The wings of your Crochet Egg-Carrying Chicken – Free Pattern are essential for adding character and completing the design. Start by making small, rounded shapes using simple stitches like single or half-double crochet. You can create texture by adding ridges or small decorative stitches, which also helps the wings look more realistic.
The tail is equally important as it provides balance and visual appeal. Often crafted in a fan-like shape, it can be made using multiple rows of stitches that gradually increase in size. Attaching the tail securely to the lower back of the chicken ensures it maintains its shape and supports the overall structure.
For both wings and tail, color contrast can enhance the chicken’s charm. For example, if the body is yellow, adding brown or orange for the wings and tail gives a playful and vibrant look. These subtle details help your Crochet Egg-Carrying Chicken – Free Pattern stand out as a decorative piece.
Texturing techniques such as puff stitches, bobble stitches, or small loops can create a more dynamic appearance. These textures make the wings and tail visually interesting and give the chicken a handcrafted, artistic touch. Such attention to detail is appreciated by both crafters and anyone who sees the finished product.
Proper attachment of wings and tail is crucial for functionality. Use strong yarn and tight stitching to make sure these parts remain in place even when handling eggs. This ensures that your chicken is both beautiful and practical, capable of fulfilling its egg-carrying purpose.
Once the wings and tail are in place, you can add finishing touches, like small embroidered details or tiny accents. These small decorations elevate the overall aesthetic, making your Crochet Egg-Carrying Chicken – Free Pattern a standout item in any kitchen or craft collection.
The final assembly of the Crochet Egg-Carrying Chicken – Free Pattern is where all individual parts come together. Use a yarn needle to carefully sew the head, wings, tail, and comb onto the body. Ensure that each part is aligned correctly to maintain balance and aesthetic appeal.
Stuffing is an essential step during assembly. Adequate stuffing ensures that the chicken keeps its shape and is firm enough to carry eggs. Use soft yet resilient stuffing to achieve the perfect balance between plushness and structure, giving the chicken a satisfying tactile quality.
After attaching all parts, check the stability of the chicken. It should stand upright and maintain its form while carrying eggs. Reinforce any loose stitches and trim excess yarn to give it a neat, polished finish. These finishing touches make the Crochet Egg-Carrying Chicken – Free Pattern durable and long-lasting.
Decorative features, like embroidered eyes or stitched patterns on the wings and tail, can further personalize your crochet chicken. These details make each chicken unique and showcase the care and craftsmanship put into the project.
Finally, take a moment to admire your creation. The Crochet Egg-Carrying Chicken – Free Pattern is not only a functional craft but also a charming decorative piece. Its whimsical appearance and practical design make it a perfect gift or a delightful addition to your own home.
Q1: Is this pattern suitable for beginners?
Yes, the Crochet Egg-Carrying Chicken – Free Pattern is designed for beginners with basic crochet knowledge, though some patience is needed for assembly and shaping.
Q2: What type of yarn is best for this project?
Cotton or acrylic yarn works best. These materials are durable, maintain shape, and provide a soft but firm texture suitable for carrying eggs.
Q3: Can the chicken hold real eggs?
Yes, if stuffed properly and assembled securely, the chicken can carry real eggs safely. However, always handle with care.
Q4: How long does it take to complete the chicken?
Completion time varies depending on experience. Beginners may take 6–8 hours, while experienced crocheters can finish in 3–5 hours.
Q5: Can I customize the colors?
Absolutely! Feel free to use any colors you like to match your home décor or personal preference. Color customization adds a unique touch.
Q6: Are there any special stitches needed?
The pattern primarily uses basic stitches like single and half-double crochet, with occasional puff or bobble stitches for texture.
The Crochet Egg-Carrying Chicken – Free Pattern is a delightful project that combines creativity, functionality, and charm. From choosing the right materials to carefully assembling each part, this pattern offers a fulfilling and enjoyable crafting experience. By following the steps outlined, you can create a practical yet whimsical chicken that will carry eggs and bring a touch of handmade beauty to your home.
Share your experience, leave your honest opinion, and suggest improvements—you never know who might be inspired to start their own crochet adventure!


