
Crocheted house-shaped cookie for Christmas tree

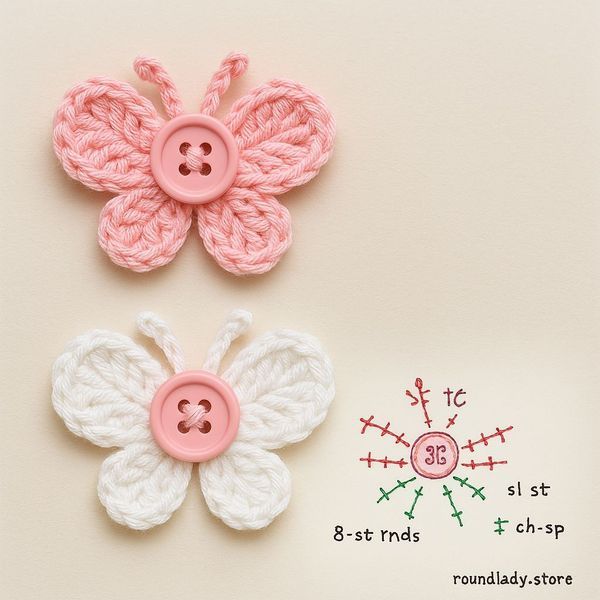
If you have ever wanted to create a charming and decorative accessory for your crafts, the Crochet Button Butterfly is the perfect project to start with.
In this step-by-step tutorial, we will guide you through every stage of making your own delicate and colorful butterfly using simple crochet techniques and a small button.
This craft is ideal for beginners and experienced crafters alike, as it combines creativity with practical skills. Whether you plan to use it as a decoration, a gift, or even a hair accessory, the Crochet Button Butterfly is a fun and rewarding project that adds a personal touch to any item.
The beauty of this craft lies in its simplicity. With only a few materials—yarn, crochet hook, and a button—you can create a unique and delightful piece.
The tutorial will cover all the essential crochet terms and techniques, ensuring that even someone new to crochet can follow along easily. Throughout this guide, we will also highlight tips to make your butterfly look more professional and polished, making your creation suitable for gifts or home decor. By the end of this tutorial, you will not only have a beautiful Crochet Button Butterfly but also improved crochet skills that you can apply to other projects.
One of the most rewarding aspects of this project is the opportunity to customize your butterfly. From choosing the colors of your yarn to selecting a button that complements your design, the possibilities are endless. Each Crochet Button Butterfly you make can reflect your personal style or the preferences of the person you are gifting it to. As we move through this step-by-step tutorial, you will learn how to assemble each part, attach the button securely, and finish your butterfly neatly. With patience and attention to detail, your final product will be a charming representation of your creativity and dedication.
Before starting your Crochet Button Butterfly, it is important to gather all necessary materials to ensure a smooth crafting experience. You will need a crochet hook, yarn of your choice, a small button, scissors, and a yarn needle. Choosing the right yarn is crucial; cotton or acrylic yarns work best because they hold their shape well. The button can be decorative, colorful, or neutral depending on the effect you want to achieve. It will serve as the body of your butterfly and provide a focal point for your design.
Having the right crochet hook is also important. Using a hook that matches the weight of your yarn will make the stitches consistent and prevent frustration. A yarn needle will be used to weave in ends and secure your button to the butterfly wings. While some crafters prefer a glue option, sewing the button with a needle is a stronger and longer-lasting solution. Preparing your materials beforehand ensures that your crafting session will be uninterrupted and enjoyable.
It’s helpful to have a comfortable workspace for your project. Good lighting, a flat surface, and a small container to hold your supplies can make the process much easier. Since this project involves fine details, taking care to avoid distractions will help maintain focus and accuracy. Once your materials are ready, you can start following the step-by-step instructions to create your very own Crochet Button Butterfly, a piece that is both cute and functional.
The first step in making your Crochet Button Butterfly is crafting the wings. Begin by making a slip knot and chaining four stitches. Join with a slip stitch to form a small ring, which will serve as the center of your wings. From here, you will work in rounds, gradually increasing stitches to create the shape of the butterfly wings. Using single crochet, half double crochet, and double crochet stitches, you can form the delicate curves that mimic real butterfly wings.
Pay attention to stitch tension, as uneven tension can distort the wings. For beginners, it’s helpful to mark the beginning of each round with a stitch marker or small piece of yarn. This will make it easier to keep track of rounds and prevent mistakes. Crochet each wing separately and ensure that they are symmetrical in size. Symmetry is key to making the butterfly look polished and professional.
After completing the first pair of wings, it’s time to crochet the smaller inner wings. These wings add depth and dimension to your butterfly, making it more visually appealing. Use a contrasting yarn color if you wish to create a more vibrant effect. Attach these wings to the larger ones with a few careful stitches.
Once all wings are complete, block them gently to give the butterfly a more defined shape. Wet the wings slightly and pin them to a flat surface, shaping them as desired. Allow them to dry completely before proceeding to the next step. Blocking ensures that the butterfly maintains its shape and looks neat when attached to projects.
The button serves as the body of your Crochet Button Butterfly, adding a charming focal point to the design. Select a button that complements the size and colors of your wings. Position it in the center of your wings and use a yarn needle and matching thread to sew it securely. Make sure the stitches are tight enough to hold the button in place but not so tight that they distort the wings.
For extra durability, you can stitch through the button multiple times. This ensures that the button stays attached even if the butterfly is used as a decoration on frequently handled items. The button adds a playful touch to your butterfly and makes it easy to attach the finished piece to various projects.
Once the button is securely attached, weave in any loose ends of yarn to create a clean finish. Tidy ends not only improve the appearance but also prevent unraveling over time. Take your time during this step, as careful finishing elevates the overall quality of your Crochet Button Butterfly.
Attaching the button also provides an opportunity for personalization. You can choose buttons with different shapes, patterns, or even small gemstones to make your butterfly unique. This step allows you to express creativity and add a signature touch to your handmade craft.
Finally, double-check the alignment of the button and wings. The butterfly should look balanced from all angles. Making small adjustments at this stage ensures that the final product is polished and visually appealing.
The finishing touches bring your Crochet Button Butterfly to life. You can add small embroidery stitches to the wings for texture or use beads to add sparkle. Some crafters like to add a little wire inside the wings to make them poseable, which can enhance the three-dimensional effect. These extra details make your butterfly more dynamic and attractive.
Check the overall symmetry of the wings and adjust if necessary. Trimming excess threads and tidying up edges ensures a clean, professional look. The finishing touches are what differentiate a simple craft from a polished handmade piece.
Experiment with different color combinations to see what works best. For example, pastel yarns create a soft, whimsical look, while bright colors make your butterfly stand out as a statement piece. Personalizing your butterfly increases the charm and uniqueness of your creation.
Consider the final use of your butterfly when adding embellishments. If it’s meant for a hair clip, ensure that all decorations are secure and comfortable to wear. If it’s for home décor, you can be more adventurous with textures and designs. Finishing touches allow you to make the Crochet Button Butterfly versatile and adaptable for various purposes.
Once your Crochet Button Butterfly is complete, you can use it in countless ways. Attach it to clothing, hats, scarves, or bags for a playful accent. It can also serve as a decorative piece for scrapbooks, greeting cards, or gift packaging. The butterfly’s lightweight design makes it easy to add charm without bulk.
If you plan to use it as a hair accessory, attach it to a clip or headband. The button body makes it easy to secure without sewing directly to the hair accessory. This flexibility allows your creation to be both functional and decorative.
For home décor, display your butterflies in shadow boxes, attach them to curtain tiebacks, or create a garland by stringing several together. Each application highlights the versatility of this simple yet charming craft.
Sharing your Crochet Button Butterfly with friends or family is another rewarding aspect of this project. Handmade gifts carry a personal touch and show effort and thoughtfulness. Whether as a small token or part of a larger project, your butterfly can brighten someone’s day.
Experiment with different sizes and color schemes to build a collection of butterflies. Having multiple butterflies allows for creative arrangements and can make your home or craft projects feel cohesive and lively.
Q1: Is this project suitable for beginners?
Yes, the Crochet Button Butterfly tutorial is beginner-friendly. We provide step-by-step instructions and explain each term, so even those new to crochet can follow along.
Q2: What materials are needed?
You will need a crochet hook, yarn, a small button, scissors, and a yarn needle. Cotton or acrylic yarns work best, and the button should complement the butterfly design.
Q3: How long does it take to make one butterfly?
For beginners, it may take 1–2 hours to complete one butterfly. Experienced crafters can finish in under an hour.
Q4: Can I make the butterfly in different sizes?
Absolutely. Adjust the yarn thickness and hook size to create smaller or larger butterflies. This is perfect for customizing for different projects.
Q5: How do I attach the butterfly to clothing or accessories?
Sew the button body securely onto your chosen item. You can also attach it to clips, pins, or glue for versatility.
Q6: Can I use different yarn colors?
Yes! Using multiple colors allows for creative designs and personalized touches, making each butterfly unique.
Creating a Crochet Button Butterfly is a delightful and rewarding craft that allows you to express creativity while practicing crochet skills. In this tutorial, we covered everything from choosing materials and making the wings to attaching the button body and adding finishing touches. We also explored practical uses for your finished butterfly and provided tips for customization.
Now it’s your turn to bring your own Crochet Button Butterfly to life. Experiment with colors, sizes, and embellishments to make your creation unique.
We would love to hear your honest opinions and suggestions about this tutorial. Share your experiences and let us know how you personalized your butterfly, so others can find inspiration from your creativity.


