
Crocheted house-shaped cookie for Christmas tree

Colorful Crochet Rooster – Complete Tutorial & Diagram is the ultimate guide for anyone looking to create a vibrant and charming crochet rooster.
Whether you are a beginner or an experienced crocheter, this Colorful Crochet Rooster project will add a unique handmade touch to your home décor or gift collection.
In this article, we will guide you step by step through the entire process, provide a detailed diagram, and explain essential crochet techniques that make this rooster truly colorful and lively. By the end, you will have a beautifully crafted piece that showcases your skill and creativity.
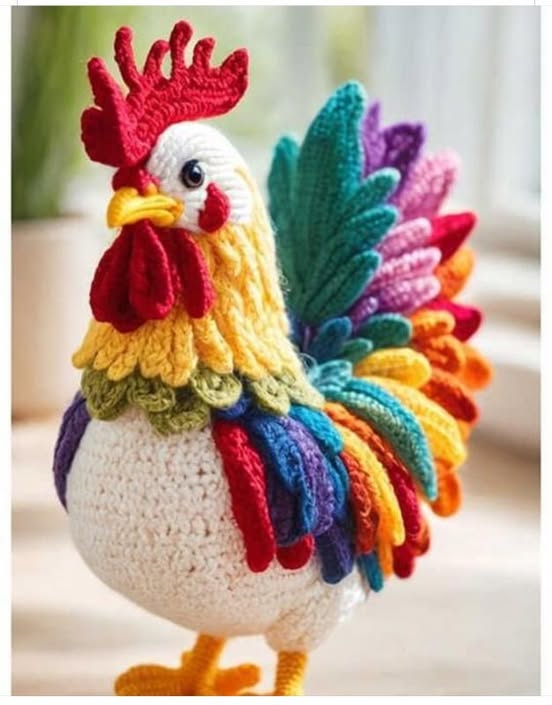
Crocheting a Colorful Crochet Rooster requires patience, precision, and a good understanding of basic crochet stitches. Each part of the rooster, from the comb to the tail feathers, contributes to the overall charm and vibrancy of the finished piece.
Choosing the right yarn colors is crucial, as it brings the rooster to life with its striking contrast and playful design. This tutorial also includes tips for selecting materials, adjusting sizes, and customizing your rooster to match your personal style or the décor theme of your space.
The Colorful Crochet Rooster is more than just a decorative item; it is a creative project that enhances your crochet skills. As you follow this tutorial, you will learn how to combine different stitches, work in rounds, and assemble multiple parts seamlessly. Additionally, the provided diagram serves as a visual guide to help you understand the structure and placement of each part, making the process smoother and enjoyable. Whether you plan to gift your rooster or keep it for yourself, this project promises both satisfaction and a sense of accomplishment.
Creating a Colorful Crochet Rooster begins with gathering the right materials. You will need yarn in several bright colors, such as red, yellow, orange, green, and blue, to highlight the rooster’s characteristic features. Opt for soft, medium-weight yarn that is easy to handle and offers durability for long-lasting use. Additionally, ensure you have a crochet hook that matches the yarn thickness to maintain consistent tension and neat stitches.
Apart from yarn and hooks, you will need a tapestry needle for weaving in ends and sewing parts together. Safety eyes or small black beads can be used for the rooster’s eyes, adding a lifelike touch. Scissors are essential for cutting yarn, while stitch markers help keep track of rounds, especially in complex parts like the tail or comb. Using the right materials ensures your Colorful Crochet Rooster turns out beautiful and structurally sound.
Understanding the importance of color selection is crucial. The vibrant colors of a rooster’s feathers and comb make it stand out, and combining complementary shades enhances the visual appeal. You can follow traditional rooster colors or experiment with your palette to create a unique design. Remember, the more vivid your yarn choices, the more eye-catching your Colorful Crochet Rooster will be.
Another key aspect is the yarn type. Cotton yarn is recommended for its stitch definition, while acrylic yarn offers versatility and ease of cleaning. Consider the texture and durability of the yarn, especially if the rooster will be handled frequently or displayed in a prominent place. Proper material selection lays the foundation for a successful crochet project and ensures satisfaction with the final result.
Finally, preparation is essential. Before starting, organize your workspace, sort yarn colors, and review the crochet diagram. This preparation helps streamline the process and reduces mistakes. With the right tools, materials, and setup, creating a Colorful Crochet Rooster becomes an enjoyable and rewarding experience that combines skill, creativity, and fun.
The body of the Colorful Crochet Rooster is the foundation of the project and requires careful attention to shape and proportion. Start with a magic ring and work in continuous rounds to form the base. Use basic stitches like single crochet (sc), half double crochet (hdc), and double crochet (dc) to achieve a smooth and consistent texture. Maintaining even tension is essential to prevent bulging or uneven areas.
As you crochet the body, gradually increase stitches to create a rounded shape that mimics a rooster’s natural curves. The choice of yarn color for the body depends on your personal preference, but using bright and warm tones enhances the visual appeal. The body should be firm enough to hold the head and tail while soft enough to allow slight flexibility during assembly.
Once the base body is completed, move on to shaping the neck and head. Decreasing stitches gradually helps create a tapering effect, giving the rooster a natural stance. Pay attention to stitch count and round consistency to ensure symmetry. This step sets the stage for attaching the comb, beak, and eyes, which are crucial for character and personality.
The next part is stuffing the body lightly with polyester fiberfill or cotton stuffing. Stuffing evenly ensures the rooster maintains its shape and stability. Avoid overstuffing, as it can distort stitches or make it difficult to attach other parts. Proper stuffing enhances the tactile quality and makes your Colorful Crochet Rooster enjoyable to hold and display.
After stuffing, close the opening neatly using a tapestry needle and a whip stitch or invisible stitch technique. This finish gives the rooster a polished and professional appearance. Closing securely also ensures durability, especially if the rooster will be handled frequently.
Finally, prepare for assembly. Gather all crocheted parts such as wings, tail, and comb, and arrange them for visual reference. Following the diagram provided helps in understanding placement and orientation. With the body complete, you are ready to add the intricate details that give your Colorful Crochet Rooster its colorful and lively personality.
The comb is one of the most distinctive features of a Colorful Crochet Rooster. It adds character and vibrancy, so careful attention is required. Use bright red yarn and small crochet stitches to create a textured, layered effect. Working in rows or rounds depends on your preferred style, but consistency in stitch size ensures a uniform appearance.
Next is the beak, which can be made using yellow or orange yarn. Simple stitches are usually sufficient, but shaping is essential to achieve a realistic look. Crochet in small increments, and adjust the taper to match the proportions of the rooster’s head. The beak should be securely attached to the head for durability.
The eyes bring the rooster to life. Use safety eyes, small beads, or embroidered stitches for a safe and expressive effect. Position them symmetrically to ensure balance and a natural expression. The combination of comb, beak, and eyes completes the facial features and adds personality to your Colorful Crochet Rooster.
When attaching these parts, it’s helpful to pin them in place before sewing. This allows for adjustments and ensures correct placement. Use strong yarn or embroidery thread to secure each piece without visible stitches. Proper attachment contributes to the overall aesthetic and prevents parts from detaching during handling.
Adding small details, such as subtle embroidery around the eyes or texture on the comb, enhances realism. These finishing touches elevate your project from simple crochet to a miniature piece of art. Attention to detail is what makes your Colorful Crochet Rooster visually striking and unique.
Finally, double-check attachment and symmetry before moving on to wings and tail feathers. A well-executed face sets the tone for the rest of the project and ensures a cohesive, professional-looking result. With these elements in place, your rooster starts to exhibit the charm and vibrancy that makes it so appealing.
The wings of the Colorful Crochet Rooster are essential for adding depth and dimension. Crochet two identical pieces using colorful yarn, combining stitches like double crochet and treble crochet for texture. Slight variations in color can create a layered, feathered effect. Proper shaping ensures the wings appear natural and proportional to the body.
Attach the wings securely to the sides of the body using a tapestry needle. Stitch evenly along the base to prevent gaps and maintain symmetry. Positioning is critical; wings placed too high or low can distort the rooster’s silhouette. Visual reference from the diagram helps maintain accuracy.
The tail feathers are the most colorful and expressive part of the rooster. Use long, flowing stitches in bright colors such as green, blue, and orange. Layering feathers creates a full, eye-catching tail that enhances the overall charm. The combination of colors contributes to the “colorful” aspect, making this rooster stand out as a decorative piece.
Crocheting tail feathers involves working in multiple rows and attaching each piece individually. This allows for flexibility in design and prevents bulkiness. Adjust the length and curvature of each feather to create a dynamic and natural look. Experimenting with colors and lengths gives your Colorful Crochet Rooster a unique personality.
Once completed, attach the tail feathers to the back of the body, ensuring they fan out evenly. Securely stitch each feather to maintain stability. The tail not only adds beauty but also gives the rooster a balanced structure, preventing it from tipping over when displayed.
Finishing touches include trimming yarn ends, fluffing feathers, and making minor adjustments to positioning. These final refinements make your Colorful Crochet Rooster polished and visually appealing. Attention to these details ensures the rooster is a vibrant and charming addition to any space.
After completing all parts, it’s time to assemble your Colorful Crochet Rooster. Begin by positioning each piece according to the diagram, ensuring proper alignment. Start with the body, then attach the wings, tail, comb, beak, and eyes. Take your time to ensure accuracy and symmetry.
Sewing parts together securely is essential for durability. Use strong yarn or embroidery thread and stitch with even tension. Hidden stitches improve aesthetics and prevent parts from detaching during handling. Reinforce areas that may experience stress, such as wing attachments and tail base.
Check the overall shape and balance of the rooster. Minor adjustments, such as repositioning feathers or wings, can improve posture and visual appeal. The goal is to achieve a natural stance and maintain the playful, colorful character of the piece.
Once fully assembled, weave in any remaining yarn ends neatly. This step prevents unraveling and gives a clean, professional finish. Proper finishing ensures your Colorful Crochet Rooster is long-lasting and ready for display or gifting.
Final inspection is crucial. Look for symmetry, stitch consistency, and secure attachments. Small corrections can significantly enhance the final result. A well-finished rooster reflects your skill and dedication, making it a delightful decorative item.
With assembly complete, your Colorful Crochet Rooster is ready to shine. Display it proudly on a shelf, use it as a centerpiece, or gift it to someone special. The combination of vibrant colors, detailed craftsmanship, and unique design makes it a cherished handmade creation.
Q1: Can beginners make a Colorful Crochet Rooster?
Yes! While some parts require intermediate skills, following step-by-step instructions and the diagram makes it accessible for beginners willing to practice.
Q2: What yarn is best for this project?
Medium-weight cotton or acrylic yarn works best. Cotton provides stitch definition, while acrylic offers durability and easier cleaning.
Q3: How do I choose colors for the rooster?
Use bright, contrasting colors for comb, tail, and body to make it visually appealing. Traditional rooster colors or your unique palette can be used.
Q4: Can I adjust the size of the rooster?
Absolutely. Using a larger or smaller hook and adjusting yarn thickness changes the overall size. Keep proportions consistent for best results.
Q5: How do I attach the wings and tail securely?
Use a tapestry needle and strong yarn. Stitch evenly and reinforce areas prone to stress to maintain stability.
Q6: Can the rooster be washed?
Yes, if using washable yarn. Hand wash in cold water and reshape while drying to preserve form and colors.
Creating a Colorful Crochet Rooster is a rewarding project that combines creativity, skill, and attention to detail. From gathering materials to completing the assembly, every step contributes to a vibrant and charming finished piece. By following this complete tutorial and diagram, you will gain confidence in crocheting complex shapes, combining colors, and finishing handmade projects professionally.
We hope this guide inspires you to create your own Colorful Crochet Rooster. Share your results, leave a sincere opinion, and offer suggestions for future tutorials.
Your feedback helps improve our content and supports the growing community of passionate crocheters. Embrace the joy of handmade crafts and let your creativity shine with this unique project.


