
Hunter's Star Quilt Block - Quick & Easy Tutorial

If you’ve ever wanted to add a delightful touch to your quilting projects, learning how to create a charming umbrella block is a perfect way to start.
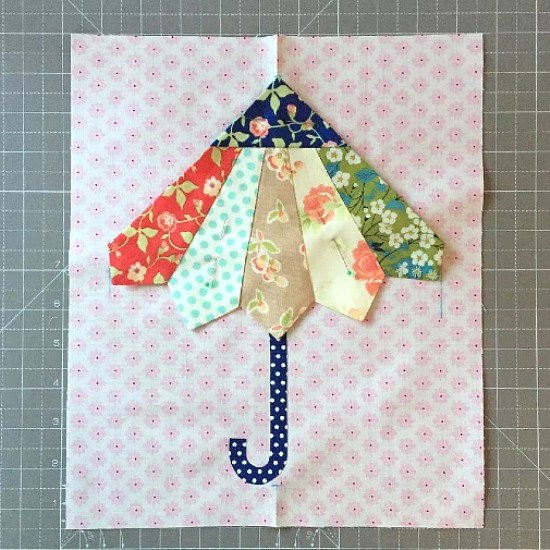
Quilting is not just a craft; it’s an art form that allows you to express creativity through patterns, colors, and textures. The umbrella block is especially appealing because it brings a playful, whimsical feel to any quilt, making it perfect for gifts, home decor, or personal keepsakes.
In this tutorial, we will explore the steps to master this block, the materials you need, and tips to ensure your finished product looks professional.
The beauty of the charming umbrella block lies in its versatility. You can use a wide range of fabrics, from classic cotton prints to modern geometric designs.
Mixing colors and patterns strategically will make your umbrellas pop against the quilt background. Moreover, this block is suitable for both beginners and experienced quilters because it balances simplicity with a chance for intricate design work. With careful piecing and pressing, your blocks will align perfectly, creating a cohesive and attractive quilt layout.
Another important aspect to consider when you create a charming umbrella block is the choice of tools and techniques. Using a rotary cutter, mat, and quilting ruler will ensure precise cuts, which is crucial for achieving clean lines in your umbrella shapes. Additionally, selecting the right thread and stitch length can significantly impact the appearance and durability of your quilt. Whether you plan to hand-sew or machine-sew, paying attention to detail at every step will guarantee a satisfying result.
When learning how to create a charming umbrella block, the first step is to gather the right materials. Essential supplies include a selection of cotton fabrics for the umbrella canopy and background. It’s helpful to choose fabrics with contrasting colors to make your umbrella stand out. A neutral background fabric allows the vibrant umbrella designs to become the focal point of your quilt.
You will also need a rotary cutter, cutting mat, and quilting ruler for precise cutting. These tools make it easier to measure and cut fabric accurately, which is essential for seamless piecing. Additionally, fabric scissors, pins, and a seam ripper are practical tools to have on hand during the assembly process. Investing in quality tools can make your quilting experience smoother and more enjoyable.
Thread choice is another critical factor when you create a charming umbrella block. Cotton or polyester thread in coordinating or contrasting colors can enhance the overall look of your quilt. Matching the thread to the fabric color can make the seams less noticeable, while contrasting thread can add decorative detail. It’s a personal choice depending on the style you wish to achieve.
Accurate measurement is key when cutting fabric for your umbrella block. Each piece should be measured carefully to maintain consistent block sizes. Remember that quilting requires precision, so take your time with this step. Using a quilting ruler with clear markings will help you cut squares, triangles, and rectangles accurately for your umbrella design.
Pressing your fabric pieces before sewing is also crucial. Ironing each piece helps eliminate wrinkles and ensures smooth seams when piecing the umbrella block together. A well-pressed fabric contributes to the overall professional appearance of your quilt.
Finally, ensure you have a comfortable workspace when assembling your charming umbrella block. Good lighting, a spacious surface, and an ergonomic chair will make the quilting process more enjoyable and reduce strain during long sewing sessions.
Once your materials are ready, it’s time to assemble the umbrella block. Begin by cutting the umbrella canopy pieces according to your pattern. Typically, this involves cutting triangles or trapezoids to form the umbrella shape. Accurate cutting ensures the pieces fit together without gaps or uneven seams.
Next, arrange the canopy pieces on your workspace to visualize the finished block. Experiment with different color combinations to see which design appeals most. Placing the pieces in different orientations can create dynamic and visually striking effects.
Sew the canopy pieces together carefully, maintaining a consistent seam allowance, usually ¼ inch. Press the seams open or to one side, depending on your preferred method. Precision in sewing ensures that the umbrella’s shape is well-defined and symmetrical.
After completing the canopy, attach it to the background square. Align the edges and pin in place to prevent shifting while sewing. Carefully stitch around the edges to secure the umbrella in position. This step transforms your pieces into a cohesive block ready to join with other blocks in your quilt.
Next, add the umbrella handle. This is typically a narrow rectangle or strip of fabric that extends downward from the canopy. Position it carefully to maintain balance and symmetry. Sewing it in place completes the overall umbrella shape, making your block recognizable and charming.
Finally, trim your block to the desired finished size. Accurate trimming ensures all blocks are uniform, which is essential when joining multiple blocks into a quilt top. Now, your charming umbrella block is complete and ready to be incorporated into your larger quilting project.
Customizing your umbrella block allows you to showcase creativity and personal style. You can experiment with different fabrics, such as florals, polka dots, or stripes, to give each umbrella a unique personality. Mixing textures can also add depth and visual interest to your quilt.
Another way to customize your block is by varying the block size. Larger blocks can be used as focal points, while smaller blocks can be scattered throughout your quilt for a playful effect. Scaling the block size provides versatility in quilt design and layout.
Appliqué is another technique to enhance your umbrella block. Adding appliqué details like raindrops, clouds, or even small embellishments like buttons or embroidery can create a whimsical scene around the umbrella. This technique allows for creative storytelling through your quilt.
Using contrasting thread for topstitching is another option for customization. It can outline the umbrella canopy or handle, highlighting its shape and adding decorative flair. Thoughtful stitching enhances both the visual appeal and texture of your quilt.
Incorporating seasonal or themed fabrics can make your block suitable for different occasions. For instance, bright, sunny prints for a summer quilt or muted, cozy tones for a winter quilt can set the mood and complement your overall design.
Finally, arranging your umbrella blocks in creative layouts allows for endless possibilities. You can create repeating patterns, random arrangements, or even a scene featuring umbrellas in the rain. Experimenting with layout ensures your quilt is uniquely yours.
When learning how to create a charming umbrella block, beginners often make mistakes that can affect the final outcome. One common issue is inaccurate cutting, which leads to mismatched seams. To avoid this, always measure twice and cut once, and use a rotary cutter and quilting ruler for precision.
Another frequent mistake is uneven seam allowance. Consistent seam width is crucial for aligning pieces properly. Practice maintaining a steady seam allowance and consider using guides on your sewing machine for consistency.
Skipping pressing steps is another common problem. Failing to press seams properly can result in bulky, uneven blocks. Always press seams after sewing each piece to ensure a neat and flat finish.
Misplacing the umbrella handle is another area of concern. Ensure you measure and position it carefully to maintain symmetry in the block. Pinning before sewing can prevent shifting and keep your handle straight.
Choosing fabrics that are too similar in color can make your umbrella block appear flat. Opt for contrasting or complementary colors to make the umbrella stand out against the background.
Finally, rushing through the assembly process often leads to mistakes. Quilting requires patience and attention to detail. Taking your time will result in a polished, professional-looking block that you can be proud of.
Q: Can beginners create a charming umbrella block?
A: Absolutely. This block is beginner-friendly, but careful measurement, cutting, and sewing are essential for success.
Q: What fabrics work best for the umbrella block?
A: Cotton fabrics are ideal because they are easy to cut and sew. Mixing prints and colors enhances the block’s visual appeal.
Q: How do I make the umbrella handle straight?
A: Use pins to secure the handle before sewing and ensure it’s centered. Measuring the position helps maintain symmetry.
Q: Can I use this block in a large quilt?
A: Yes. Multiple umbrella blocks can be combined to create a quilt with a playful, whimsical theme.
Q: Is it better to machine-sew or hand-sew the block?
A: Both methods work. Machine sewing is faster, while hand-sewing allows for more detailed control and decorative stitches.
Q: How do I prevent seams from showing through?
A: Use matching thread or press seams carefully. Topstitching with contrasting thread can also be used decoratively without distracting from the design.
In this tutorial, you learned how to create a charming umbrella block step by step, from gathering materials and tools to assembly, customization, and avoiding common mistakes. We explored techniques to make your blocks precise, colorful, and visually appealing. By experimenting with fabrics, sizes, and layouts, your quilt can become a truly unique piece of art. Don’t forget to take your time, press your seams carefully, and have fun throughout the process.
We’d love to hear your thoughts! Please share your honest opinions and any suggestions about your experience making umbrella blocks. Your feedback helps inspire future tutorials and encourages the quilting community to keep creating and innovating.


