
Crocheted house-shaped cookie for Christmas tree

Creating a Peppermint Throw – Free Pattern is an exciting project for anyone who loves crochet and wants to add a cozy, festive touch to their home.
This pattern is designed to be accessible for both beginners and experienced crocheters, combining simplicity with a charming peppermint-inspired design.
If you have ever wanted to make a handmade blanket that is not only practical but also visually appealing, this Peppermint Throw – Free Pattern is perfect for you. With the included PDF tutorial, you can follow along step by step and create a throw that will be cherished for years.
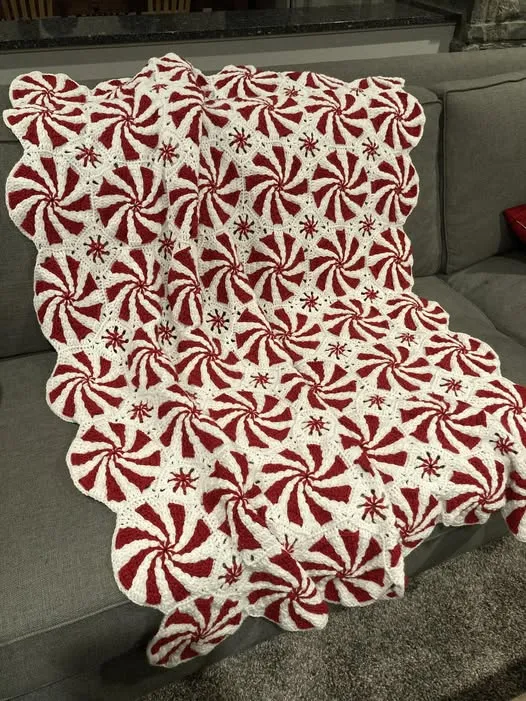
One of the best aspects of this Peppermint Throw – Free Pattern is its versatility. The classic peppermint design can easily be adapted for various color combinations, allowing you to customize it to your own style.
Whether you want a traditional red-and-white theme or a more modern pastel palette, this pattern accommodates all tastes. Beyond aesthetics, the throw is made with comfort in mind, using soft yarns that are perfect for snuggling on cold evenings or gifting to loved ones.
Additionally, this Peppermint Throw – Free Pattern comes with a comprehensive PDF tutorial that makes it simple to follow even if you are new to crochet. The tutorial includes detailed instructions, clear diagrams, and tips for maintaining consistent tension throughout the project. By the end of this project, you will not only have a beautiful throw but also gain valuable skills that will help you tackle future crochet projects with confidence and creativity.
Before starting the Peppermint Throw – Free Pattern, it is important to gather all the necessary materials. Choosing the right yarn and hook size will ensure your throw has the ideal texture and drape. For this project, medium-weight yarn is recommended because it balances warmth with ease of handling. You will also need a crochet hook that matches your chosen yarn weight to maintain consistent stitches throughout.
When selecting yarn colors for the Peppermint Throw – Free Pattern, consider the traditional peppermint palette of red and white, or experiment with shades that match your home decor. Using high-quality yarn will enhance the overall feel and longevity of the throw. Other materials include scissors, a yarn needle for weaving in ends, and stitch markers if you want to keep track of your rows more easily.
Additionally, it is helpful to have a measuring tape on hand to ensure your throw reaches the desired size. The Peppermint Throw – Free Pattern can be adapted for various dimensions, whether you want a baby blanket, a lap throw, or a larger bed-sized blanket. Taking the time to gather and prepare your materials will make the crochet process more enjoyable and efficient.
The step-by-step instructions in the Peppermint Throw – Free Pattern PDF tutorial are designed to be beginner-friendly while still offering enough detail for experienced crocheters. Start with a foundation chain that matches your desired width and maintain even tension throughout the project. This foundation is critical because it forms the base of your throw.
Once the foundation chain is complete, the pattern guides you through creating the signature arches that define the peppermint look. These arches are made using a combination of basic crochet stitches such as double crochet, chain stitches, and slip stitches. Each row builds upon the previous one, gradually forming the visually appealing peppermint swirl design.
The PDF tutorial also includes helpful diagrams to illustrate complex stitch patterns. Visual learners will find this particularly useful for understanding how to execute the arches. By following the step-by-step instructions, you will be able to crochet the Peppermint Throw – Free Pattern with precision and confidence.
To achieve the best results with your Peppermint Throw – Free Pattern, it is important to focus on consistency and technique. Maintaining an even tension throughout your stitches will ensure that the throw lays flat and looks professionally finished. Avoid pulling too tightly or leaving stitches too loose, as this can distort the pattern.
Blocking your throw after completion is another tip for perfecting the look of your Peppermint Throw – Free Pattern. Blocking helps set the stitches, smooth out any unevenness, and enhances the overall appearance of the arches. It can make a significant difference, especially for more intricate designs.
Finally, don’t be afraid to experiment with color changes and stitch variations. While the Peppermint Throw – Free Pattern provides a standard method, personalizing your throw can make it truly unique. Small adjustments in color sequence or stitch technique can create a signature style that reflects your creativity and adds an extra special touch to your handmade project.
Once your Peppermint Throw – Free Pattern is complete, proper care will help maintain its softness, shape, and color. Hand washing with a gentle detergent is recommended, especially for delicate yarns. Avoid harsh chemicals or hot water, which can damage fibers and cause colors to fade.
Drying your throw flat is another important step. Hanging it can stretch the stitches and distort the arches, affecting the overall appearance. If machine washing is preferred, use a delicate cycle and place the throw in a mesh laundry bag to protect it.
Finally, store your Peppermint Throw – Free Pattern in a cool, dry place when not in use. Folding it neatly and avoiding heavy items on top will help preserve its shape and texture. Proper care ensures that your handmade throw remains a cherished piece for years to come.
Q1: Is the Peppermint Throw suitable for beginners?
Yes, the Peppermint Throw – Free Pattern is designed to be beginner-friendly. The PDF tutorial provides clear, step-by-step instructions and diagrams to guide you through the process.
Q2: What yarn type is best for this throw?
Medium-weight yarn is recommended for the Peppermint Throw – Free Pattern. Soft, durable yarns like acrylic or cotton blends work well and provide comfort and warmth.
Q3: Can I change the colors of the peppermint design?
Absolutely! While traditional peppermint colors are red and white, you can customize the Peppermint Throw – Free Pattern with any color combination you like to match your home decor.
Q4: How long does it take to crochet this throw?
The time required depends on your experience and speed. Beginners may take a few days to a week, while experienced crocheters could finish it in a couple of days.
Q5: Can this pattern be adapted for different sizes?
Yes, the Peppermint Throw – Free Pattern is versatile and can be adjusted for baby blankets, lap throws, or larger bed-sized blankets by changing the foundation chain length.
Q6: How should I care for my finished throw?
Hand wash with gentle detergent, dry flat, and store in a cool, dry place to maintain the quality and shape of your Peppermint Throw – Free Pattern.
The Peppermint Throw – Free Pattern is a delightful crochet project that combines aesthetic appeal with practical use. By following the step-by-step instructions in the PDF tutorial, you can create a cozy, charming throw that will brighten any room. This pattern allows for creativity in color choices and provides valuable experience for both beginners and seasoned crocheters. Proper care will ensure your throw remains soft, beautiful, and functional for years to come.
We hope this guide helps you successfully complete your Peppermint Throw – Free Pattern. Please share your honest feedback and suggestions, as your input can inspire new ideas and improvements for future crochet patterns. Happy crocheting!


