
Hunter's Star Quilt Block - Quick & Easy Tutorial

How to Make Jeans Outfits with Patrón Step by Step is a practical, creative guide for anyone who wants to design, sew and style denim looks using a Patrón (sewing pattern) as the central tool.
In this article you’ll find a friendly, humanized walkthrough that blends technical sewing instructions with real-world jeans outfits styling advice so you can make garments that look great and fit well.
I’ll explain what Patrón means in a sewing context, how to choose or draft a jeans pattern, which materials and tools you’ll need, and step-by-step construction and styling tips so you go from paper to wearable denim.
This article is written with search engines and readers in mind: clear headings, repeated but natural use of the title phrase, and bolded keywords like jeans outfits, Patrón, jeans pattern, and denim styling for emphasis and scannability.
I’ll also explain each keyword so the post doubles as a mini-glossary for beginners. Whether you’re a sewist making custom denim for the first time or a stylist learning how to translate a Patrón into multiple jeans outfits, these steps will help you move confidently from idea to finished look.
Before we begin, a note on terminology: Patrón is commonly used by Spanish- and French-speaking sewists to mean a sewing pattern — the paper or digital template used to cut fabric pieces for a garment. At the same time, Patrón can appear as a brand or label in some fashion contexts, so when I say Patrón here I usually mean “pattern” (the template) unless I explicitly mention a brand. This dual usage is common in international sewing communities.
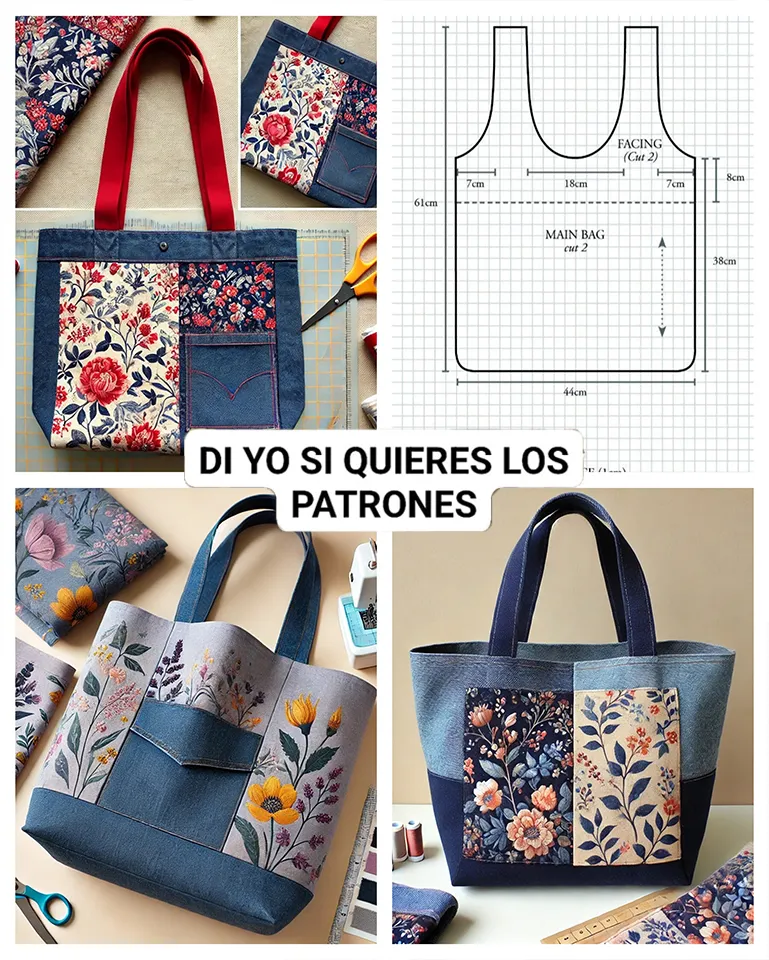
A Patrón (sewing pattern) is the 2D template that becomes the shape of a garment once cut and stitched — it includes pieces for the front and back, pockets, waistbands and other parts specific to jeans patterns. These templates encode sizing, seam allowances and construction lines so the sewers can assemble a professional-looking pair of jeans.
Jeans pattern types vary: classic five-pocket, high-waist, low-rise, wide-leg, skinny and shorts. Choosing the right jeans pattern is the first styling decision that affects how your jeans outfits will look — a cropped wide leg gives a very different silhouette than a slim high-rise. Knowing the silhouette you want is key before you cut your fabric.
When picking a Patrón, consider size grading and fit options: many modern patterns come with multiple sizes printed on layers or with digital layers you can toggle. That way you can trace only the size you need and reduce confusion. If you’re drafting your own Patrón, start from accurate body measurements and a basic pants block.
Fabric choice matters for jeans outfits: rigid denim behaves differently from stretch denim. Rigid (non-stretch) denim needs different ease in the jeans pattern and often a more structured waistband; stretch denim allows for closer fits and can hide small fit errors. Also pay attention to weight (oz per yard), as heavier denim is better for structured jackets and classic jeans, while lighter weight denim can be used for shirts and relaxed styles.
Tools and supplies you’ll need for working with a Patrón include: tracing paper or a printed digital pattern, rulers and curves, tailor’s chalk or fabric marker, heavy-duty needles for denim, topstitch thread, a strong zipper or button fly, rivets (optional), interfacing for waistbands and pocket facings, and an industrial or denim needle for your machine. Investing in the right tools improves the final jeans outfits quality significantly.
Understanding pattern markings — grainline, notches, darts, fold lines and seam allowances — is essential. When you follow a Patrón, these little symbols are the roadmap that tell you which pieces match and how to align them during construction. Learn to read those symbols before you cut fabric to avoid mistakes.
Start with accurate measurements: waist, hip, front rise, back rise, thigh, knee and desired length. Accurate numbers let you choose a Patrón size or alter one without guesswork. Use a flexible tape measure and measure while wearing similar undergarments to the ones you’ll pair with your finished jeans outfits.
If you buy a commercial jeans pattern, trace your size carefully and mark adjustments (lengthen/shorten lines, waist adjustments). If drafting your own Patrón, use a basic pants block and add jeans details: pocket bags, coin pocket, front fly extension and topstitch lines. Digital drafting tools and open-source pattern generators can help streamline this process.
Make a muslin or toile: cut the pattern in inexpensive cotton or drill to test fit. This mock-up lets you fine-tune the Patrón for real body shape — adjust the crotch curve, waist ease, or thigh width until the fit matches the silhouette you want for your jeans outfits.
Once the Patrón fits on the muslin, transfer alterations to the master pattern. Add construction marks such as pocket placement lines, bar tack points and topstitch lines; label each piece clearly. This step reduces mistakes when you cut fashion denim, which is less forgiving than muslin.
Cutting denim: lay the Patrón on folded fabric with proper grainline alignment, pin or weigh the pattern down, and use a sharp rotary cutter or denim shears. Mark notches and drill holes for rivets or bartacks if your design includes them. Keep seam allowances consistent with what the Patrón specifies.
Prepare pocket pieces and interfacing: pockets and waistband facings often need stabilizer or interfacing because denim can stretch or fray. Interface the wrong side of waistbands, fly shield pieces and pocket openings to maintain shape in your finished jeans outfits.
Begin assembly by sewing pockets first: attach pocket bags to the front pieces and secure pocket openings with bartacks or small topstitching. Proper pocket construction is a hallmark of professional jeans outfits.
Construct the fly (zipper or button fly): this is often the trickiest part of a jeans pattern. Follow the Patrón instructions closely, baste first, and test the closure before topstitching. Press every seam well as you go to get crisp edges typical of quality jeans outfits.
Join front and back legs at the inseam and outseam, finish raw edges with a serger or flat-felled seam for strength and that classic denim look. Flat-felled seams are durable and give a clean inside finish, elevating the perceived quality of your jeans outfits.
Attach waistband and belt loops, and add hardware: rivets at pocket corners, sturdy zipper or heavy buttons, and topstitch with a heavier thread for contrast. These little details define denim garments and give your jeans outfits professional polish.
Hem and finish: try the jeans on inside out to check length with your preferred shoes, then hem with either a blind hem or a visible chain stitch for authenticity. Press hems well and add a final topstitch to secure if needed.
Final touches: reinforce stress points with bartacks, add a leather or fabric label if desired, and launder the jeans according to fabric instructions before styling them into finished jeans outfits.
A well-made pair of jeans from your Patrón can be the base for many outfits. For a casual daytime look, pair your jeans with a simple tee, layered with a denim jacket or bomber — mixing textures and proportions creates interest while keeping the focus on fit. Use your jeans outfits silhouette (slim, relaxed, wide) to guide top choices.
To dress up denim, choose elevated pieces: a tailored blazer, silk blouse, or structured leather jacket. Heels or polished boots instantly pull a look together; the right accessories — belts, minimalist jewelry — transform your jeans outfits from casual to refined.
Seasonal styling: crop lengths and ankle hems work well in spring and summer with sandals or sneakers, while full-length and wide legs pair with boots and heavier layering in fall and winter. Consider lining or heavier denim for colder seasons so the jeans outfits remain comfortable.
Mixing washes: if you make multiple pairs from the same Patrón, vary washes (dark rinse, stonewash, black) to expand wardrobe possibilities. Darker washes read as more formal; lighter or distressed finishes read casual and relaxed.
Alterations for styling: small pattern tweaks — raising the rise, tapering the knee, or lengthening the inseam — let you customize the same Patrón to create a capsule of jeans outfits that share a consistent fit language across silhouettes.
Care and maintenance: proper washing and minimal drying retain denim color and shape, keeping all your homemade jeans outfits looking their best for longer. Follow fabric-specific care and avoid overwashing to preserve topstitching and hardware.
Q: What exactly does “Patrón” mean in sewing? A: Patrón is the Spanish/French-derived term commonly used for a sewing pattern — the paper or digital template that gives you the pieces to cut and assemble a garment. Patterns include markings and seam allowances to guide construction.
Q: Can I use a regular pants Patrón to make jeans? A: Yes, but jeans patterns usually include specific details (pocket bags, reinforced fly, heavier seam allowances) and design lines. You’ll often need to adapt a regular pants Patrón for denim by adjusting seam allowance, adding topstitching lines and reinforcing stress points.
Q: Are there free tools to create a custom Patrón? A: There are open-source and digital tools that help generate bespoke patterns and grade sizes; many sewists use these to create a personalized base Patrón before adding jeans details.
Q: What kind of denim should I buy for first attempts? A: For your first pair, choose a medium weight (10–12 oz) cotton denim with a small percentage of elastane if you want some stretch; this makes fitting more forgiving. For a classic rigid jean, pick non-stretch denim and expect a period of breaking in.
Q: How do I choose the right size in a commercial jeans pattern? A: Use your hip and waist measurements and the pattern’s size chart; trace the size that most closely matches your measurements and make a muslin to adjust fit points like crotch curve and rise before cutting your denim.
Q: Are there tutorials to learn complex steps like the fly? A: Yes — many pattern companies and sewing educators provide step-by-step video tutorials that visually explain fly construction and other technical steps, which can be very helpful when following a Patrón.
This guide to How to Make Jeans Outfits with Patrón Step by Step covered the meaning of Patrón (pattern), how to choose and alter a jeans pattern, the sequential steps to cut and sew denim, and practical styling advice so your handmade denim becomes wearable looks. You learned what to measure, how to test a Patrón with a muslin, how to construct critical elements like pockets and the fly, and how to style the finished pieces into multiple jeans outfits. If you try these steps, start with a single well-fitting Patrón, make a muslin, and gradually add details and finishes as your confidence grows.
Please leave an honest opinion below — tell me what worked for you, what you’d like explained in more detail, and any suggestions for future articles so I can make the next guide even more useful.


