
Crocheted house-shaped cookie for Christmas tree

If you are looking for a Waffle Stitch Crochet Tutorial, you’ve come to the right place. The waffle stitch is a popular crochet technique that creates a thick, textured fabric perfect for blankets, scarves, and even home décor items.
Whether you are a beginner or an experienced crocheter, learning this stitch can add a stunning, professional look to your projects. In this guide, we will take you step by step through the process, ensuring you can master the waffle stitch with confidence.
The Waffle Stitch Crochet Tutorial is designed to be easy to follow while giving you a solid understanding of the stitch’s structure. The beauty of the waffle stitch lies in its raised texture, created by working front post double crochets (FPDCs) alongside regular double crochets.
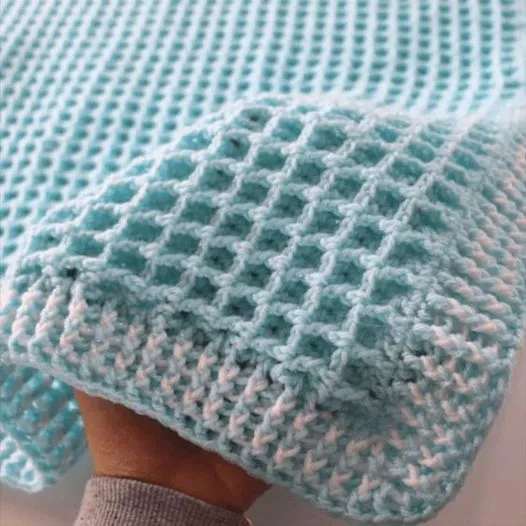
This combination produces a pattern that resembles a grid, giving your projects a cozy, dimensional feel. Many crocheters choose this stitch for baby blankets, dishcloths, and even cushion covers due to its softness and durability.
By following this Waffle Stitch Crochet Tutorial, you will also gain insight into pattern reading, stitch counting, and maintaining consistent tension. Each of these skills is essential not just for this stitch but for improving your overall crochet technique. Plus, having a go-to waffle stitch pattern in your skillset allows you to create beautiful, textured items that are both functional and decorative. Let’s dive into the details and start mastering the waffle stitch.
The waffle stitch is essentially a combination of double crochets and front post double crochets, which are strategically placed to create a raised, textured surface. This stitch pattern is often compared to the look of a waffle because of its grid-like, puffy design. One of the advantages of this stitch is its versatility; it works well for blankets, scarves, hats, and even textured bags.
To begin your waffle stitch crochet project, it’s important to understand the foundation chain and how your first row will establish the pattern. Typically, the stitch requires a multiple of three plus two additional chains. This formula ensures that the waffle texture forms consistently throughout your project. Using a smooth yarn can help make the texture stand out more prominently.
The height of the waffle stitch comes from using the front post double crochet, which involves inserting your hook around the post of the stitch in the previous row rather than the top loops. This technique pushes the stitch forward, creating the signature raised blocks. Practicing this stitch on a small swatch first can help you get comfortable with the movement.
Maintaining consistent tension is key when working the waffle stitch. Uneven tension can result in uneven blocks or a misshapen texture. Using the same yarn and hook size throughout your project ensures the fabric remains uniform.
Another essential aspect of this Waffle Stitch Crochet Tutorial is understanding how to read your stitches and count rows. Proper row counting prevents accidental pattern mistakes and helps you maintain the grid structure. Many crocheters use stitch markers to keep track of where each repeat starts.
Lastly, the waffle stitch is highly adaptable. You can make it more open and airy by using a larger hook or denser and cozier by using a smaller hook and thicker yarn. This flexibility allows you to customize your project according to your preference, whether for a lightweight shawl or a warm, plush blanket.
For this Waffle Stitch Crochet Tutorial, gathering the right materials is essential for a successful project. First, choose a soft, medium-weight yarn that highlights the textured pattern. Worsted-weight yarn is a popular choice for beginners because it is easy to handle and shows the stitch definition clearly.
A suitable crochet hook is equally important. Typically, a 5mm or 5.5mm hook works well with worsted-weight yarn. However, feel free to adjust the hook size depending on your tension and the type of yarn you choose. Using a slightly larger hook will create a softer, looser fabric, while a smaller hook will make the stitch firmer and more structured.
Other materials include a yarn needle for weaving in ends and stitch markers to help you keep track of pattern repeats. Having these tools on hand will make your waffle stitch project much easier and more enjoyable.
Many crocheters also recommend having a printed or digital version of the pattern handy, especially if you are following a specific tutorial. This allows you to reference instructions without disrupting your workflow. In our Waffle Stitch Crochet Tutorial, we’ll guide you through each row so you can work confidently without constantly checking notes.
Choosing the right workspace can also impact your experience. Adequate lighting and a comfortable seat help prevent hand strain and make it easier to see the textured pattern forming row by row.
Finally, patience and practice are part of the materials you bring into the project. The waffle stitch may take a few attempts to perfect, but the results are well worth it. Starting with a small swatch is an excellent way to build confidence before committing to a larger blanket or scarf.
Starting your Waffle Stitch Crochet Tutorial begins with a foundation chain. Remember, the chain should be a multiple of three plus two extra stitches. For example, a chain of 32 stitches works well for a small sample. This ensures your pattern repeats correctly across the row.
The first row usually consists of double crochets, establishing a solid base for the waffle texture. Turn your work at the end of the row, and prepare for the first set of front post double crochets in row two. This row is where the textured blocks start to emerge.
To work a front post double crochet, yarn over, insert your hook from front to back around the post of the stitch indicated, yarn over again, pull through, yarn over, pull through two loops, yarn over, pull through the remaining loops. This motion creates the raised texture characteristic of the waffle stitch.
Alternate rows of double crochets and front post double crochets to continue building the grid pattern. Each new row of front post stitches aligns with the previous row, forming neat squares that resemble a waffle. Consistent stitch height and tension are critical to maintain the pattern’s integrity.
As you continue the waffle stitch, count your rows carefully. Using stitch markers at the beginning of repeats can help you avoid mistakes and ensure a uniform texture. It’s normal for beginners to take extra time during the first few rows, but practice will speed up the process.
Finally, finishing your waffle stitch project involves weaving in the ends neatly and, if desired, blocking the piece to even out the texture. A properly blocked waffle stitch blanket or scarf looks professional and showcases the stitch’s beautiful depth.
Once you’ve mastered the basic Waffle Stitch Crochet Tutorial, you can experiment with variations to create unique textures. One option is to combine different yarn weights or colors to highlight the grid pattern. For example, alternating colors every two rows can create a visually striking effect.
Another tip is to adjust the hook size to achieve a different fabric density. A larger hook produces a soft, loose texture perfect for blankets, while a smaller hook makes the stitch more structured for bags or cushion covers.
You can also modify the waffle stitch by changing the stitch type. Using half-double crochets instead of double crochets results in a slightly denser and tighter fabric, which can be ideal for winter accessories.
Edge finishing is another area for creativity. Adding a simple single crochet border or a scalloped edge enhances the project’s appearance and gives it a polished look.
For a fun twist, try using textured yarns such as boucle or chenille. These yarns add extra depth to the waffle stitch and create a plush, luxurious feel.
Finally, consider combining the waffle stitch with other crochet patterns. Alternating sections with openwork stitches or cables can produce an intricate, multidimensional piece that’s sure to impress.
Q1: Is the waffle stitch suitable for beginners?
A1: Yes! While the waffle stitch involves front post double crochets, it is straightforward to learn with practice. Starting with a small swatch helps build confidence.
Q2: What type of yarn is best for waffle stitch projects?
A2: Medium-weight yarn, such as worsted-weight, works best to showcase the textured pattern. Soft, smooth yarn enhances the stitch definition.
Q3: Can I adjust the size of my waffle stitch blanket?
A3: Absolutely. Simply increase the number of foundation chains while keeping the multiple of three plus two formula. This allows you to make blankets of any size.
Q4: Do I need to block my waffle stitch projects?
A4: Blocking is optional but recommended for larger projects like blankets. It helps even out the texture and gives a polished finish.
Q5: Can I use colored yarns in the waffle stitch?
A5: Yes! Changing colors every few rows can create beautiful visual effects while maintaining the classic waffle texture.
Q6: What crochet hook size should I use for waffle stitch?
A6: Typically, a 5mm or 5.5mm hook works well with worsted-weight yarn, but you can adjust based on tension and desired fabric density.
This Waffle Stitch Crochet Tutorial has guided you through understanding, creating, and customizing the waffle stitch. From mastering front post double crochets to exploring variations and color combinations, you now have the tools to create beautiful, textured projects. Remember, practice and patience are key to perfecting this stitch.
We encourage you to try different yarns, hook sizes, and project types using the waffle stitch. Leave your opinion and suggestions below — we’d love to hear how your projects turned out and any tips you discovered along the way. By sharing your experience, you help others enjoy the wonderful world of waffle stitch crochet.


