
Crocheted house-shaped cookie for Christmas tree

The Amigurumi Eagle Pattern is an inspiring crochet project that combines artistry, patience, and imagination. Designed for makers who love creating symbolic and majestic creatures, this pattern lets you craft a proud bald eagle or any eagle species you prefer, all from yarn and fiber.
The pattern usually comes in a digital PDF format, offering instant access and detailed step-by-step instructions that guide you from the first stitch to the final feather.
What makes the Amigurumi Eagle Pattern so appealing is its balance between realism and charm. The finished eagle can serve as a decorative piece, a toy, or a thoughtful handmade gift that represents strength and freedom.
Amigurumi, the Japanese art of crocheting small stuffed figures, has taken the crafting world by storm, and this eagle design is a favorite among animal lovers and collectors.
Before diving into your project, it helps to understand what makes this pattern unique. From the choice of yarn to the details in shaping the wings and beak, every part of the Amigurumi Eagle Pattern tells a story of craftsmanship. You can customize colors, add accessories, or even modify the size depending on your experience and creativity.
To start your Amigurumi Eagle Pattern, gather the basic crochet materials and a few extras to give your eagle its lifelike appearance. Choosing the right supplies ensures smooth progress and a beautiful finish.
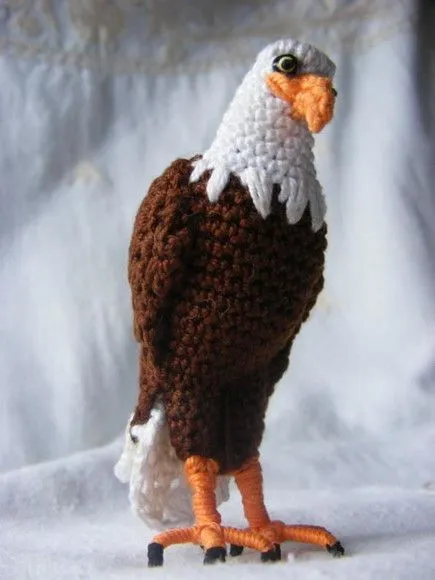
First, you’ll need a high-quality yarn suitable for amigurumi projects. Most makers prefer 100% cotton or a cotton-blend yarn, as it provides structure and durability. For a traditional bald eagle, select dark brown for the body, white for the head, yellow for the beak and feet, and black or dark gray for wing shading.
Next, pick the correct crochet hook size according to your yarn weight—usually between 2.0 mm and 3.5 mm. A smaller hook helps maintain tight stitches so the stuffing doesn’t show through. You’ll also need polyester fiberfill or another soft stuffing material to give your eagle its firm shape.
Other essential tools include stitch markers, a yarn needle, and safety eyes. Stitch markers keep track of rounds, while the yarn needle helps you sew parts together neatly. Safety eyes or embroidered eyes add personality—choose whichever suits your style.
Finally, have a pair of small scissors and possibly some wire if you want posable wings or legs. Though optional, flexible wire can help your eagle stand proudly or appear in flight, adding a dynamic touch to your finished amigurumi sculpture.
Every Amigurumi Eagle Pattern is divided into parts: the head, body, wings, tail, beak, and legs. Working section by section makes it easier to manage and ensures consistent stitch tension.
You’ll typically begin with the head and beak. These are worked in continuous rounds, often using the magic ring method to create a seamless start. Increase and decrease stitches shape the head, while color changes add detail around the face and crown. The beak, usually crocheted in yellow yarn, is attached separately to give depth and structure.
The body follows, and this section determines the overall size of your eagle. The pattern usually provides clear stitch counts per round so you can maintain symmetry. After completing the body, you’ll stuff it firmly before joining it to the head.
The wings are where artistry shines. They can be made flat or in layers, depending on how realistic you want the feathers to look. Some crocheters use gradient yarns or multiple shades of brown to create a natural transition, giving your eagle an authentic, feathered effect.
Next are the legs and claws. Because eagles are powerful birds of prey, these features are essential to capture strength. You can crochet the legs separately and attach them using strong stitches. A bit of wire inside helps the eagle stand upright, especially for display purposes.
Lastly, the tail feathers are created. A spread-out or layered tail adds character and realism. Once all parts are complete, you’ll assemble them with careful stitching and make any adjustments to proportions or posture.
Creating a realistic Amigurumi Eagle Pattern involves attention to proportion, color, and texture. Even simple details can make your design look more natural and polished.
Start with tight, consistent stitches. Amigurumi relies on firm, uniform tension to hold shape. Loose stitches can make the figure floppy or uneven. Practicing on small sample circles before beginning the actual eagle helps you find your best tension.
When it comes to color changes, always switch yarns cleanly to avoid visible gaps. Carrying the unused color inside your stitches keeps the inside neat and prevents loose strands. This is especially useful for defining the eagle’s white head and brown body transition.
To give your eagle expression, placement of the eyes is crucial. A slightly forward-facing position makes the bird look alert, while a sideways angle creates a softer or more whimsical appearance. You can experiment with embroidered eyebrows or small felt additions to personalize the design.
For wing detailing, consider adding surface crochet lines or layered feathers. These embellishments give dimension and motion. Lightly brushing the yarn surface with a soft toothbrush can even create a feathery texture without adding weight.
Blocking and shaping also enhance presentation. Once assembled, use steam or a damp cloth to smooth edges and set the final pose. If your eagle is meant to stand, ensure the base is balanced before the stuffing settles.
Finally, don’t forget to enjoy the process. Every amigurumi project teaches something new about texture, patience, and technique. Your eagle doesn’t have to be perfect—it just has to reflect your creativity.
The Amigurumi Eagle Pattern – PDF download offers several advantages for both beginners and professionals. Digital formats are convenient, eco-friendly, and easy to store, helping you organize your patterns without paper clutter.
A PDF pattern usually includes clear photos, stitch diagrams, and detailed written instructions. Many also provide tips for assembly, color selection, and adjustments for different yarn weights. Because you can zoom in on digital pages, it’s easier to see tiny stitches or symbols while you crochet.
Another benefit is instant access. The moment you purchase or download the Amigurumi Eagle Pattern, you can start crocheting. There’s no need to wait for shipping, making it ideal for spontaneous crafting sessions or workshops.
PDF patterns are also portable. You can store them on your phone, tablet, or laptop and carry them wherever you go. If you prefer physical copies, printing a few pages or the whole file is simple and inexpensive.
Additionally, digital patterns often receive updates or corrections directly from the designer. That means you’ll always have the latest version, complete with any improvements or extra features added over time.
Finally, supporting pattern designers by purchasing legitimate Amigurumi Eagle Patterns helps sustain the creative community. Independent creators invest time and skill into crafting accurate instructions, and downloading directly from them keeps new designs coming.
1. Is the Amigurumi Eagle Pattern suitable for beginners?
Yes! While it includes multiple parts, the pattern is usually designed with clear instructions and photos. Beginners can start slowly, learning increases, decreases, and color changes along the way.
2. What kind of yarn works best?
Cotton or cotton-blend yarn is recommended for structure and durability. Acrylic yarn also works if you prefer a softer texture or lighter finish.
3. Can I adjust the size of my eagle?
Absolutely. Use thicker yarn and a larger hook for a bigger eagle, or thinner yarn and a smaller hook for a miniature version.
4. How long does it take to complete the project?
Depending on your crochet speed, it can take anywhere from 6 to 15 hours to finish, including assembly and detailing.
5. Can I sell eagles made from this pattern?
Most designers allow sales of finished items if you credit the pattern creator, but always read the copyright note included in your PDF file.
6. How do I clean or maintain my crochet eagle?
Hand-wash gently with mild soap and air-dry. Avoid machine washing, as the stuffing can lose shape.
7. Are there variations of the Amigurumi Eagle Pattern?
Yes. Some patterns depict realistic bald eagles, while others use cartoon-style proportions or colorful fantasy versions.
8. Do I need to use wire for structure?
Wire is optional. It helps create poseable wings or legs, but you can achieve good results without it by stuffing firmly.
9. How can I make my eagle stand upright?
Ensure even stuffing in the legs, or add a small weighted base using pellets or a flat stone wrapped in fabric inside the body.
10. Where can I find community support for this project?
Many crocheters share tips on crafting forums and social media groups. Joining these communities can boost your skills and confidence.
The Amigurumi Eagle Pattern is more than a crochet guide—it’s a creative journey that blends skill, imagination, and cultural symbolism. From the careful choice of yarn to the last stitch on the tail feathers, every part of this project celebrates craftsmanship and attention to detail. Whether you download the PDF pattern for personal enjoyment or to create handmade gifts, you’ll gain satisfaction from seeing your yarn transform into a majestic symbol of freedom and grace.
If you’ve ever dreamed of crocheting something meaningful, start with the Amigurumi Eagle Pattern. It’s accessible, educational, and endlessly customizable. Once you’ve completed your eagle, share your results and leave your honest opinion and suggestions—your feedback helps inspire more beautiful designs for the amigurumi community.
By following this pattern, you will learn how to shape body parts, attach wings and beak, and combine various techniques to achieve a balanced and proportionate design.


