
Crocheted house-shaped cookie for Christmas tree

The Wiggly Crochet Rug is one of the most creative and textured crochet projects that crafters love to make. Its unique, three-dimensional design creates waves and curves that seem to move right across the surface—hence the name wiggly.
The wiggly crochet rug combines functionality with style, making it an ideal project for crochet enthusiasts who want to experiment with texture and color while crafting something useful for their home.
One of the best things about a wiggly crochet rug is its versatility. It can be made in any shape—round, rectangular, or even heart-shaped—using different yarn weights and color combinations.
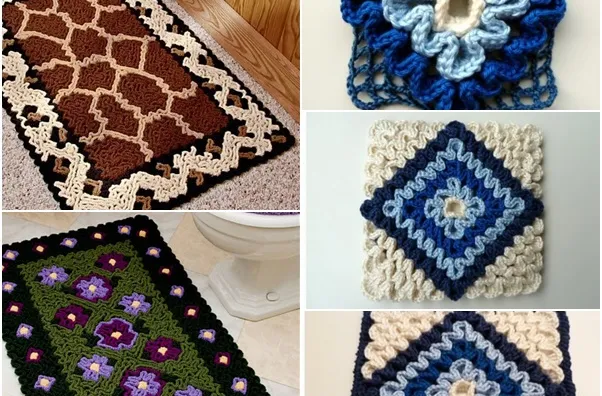
The technique involves crocheting raised ridges on a base grid, creating a sculpted, wavy surface that feels plush and inviting underfoot. Whether you’re looking for a fun project to upgrade your home décor or a thoughtful handmade gift, this rug is both practical and eye-catching.
Creating a wiggly crochet rug allows you to explore your creativity while practicing important crochet skills such as tension control, color changes, and shaping. It’s also a great way to use up leftover yarn from previous projects, giving your rug a colorful, patchwork-like personality. In this article, we’ll explore what makes this pattern so special, the materials you’ll need, step-by-step guidance, styling ideas, and answers to common questions about wiggly crochet.
The wiggly crochet rug stands out for its distinctive texture. Unlike traditional flat crochet projects, this design creates raised loops and swirls that almost seem alive. The technique gives the rug a three-dimensional surface that adds depth and a cozy tactile feel. When placed on the floor, it brings instant warmth and visual interest to your space.
One reason this pattern is so beloved is its adaptability. You can choose from a wide range of yarns, from soft cotton blends to sturdy acrylic fibers, depending on the look and function you want. Thicker yarns will create a chunkier, more cushioned rug, while thinner ones result in a delicate, detailed texture. Many crafters enjoy experimenting with bright, contrasting colors that make the pattern “pop.”
Another unique feature is how customizable the pattern is. Because the wiggly crochet method is based on a grid, you can easily adjust the size to fit your space. Small versions work perfectly as bath mats or table accents, while larger ones make excellent area rugs for living rooms or nurseries. You can even crochet matching coasters or pillow covers to coordinate your décor.
This pattern also has a fascinating visual rhythm. The curves and waves resemble rippling water or flowing honeycombs, depending on your color choices. It’s one of those projects that looks complex but can actually be made with basic crochet stitches once you learn the technique. Beginners can start small, while advanced crocheters can experiment with intricate designs and color gradients.
In addition to being beautiful, the wiggly crochet rug is practical. Its layered texture gives extra cushioning, making it comfortable to walk on. It’s also durable, easy to wash, and resistant to wear—especially when crafted with the right yarn and stitch density. The finished rug will last for years with proper care, becoming a beloved handmade piece in your home.
Lastly, this project is a wonderful way to experience mindful crafting. The repetitive motions and rhythmic pattern are relaxing, helping reduce stress while keeping your hands busy. It’s a satisfying blend of art and therapy that results in something tangible and functional.
Before beginning your wiggly crochet rug, gather all the necessary materials. Having everything prepared will make your crocheting smoother and more enjoyable.
First, you’ll need yarn. The choice of yarn affects both the appearance and durability of your rug. Cotton yarns are a popular choice because they are sturdy, absorbent, and easy to wash. Acrylic yarns are another good option—they’re affordable, soft, and come in a wide range of colors. For a more luxurious touch, you can mix yarn types or use a bulky wool blend for extra softness.
You’ll also need a crochet hook that matches your yarn weight. Usually, a larger hook is recommended to maintain flexibility and make the rug less stiff. Check the yarn label for the suggested hook size, but don’t hesitate to adjust depending on your tension and preference.
Another essential item is a base grid, which can be crocheted using double crochet or treble crochet stitches in a square or rectangular shape. This grid will serve as the foundation where you’ll later build your wiggly design.
A pair of scissors, tapestry needle, and stitch markers will also come in handy. Stitch markers help you track pattern repeats, especially when working with multiple colors. A tapestry needle is essential for weaving in ends neatly and securing loose threads.
For larger rugs, consider using a non-slip rug backing. This can be attached to the underside of your rug to prevent it from sliding on smooth surfaces. Safety and stability are important, especially if the rug is used in high-traffic areas.
Finally, prepare your color palette. Choose hues that complement your interior décor or express your personality. Some people prefer pastel shades for a calm look, while others use bold, contrasting tones for an artistic flair.
Making a wiggly crochet rug may look complicated, but it’s easier than it seems once you understand the process. It’s all about layering and shaping.
Start by creating the base grid. This foundation is typically made using double crochet stitches worked in rows or rounds. Keep your stitches consistent, as this will determine the evenness of your final design. The grid pattern—usually alternating spaces and stitches—will later guide where the raised loops go.
Next, use different colors to crochet the raised “wiggles” on top of the base. You’ll work in the front loops only, creating soft ridges that stand out. The placement of these ridges forms the wavy texture characteristic of wiggly crochet. Beginners might want to start with simple wave lines, while more advanced crafters can attempt swirls or floral shapes.
Keep your tension even to ensure that the rug lays flat without curling. Uneven tension can distort the design or cause unwanted bumps. If you notice this happening, simply adjust your hook size or redo a few stitches to balance it out.
When your rug reaches the desired size, secure all ends by weaving them into the back of the work. This step is important for durability and helps prevent unraveling. You can also block your finished piece—lightly wet it, shape it, and let it dry flat—to achieve a professional finish.
Finally, if you plan to use your rug on tile or wood floors, attach a non-slip backing. You can sew it directly or use adhesive options. This ensures your beautiful handmade rug stays in place safely.
Once complete, take a moment to admire your work. Each wiggly crochet rug is a unique piece of art that reflects the maker’s creativity and patience.
A wiggly crochet rug can instantly transform any space. Its textured pattern adds depth and character, making it a perfect centerpiece for living rooms, bedrooms, or cozy reading nooks. For small bathrooms, mini versions work well as bath mats, while larger ones add warmth beside the bed or under a coffee table.
The best part of styling this rug is its color flexibility. You can create neutral tones for a minimalist look, or choose bright hues for a cheerful, modern feel. Multicolor designs are especially eye-catching and can tie together other elements in your home décor.
To keep your rug looking new, proper care and maintenance are essential. Vacuum it regularly using a soft brush attachment to remove dust and debris. If it gets stained, gently hand wash with mild detergent and cold water. Avoid wringing or twisting, as this can damage the raised loops. Always lay it flat to dry.
You can also refresh your rug occasionally by re-blocking it. This helps it maintain its shape, especially if it’s been in use for a while. Wool yarns may need a little more attention due to their tendency to stretch, but acrylics generally hold their form well.
Finally, if you love crafting, consider making seasonal versions of your wiggly crochet rug. Soft pastels for spring, bold warm colors for autumn, or festive shades for winter—all can bring fresh energy to your home décor year-round.
1. What is a wiggly crochet rug?
A wiggly crochet rug is a handmade floor covering created using raised crochet stitches arranged in wavy or spiral patterns. It’s known for its 3D texture and vibrant designs.
2. Is this project beginner-friendly?
Yes! While it looks complex, the basic stitches are simple enough for motivated beginners. Starting with a small version helps build confidence.
3. What yarn is best for a wiggly crochet rug?
Cotton or acrylic yarns work best. Cotton provides strength and structure, while acrylic adds softness and color variety.
4. Can I make different shapes?
Absolutely! The technique can be adapted to round, square, or even irregular shapes. Simply adjust your base grid accordingly.
5. How do I stop my rug from slipping?
Attach a non-slip rug pad or backing underneath. This ensures your rug stays secure, especially on tile or wooden floors.
6. Can I machine wash my rug?
If you use washable yarns like cotton or acrylic, you can machine wash on gentle cycle. Always check the yarn label for specific care instructions.
7. How long does it take to make one?
It depends on size and complexity. A small rug may take a weekend, while a large one might require several weeks of part-time work.
The wiggly crochet rug is a delightful way to combine art, texture, and functionality. With its flowing lines and raised design, it turns an everyday object into a handmade masterpiece. Whether you make it for yourself or as a gift, each stitch adds personality and charm.
This article showed you how to start, what materials to use, and how to care for your finished piece. Now it’s your turn to bring your own creativity to life—grab your yarn, choose your colors, and start your wiggly crochet rug today!
If you found this guide helpful, share your thoughts and experiences below. Your honest opinion and suggestions help inspire more crafters to discover the joy of handmade design.


