
Hunter's Star Quilt Block - Quick & Easy Tutorial

The Double Four Patch Quilt Block Tutorial is one of the best ways to learn traditional quilting while building a strong foundation in fabric cutting, piecing, and design balance.
This timeless block pattern combines classic geometry with a modern twist, making it both beginner-friendly and endlessly customizable. In this guide, we’ll walk through every stage of creating your own Double Four Patch Quilt Block, from understanding its layout to assembling it with precision.
The Double Four Patch is an ideal pattern for quilters who love order, repetition, and clean design. It consists of small and large squares arranged in a way that creates a secondary pattern when blocks are joined together.
The beauty of this design lies in its simplicity — just two different fabric values can form a striking quilt top. Whether you plan to make a full quilt or a small sampler, this tutorial gives you all the information you need to get started.
Another reason this pattern is so popular is that it works beautifully with leftover fabric scraps. The Double Four Patch Quilt Block Tutorial encourages sustainable quilting by making use of small pieces that might otherwise be wasted. You can experiment with contrasting tones, or use subtle variations for a soft, blended look. No matter what fabric palette you choose, the result is guaranteed to be visually pleasing and full of character.
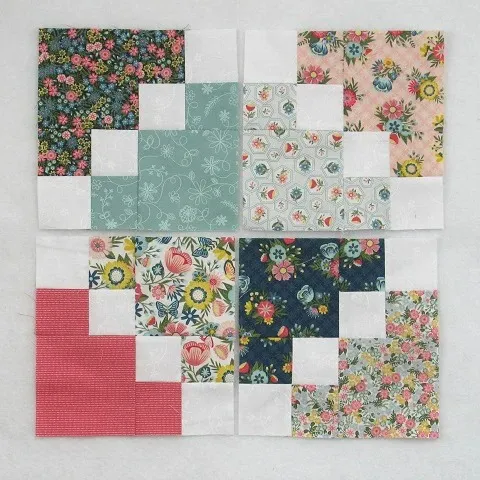
The Double Four Patch Quilt Block is composed of two smaller Four Patch units combined with larger background squares. Each small Four Patch block uses four equal squares sewn together, while the larger units provide space that highlights the patchwork design. When multiple blocks are joined, the pattern creates a checkerboard-like effect that’s clean, modern, and perfectly balanced.
This layout provides both flexibility and visual rhythm. The alternating squares create a sense of movement across the quilt top, drawing the eye from block to block. Quilters love this pattern because it’s easy to sew yet produces professional results. Even beginners can master it quickly while practicing accuracy in cutting and stitching.
What makes this pattern even more appealing is that it can be adapted to almost any quilt size. You can make tiny blocks for miniature quilts or large ones for quick bed-sized projects. The Double Four Patch Quilt Block Tutorial helps you learn how to calculate fabric measurements for any scale, giving you the confidence to experiment freely.
You can also choose between traditional color schemes or bold, modern palettes. A classic look might use light and dark neutrals, while a contemporary version could feature bright solids or prints. The possibilities are endless, and each combination tells its own creative story.
Before you begin, gather all your materials. For each Double Four Patch Quilt Block, you’ll need two main fabrics — one light and one dark (or contrasting colors). The light fabric will typically form the background, while the darker one defines the smaller Four Patch units.
You’ll need:
Press your fabric before cutting to remove any wrinkles that could affect accuracy. Then, use your rotary cutter to cut strips or squares of the desired size. Many quilters prefer to work with 2.5-inch strips for smaller blocks, but you can easily adjust the size based on your project’s scale.
Keeping your cutting precise is key to success. Each piece should measure exactly the same to ensure that seams align perfectly later. Even a small difference can affect how the blocks fit together. Accuracy is the secret behind a crisp, professional-looking quilt top.
Finally, keep your workspace organized. Label each group of squares according to fabric and size. This will save time during the piecing stage and reduce confusion, especially if you’re working with multiple color combinations.
Now that your fabric pieces are ready, it’s time to start sewing the Double Four Patch Quilt Block. Begin by creating two small Four Patch units. Arrange four small squares — two of each fabric — in alternating positions to form a checkerboard pattern. Sew them together in pairs, pressing the seams toward the darker fabric. Then, join the two rows to complete each unit.
Once your small Four Patch units are finished, arrange them with the larger background squares to create the Double Four Patch layout. The smaller patchwork sections will sit diagonally from each other, with the large squares filling the remaining spaces. Check that the dark and light fabrics alternate correctly before stitching.
Sew the units together in rows, then join the rows to complete your block. Press all seams flat, and square up the block to the correct size if needed. You now have a finished Double Four Patch Quilt Block that’s ready to be added to your quilt top.
If you’re making multiple blocks, it’s best to sew them assembly-line style. This means completing each step for all blocks before moving to the next. For example, chain piece all your small squares, then press them, then join them into units. This method saves time and ensures consistency throughout your quilt.
You can also experiment with seam pressing directions. Some quilters like to press seams open for a flatter finish, while others press to one side for added strength. Choose whichever technique feels most comfortable for your workflow.
Finally, check your block alignment by laying several blocks together on a flat surface. The repeating pattern should flow naturally, creating a unified design. Adjust colors or fabric placement as needed before sewing your full quilt top.
The Double Four Patch Quilt Block is incredibly versatile. You can make endless variations by changing the fabric placement, scale, or color scheme. For example, try using bold, bright fabrics for a contemporary aesthetic, or soft pastels for a baby quilt. You can also incorporate patterned prints instead of solids for a more dynamic look.
Another creative idea is to alternate light and dark backgrounds between blocks. This creates a striking visual rhythm when the quilt is assembled. You can also rotate blocks in different directions to form secondary patterns such as diagonal chains or X-shapes across the quilt.
Scrappy versions of the Double Four Patch are very popular. They let you mix fabrics from different collections, making each block unique. Using leftover strips from previous projects adds sentimental value and reduces waste, embodying the sustainable side of quilting.
You can further personalize your quilt by adding sashing between the blocks or framing each one with contrasting borders. These simple adjustments help define each block and give your finished quilt a more structured appearance.
Don’t forget to think about the quilting itself. Straight-line quilting enhances the geometric design, while free-motion quilting adds softness and flow. The choice of thread color can also highlight or blend with your fabrics, depending on the effect you want.
Most importantly, enjoy the creative process. The Double Four Patch Quilt Block Tutorial isn’t just about sewing; it’s about experimenting, learning, and creating something meaningful with your own hands.
1. What size should my Double Four Patch Quilt Block be?
The block size depends on your project. Common finished sizes are 8″, 10″, or 12″. You can scale the squares up or down to adjust.
2. Is the Double Four Patch good for beginners?
Yes! It’s perfect for beginners because it uses basic straight-line sewing and simple cutting. You’ll gain confidence while learning essential quilting skills.
3. Can I make this block using scraps?
Absolutely. The pattern is scrap-friendly and works beautifully with leftover fabrics from previous projects.
4. What type of fabric works best?
100% cotton quilting fabric is ideal. It’s easy to cut, sew, and press, and it holds its shape well through multiple washings.
5. How many blocks do I need for a full quilt?
That depends on your desired quilt size. For a lap quilt, 25–30 blocks may be enough; for a queen or king, you might need 49 or more.
6. Should I press seams open or to one side?
Both methods work. Pressing to one side strengthens the seams, while pressing open reduces bulk. Choose based on your preference.
7. Can I make a Double Four Patch using pre-cut fabrics?
Yes! Jelly rolls or charm packs are great options. Just adjust your cutting measurements to match the pre-cut sizes.
8. How do I make sure my points line up?
Accurate cutting and a consistent seam allowance are key. Pin intersections carefully before stitching to keep seams aligned.
The Double Four Patch Quilt Block Tutorial offers a timeless pattern that’s both easy to learn and deeply satisfying to sew. With its simple geometry and elegant balance, this block is perfect for beginners and experienced quilters alike. You can create endless variations by experimenting with color, layout, and size, making each quilt uniquely yours.
By following the steps in this guide, you’ve learned how to cut, piece, and assemble your blocks with confidence. Whether you choose to make a small wall hanging or a full-sized quilt, the result will be a beautiful handmade piece that reflects your creativity and care.
Have you tried making a Double Four Patch Quilt Block before? Share your honest opinion and suggestions — your experience might inspire other quilters to start their own project!


