
Hunter's Star Quilt Block - Quick & Easy Tutorial

The God’s Eye Quilt Block – Free Tutorial is a creative and meaningful quilting project that blends geometry, color, and symbolism into one captivating design.
Inspired by the ancient “Ojo de Dios” symbol—representing protection, vision, and spiritual awareness—this quilt block offers both visual beauty and a touch of cultural storytelling.
For quilting enthusiasts, the God’s Eye Quilt Block provides a chance to practice precision piecing, experiment with bold color combinations, and produce a stunning result that’s as symbolic as it is decorative.
This free tutorial allows crafters to learn step-by-step how to design, cut, and piece together the iconic diamond-shaped block. Since it’s a digital guide, it’s perfect for beginners and experienced quilters alike. You can download the instructions, print them out, and get started right away.
The God’s Eye Quilt Block – Free Tutorial is not only an easy-to-follow pattern but also a wonderful way to enhance your quilting skills and expand your pattern library.
Whether you plan to use this block as part of a larger quilt, a wall hanging, or even a cushion cover, the God’s Eye design brings elegance and depth to any project. Its symmetry and striking visual balance make it a timeless choice that fits both traditional and modern quilting aesthetics. Let’s explore what makes this pattern so unique and how you can bring it to life in your own sewing space.
The God’s Eye Quilt Block is more than just a geometric shape—it’s a design rooted in centuries of spiritual symbolism. Traditionally, the “Ojo de Dios” (translated as “Eye of God”) originated from the Huichol and Tepehuan people of Mexico. It was woven using yarn and sticks as a way to bless children and protect them from harm. When quilters adopt this motif, they’re not only creating a beautiful piece of fabric art but also connecting with a cultural tradition of faith and mindfulness.
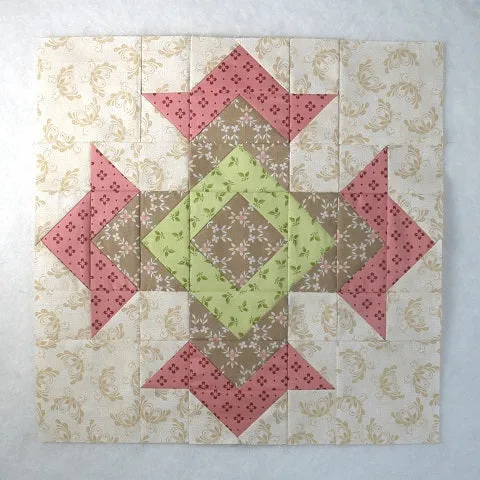
In quilting, this symbolic eye is recreated through triangles and diamonds that radiate from the center, often representing vision, wisdom, and unity. The structure of the God’s Eye Quilt Block is ideal for those who appreciate symmetry and crisp lines. It also offers the flexibility to play with color gradients, fabric contrasts, or even subtle tone-on-tone palettes.
The pattern’s name isn’t just spiritual—it reflects the way the design draws the viewer’s attention toward the center, creating an illusion of depth. It’s a mesmerizing block that invites both the maker and observer to “look deeper,” making it especially appealing in modern quilt compositions.
If you’re new to quilting, this is an excellent project to start with because it helps you develop essential cutting and piecing skills while also teaching the importance of color harmony. The God’s Eye Quilt Block – Free Tutorial guides you through every step with precision and clarity, ensuring your finished piece looks professional and aligned.
For experienced quilters, it’s an opportunity to experiment with fabric placement and bold designs. You can create stunning visual effects by alternating dark and light fabrics, resulting in a quilt that seems to shimmer with energy.
In essence, the God’s Eye Quilt Block bridges art, tradition, and emotion—a combination that makes quilting such a rewarding and meditative craft.
Before starting the God’s Eye Quilt Block – Free Tutorial, gather all the materials and tools you’ll need to make the process smooth and enjoyable. Preparation is key to successful quilting, and having everything ready will make each step flow naturally.
Once you have your supplies ready, it’s time to start cutting your fabric according to the measurements provided in the God’s Eye Quilt Block – Free Tutorial. Always double-check your measurements before cutting, as precision is crucial to maintaining symmetry.
It’s also helpful to lay out your fabric pieces on a design board before sewing them together. This step allows you to visualize the final pattern and make adjustments to color balance or orientation.
The God’s Eye Quilt Block looks particularly striking when you use gradient tones or complementary colors. For example, combining deep blues with golds or reds with creams creates an elegant visual contrast that brings the block to life.
As with any quilting project, patience and consistency are key. Take your time aligning seams and pressing each piece—it will make a noticeable difference in the final look.
Now comes the fun part: constructing the God’s Eye Quilt Block. Follow these steps carefully to achieve a perfect finish every time.
This pattern is known for its sharp, clean lines and its visually hypnotic center. With just a few color variations, you can completely transform the mood of your quilt—from bright and modern to warm and rustic.
Remember that quilting is an art form as much as a craft. There’s no single “right” way to choose your colors or arrangement—the goal is to create something that feels beautiful and personal to you.
Once you’ve mastered the God’s Eye Quilt Block, there are endless ways to incorporate it into other projects. This versatile block can stand alone or become part of a larger piece.
You can create a mini quilt by repeating the block in different colorways or combine several into a bold wall hanging. The diamond shape naturally draws attention, making it perfect for a centerpiece or statement piece.
Another idea is to use the God’s Eye design for a pillow cover, where its symmetry becomes a striking focal point in home décor. For larger projects, alternating the block with simpler ones (like squares or half-square triangles) can create an interesting rhythm throughout your quilt top.
The God’s Eye Quilt Block – Free Tutorial also provides a great opportunity to practice fabric contrast. Try mixing solids with patterned fabrics, or experiment with light-to-dark gradients to give your design depth.
Some quilters even use metallic or textured fabrics in the center to enhance the “eye” illusion and catch the light beautifully.
Lastly, this pattern is wonderful for gifts. A handmade quilt or pillow featuring the God’s Eye block is meaningful, symbolic, and visually impressive—making it a perfect keepsake for friends and family.
1. What size is the God’s Eye Quilt Block?
The size can vary depending on the tutorial you follow, but most versions range from 8 to 12 inches square. You can easily scale it up or down by adjusting fabric measurements.
2. Is the God’s Eye Quilt Block good for beginners?
Yes! The God’s Eye Quilt Block – Free Tutorial is beginner-friendly. It teaches basic piecing, trimming, and pressing techniques without being overly complicated.
3. Can I use scraps for this pattern?
Absolutely. This block is ideal for using up leftover fabric pieces. Just make sure the colors contrast enough to highlight the central design.
4. How long does it take to make one block?
Most quilters can complete one block in about an hour or two, depending on their experience and setup.
5. What type of fabric works best?
100% cotton quilting fabric is recommended for its durability and ease of use. Avoid fabrics that stretch too much, as they can distort the shape.
6. Can I combine this block with others?
Yes. The God’s Eye Quilt Block pairs beautifully with solid blocks, star designs, or modern geometric layouts.
The God’s Eye Quilt Block – Free Tutorial offers a perfect blend of artistry, symbolism, and creativity. It’s a pattern that’s easy enough for beginners but still satisfying for experienced quilters looking to refine their skills. With its bold lines and captivating symmetry, the God’s Eye Quilt Block brings beauty and meaning to every stitch.
By following this guide, you’ve learned how to choose fabrics, assemble your block, and explore creative uses for the design. Now it’s your turn to bring this timeless pattern to life.
If you enjoyed this tutorial, please share your thoughts, feedback, and suggestions. Your opinion helps inspire new quilters and keeps the spirit of creativity alive in our community!


