
Crocheted house-shaped cookie for Christmas tree

The Crochet Shell Pattern Tutorial is one of the most timeless and versatile guides you can follow to create beautiful, textured designs using simple crochet techniques.
The shell stitch, known for its elegant curves that resemble seashells, brings a delicate and classic charm to blankets, scarves, shawls, baby clothes, and even home décor projects.
This tutorial is designed for beginners and experienced crocheters alike, offering easy-to-follow steps to help you master the pattern while unleashing your creativity.
If you’re looking to add texture, dimension, and sophistication to your crochet work, learning the crochet shell stitch pattern is an excellent choice.
The stitch is simple yet visually captivating, making it perfect for both simple accessories and elaborate projects. With this Crochet Shell Pattern Tutorial, you’ll gain the confidence to create cozy and eye-catching items that showcase your skill and personal style.
One of the best things about this technique is its adaptability. You can easily adjust the size, yarn type, or color palette to fit your desired project. The shell stitch pattern works beautifully with cotton yarns for summer projects or thicker wool for cozy winter blankets. In this tutorial, we’ll explore how to create the pattern step-by-step, its variations, and tips to make your crochet work stand out.
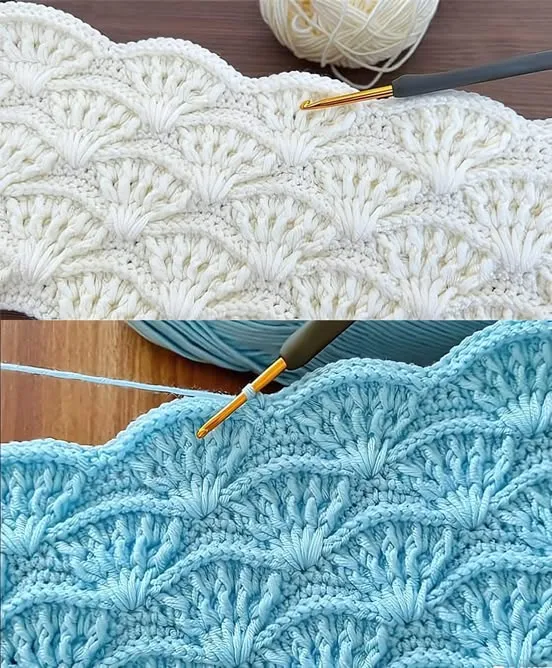
The crochet shell pattern is a stitch design that uses groups of stitches (usually double crochets) worked into the same stitch or space to form a shell-like curve. This creates a beautiful, scalloped texture that’s both elegant and versatile. It’s one of those patterns that can instantly transform a basic crochet project into something extraordinary.
The classic shell pattern typically consists of five double crochets worked into one stitch or space, but variations exist with three, four, or even seven stitches per shell. This makes it easy to adapt depending on the project’s texture or density. The pattern repeats evenly across the row, creating a soothing rhythm as you work.
The crochet shell stitch has been around for generations, loved by crocheters for its timeless beauty. Whether used for baby blankets, cushion covers, or decorative borders, it never goes out of style. It’s also perfect for combining colors — alternating yarn shades between rows can give the appearance of layered seashells or waves.
Another reason this pattern remains a favorite is that it’s easy to memorize. Once you’ve completed a few rows, you’ll find yourself naturally following the flow without constantly referring to a pattern chart. It’s a relaxing and rewarding stitch to add to your crochet repertoire.
Learning the Crochet Shell Pattern Tutorial starts with mastering the basics. You’ll only need to know a few fundamental stitches: the chain stitch, double crochet, and slip stitch. These are all simple techniques that build upon one another to form the classic shell look.
Start by creating a foundation chain. The number of stitches in your chain will depend on your desired project width, but it’s best to work in multiples of six plus one for symmetry. Once your chain is ready, you can begin your first row.
In the second row, skip two chains and make five double crochets into the next chain. This group forms your first shell. Skip two more chains, then work a single crochet into the next stitch to anchor your shell. Repeat this pattern across the row: skip two chains, make five double crochets into the next chain, skip two, then single crochet. By the end of the row, you’ll see a beautiful wavy texture forming.
In the next row, you’ll begin each shell above the single crochets from the previous row. This alternating alignment creates the signature overlapping pattern that gives the crochet shell stitch its elegant texture. As you continue, you’ll start to see how naturally the pattern flows together.
The best part about the Crochet Shell Pattern Tutorial is its flexibility. You can experiment with different yarn weights, hook sizes, and color combinations to achieve unique results. For beginners, lighter-colored yarns are ideal since they make it easier to see your stitches clearly.
The crochet shell pattern isn’t limited to one design — it offers countless creative variations. Once you’ve mastered the basic form, you can modify the stitch count, spacing, and color sequence to create different textures and effects. These variations are what make the shell pattern a favorite among both traditional and modern crocheters.
One popular variation is the fan shell stitch, where larger shells are created by adding extra double crochets to each group. This creates a more dramatic, wave-like texture that’s perfect for statement pieces like shawls or throws. Another version, the v-shell stitch, combines the shell with a V-shaped pattern, creating an airy and lace-like appearance ideal for summer garments.
If you’re into colorwork, alternating yarn shades between rows produces stunning visual effects. Imagine soft pastel stripes or bold contrasting hues, each shell row building a rhythm of colors reminiscent of ocean waves or blooming petals. The crochet shell pattern adapts beautifully to both subtle and vibrant color palettes.
The pattern also works wonderfully for edging and borders. Adding a shell stitch trim to blankets, towels, or pillowcases gives them a handcrafted elegance that looks professionally made. You can even use mini-shell variations for baby clothes or decorative accessories.
With this Crochet Shell Pattern Tutorial, your imagination is the limit. Once you understand the basic technique, you can create endless designs — from cozy afghans and boho-style bags to delicate lacy tops. The shell stitch opens the door to countless crochet possibilities.
Perfecting your crochet shell pattern takes a bit of practice, but once you master the rhythm, it becomes second nature. Here are a few expert tips to help you achieve consistent and beautiful results in your projects.
First, maintain consistent tension throughout your work. The shells rely on even stitch height to maintain their symmetry, so try to keep your yarn movement steady. Uneven tension can make your shells look uneven or bunched up. Practicing a few rows before starting your main piece will help you adjust your hand movement and yarn tension.
Second, pay attention to your stitch count. Missing a stitch or skipping one too many spaces can throw off the alignment of the shells. Count carefully at the end of each row to ensure your pattern remains balanced and uniform.
Third, use stitch markers if you’re new to crocheting. Marking the start or end of each shell cluster will help you keep track of your rows and make the process more manageable. It’s especially useful for larger projects like blankets or shawls.
Blocking your finished piece is also a great way to enhance the final look. After completing your project, lightly dampen it and pin it flat to shape the shells evenly. This will give your work a clean, polished appearance.
Finally, don’t be afraid to experiment. The Crochet Shell Pattern Tutorial encourages creativity, so play with different yarn textures—like combining cotton with metallic threads or adding a touch of mohair for a soft halo effect. Every small change gives your work a unique personality.
1. Is the crochet shell stitch good for beginners?
Yes! The crochet shell pattern is one of the best stitches for beginners because it only requires basic crochet skills—chain, single crochet, and double crochet. Once you get into the rhythm, it’s easy and relaxing to make.
2. What can I make with the shell stitch?
You can create a wide range of items including blankets, scarves, shawls, tops, cushion covers, and even decorative borders. It’s also ideal for baby projects because of its soft, textured appearance.
3. What type of yarn works best for shell stitch patterns?
The shell pattern works beautifully with most yarn types. For clear stitch definition, cotton and acrylic yarns are great choices. For a cozier effect, use wool or blends with a bit of stretch.
4. Can I change colors between shell rows?
Absolutely! Color changes between rows create a stunning striped effect. Use contrasting or complementary shades to highlight the shell shapes and make your design pop.
5. How can I make my shells look even and neat?
Maintaining consistent tension, counting your stitches carefully, and blocking your finished piece are key to achieving neat and even shells.
The Crochet Shell Pattern Tutorial is more than just a guide—it’s an invitation to explore creativity through yarn and hook. This versatile and elegant stitch can elevate any crochet project, whether you’re crafting something small and simple or large and intricate. Its timeless beauty, combined with its ease of learning, makes it a favorite among crocheters worldwide.
With practice and imagination, you can transform the crochet shell pattern into your signature style. We hope this tutorial helps you master the technique and inspires you to create something truly special.
If you enjoyed this guide, please share your honest opinion in the comments and let us know what kind of crochet tutorials or patterns you’d like to see next. Your feedback helps us grow and create more valuable content for you!


