
Crocheted house-shaped cookie for Christmas tree

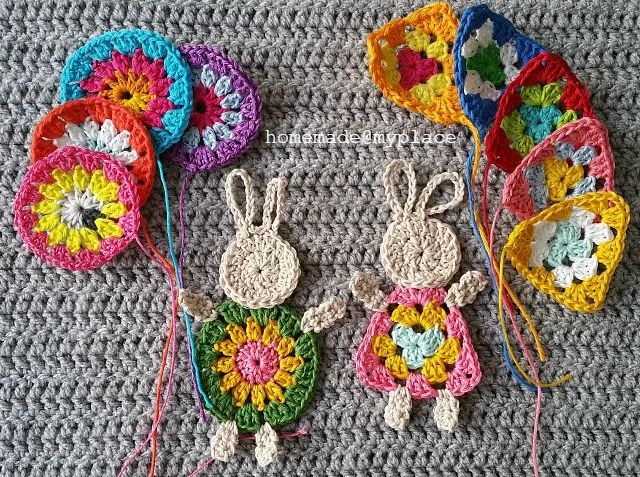
The Granny Bunny Free Crochet Pattern is one of the most heartwarming and creative projects for crochet lovers of all skill levels.
Combining the charm of traditional granny squares with the cuteness of a handmade bunny, this pattern offers both nostalgia and modern flair.
Whether you’re crocheting for Easter, a baby shower, or simply to decorate your home, the Granny Bunny Free Crochet Pattern provides a fun and meaningful crafting experience.
This adorable bunny project takes the simplicity of granny-style motifs and turns them into a lovable character. Unlike complex amigurumi designs that require intricate shaping and endless counting, the Granny Bunny Free Crochet Pattern uses basic stitches, making it approachable even for beginners.
Another wonderful advantage is that this crochet pattern is completely free. You don’t need to invest in paid templates or kits — everything you need to get started is explained clearly. With just a bit of yarn, a hook, and creativity, you can make your own cozy bunny in a short amount of time. Let’s explore what makes this project so enjoyable and how you can master it from start to finish.
The Granny Bunny Free Crochet Pattern stands out because it merges two beloved crochet traditions: the granny square technique and amigurumi-style shaping. This combination creates a whimsical toy or decoration that feels both vintage and fresh. It’s an ideal project for crafters who appreciate handmade nostalgia but want something modern and unique.
One of the key appeals of this pattern is how customizable it is. You can experiment with yarn colors, patterns, and embellishments to give your bunny its own personality. Some makers prefer pastel shades for a baby-themed bunny, while others go for bold, vibrant colors that make their creation stand out as home décor. The flexibility of the design ensures every project is one-of-a-kind.
The Granny Bunny Free Crochet Pattern also offers a wonderful opportunity to use up leftover yarn from other projects. It’s a sustainable, eco-friendly way to reduce waste while producing something adorable. Many crafters enjoy using different yarn textures to add dimension, giving each bunny a unique character and charm.
Beyond aesthetics, this pattern has emotional value. Handmade toys like the Granny Bunny carry sentimental worth — they can become cherished keepsakes for children, friends, or family members. The combination of effort, time, and love invested in crocheting something by hand turns this pattern into a meaningful experience rather than just a hobby.
Another reason this project is special is its compact size. Because it’s a mini pattern, you can complete it quickly, even within a weekend. This makes it ideal for last-minute gifts or quick craft fairs. Despite its small size, the final result looks detailed and impressive, making it perfect for display or gifting.
Finally, the Granny Bunny Free Crochet Pattern is beginner-friendly. It doesn’t demand advanced knowledge of complex stitches or patterns. As long as you know how to make basic granny squares and sew pieces together, you’ll be able to finish this project beautifully.
Before starting your Granny Bunny Free Crochet Pattern, it’s important to gather the right materials. Fortunately, the requirements are minimal and easily accessible at most craft stores or online.
First, you’ll need yarn in your preferred color palette. Most crocheters choose soft acrylic or cotton yarn because they’re durable and comfortable to work with. Depending on your style, you can mix neutral tones for a classic look or go bold with multi-colored combinations. A pastel mix also looks perfect for spring or Easter themes.
Next, you’ll need a crochet hook that matches the yarn weight. Typically, a 3.5 mm to 4 mm hook works well for medium-weight yarns. Using the correct hook size helps maintain consistent tension, ensuring your bunny holds its shape nicely.
You’ll also need a tapestry needle to sew your granny squares together. This part is crucial for shaping the bunny’s body and adding the final details. Many crafters also recommend using stitch markers to keep track of corners and edges while assembling your bunny.
For the stuffing, you can use polyester fiberfill or natural alternatives like wool. Stuffing helps your bunny maintain its shape and gives it that soft, cuddly feel. Be careful not to overfill, as it may distort the pattern’s symmetry.
Lastly, you can personalize your bunny with accessories such as small bows, ribbons, or embroidered facial details. This adds a charming touch and makes your finished piece uniquely yours.
Once you’ve gathered everything, you’re ready to begin the joyful process of crocheting your very own Granny Bunny.
Creating your Granny Bunny Free Crochet Pattern is simple if you follow the steps carefully. The project starts with crocheting several granny squares, which form the main parts of the bunny — the body, head, ears, and limbs.
Start by making your granny squares using your chosen color combinations. Traditional granny squares usually include three double crochets separated by chain stitches. Make sure to keep your tension consistent so that all squares come out the same size.
Once your squares are complete, it’s time to assemble the bunny. Lay the squares flat to visualize how they’ll connect. Usually, you’ll need two squares for the body, two smaller ones for the ears, and additional pieces for arms and legs if desired.
Next, use your tapestry needle to sew the squares together. Use a whip stitch or mattress stitch for a neat finish. Remember to leave an opening for stuffing before closing up the body. Add the stuffing evenly to avoid lumps, shaping the bunny gently as you go.
After assembling the body, it’s time to focus on the details. Add small safety eyes or embroider them using black yarn. A tiny triangle-shaped nose and a few stitches for the mouth can give your bunny a sweet expression. You can even crochet a small bow or flower for decoration.
Finally, weave in all loose ends, trim excess yarn, and give your bunny a gentle fluff. Congratulations — your handmade Granny Bunny is ready to bring joy wherever it goes!
To make your Granny Bunny Free Crochet Pattern look its best, there are a few helpful tips to keep in mind.
First, choose your colors carefully. Harmonious color combinations can make a huge difference in how your bunny looks. Try to balance bold and neutral tones or stick to pastel palettes for a softer aesthetic.
Second, pay attention to tension and stitch uniformity. Inconsistent stitches can make assembly harder and cause uneven edges. Practice a few sample squares before starting the final project.
Third, if you’re new to crocheting granny motifs, consider blocking your squares before assembling. This helps align edges and gives your finished bunny a professional appearance.
Another important tip is to use lightweight stuffing. Overstuffing can stretch the squares and distort their shape, while under-stuffing can make the bunny too floppy. Find a comfortable balance that keeps it soft yet stable.
Additionally, don’t hesitate to add personal touches. Small embellishments like embroidered initials, little scarves, or pom-pom tails can transform your bunny into a true keepsake.
Lastly, take your time. Crafting should be relaxing, not rushed. Enjoy each step, from choosing yarn to sewing the last piece — that’s what makes handmade art so fulfilling.
1. Is the Granny Bunny Free Crochet Pattern suitable for beginners?
Yes! It’s one of the best beginner-friendly projects since it uses simple granny squares and basic stitches.
2. How long does it take to make a Granny Bunny?
On average, it takes 3–5 hours, depending on your experience and how detailed you want your bunny to be.
3. What type of yarn is best for this pattern?
Soft acrylic or cotton yarn works best. They’re easy to handle and hold the bunny’s shape well.
4. Can I use leftover yarn from other projects?
Absolutely! This is a great stash-busting project that allows creative color combinations.
5. How do I clean my finished Granny Bunny?
Use a gentle hand wash with mild detergent, then let it air dry completely to maintain its form.
6. Can I sell my finished Granny Bunny creations?
Yes, as long as the pattern is labeled as “free to make and sell,” you can sell your handmade versions — just avoid redistributing the actual pattern.
The Granny Bunny Free Crochet Pattern is more than just a cute craft — it’s a celebration of creativity, comfort, and handmade artistry. From learning new techniques to gifting something truly personal, this project brings happiness at every stage. Whether you’re making it for a child, a loved one, or yourself, it’s a reminder that the simplest stitches can create something magical.
If you’ve enjoyed this guide or tried making your own Granny Bunny, share your honest opinion and suggestions. Your feedback helps inspire others to explore the beauty of crochet and keeps the spirit of handmade art alive.


