
Crocheted house-shaped cookie for Christmas tree

The Granny Square With 3D Rose Tutorial is a must-read for anyone passionate about crocheting. This tutorial will guide you through the process of creating a beautiful granny square adorned with a striking 3D rose, perfect for blankets, cushions, or decorative items.
Crocheting a 3D rose within a granny square adds a unique texture and elegance, making your handmade projects stand out. Whether you are a beginner or an experienced crocheter, this step-by-step guide will help you master this stunning craft.
Creating a granny square with a 3D rose is not just about following instructions; it’s about understanding the techniques behind each stitch and pattern.
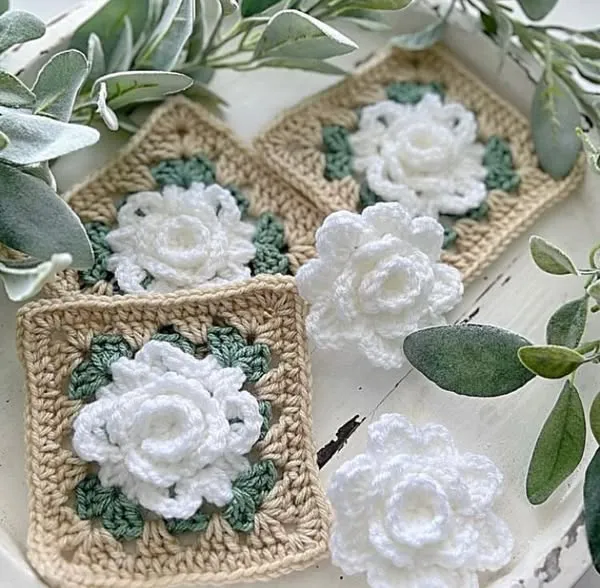
By incorporating the 3D rose, you give depth and dimension to your work, turning a simple square into a piece of art.
This tutorial emphasizes clarity and ease, so you can achieve professional-looking results even if you are new to crochet. Learning to crochet a 3D rose requires patience, but the outcome is worth every effort.
This tutorial will also highlight essential tips and tricks for beginners, including choosing the right yarn, hooks, and tension for your granny square with a 3D rose. By following this guide, you will gain confidence in your crocheting skills and expand your repertoire of creative patterns. Additionally, this tutorial is optimized with SEO-friendly tips so that enthusiasts searching for a comprehensive granny square with 3D rose tutorial online can find it easily.
A granny square is one of the most versatile and popular crochet patterns. Traditionally made in the form of a square, it consists of repeated motifs that can be combined to create larger projects like blankets, throws, and scarves. The simplicity of the granny square allows crocheters of all levels to experiment with colors, textures, and techniques. Learning the foundational stitches, such as chains, double crochets, and slip stitches, is essential to creating a perfect granny square.
In a standard granny square, corners are formed using chains and clusters of stitches, giving it a geometric yet charming appearance. The beauty of a granny square lies in its flexibility, as you can adapt it to suit your creative needs. Incorporating a 3D rose within the square takes this traditional pattern to a whole new level. Crocheters often combine multiple granny squares with 3D roses to create visually stunning designs that add sophistication to handmade items.
Another advantage of the granny square is that it can be made from leftover yarn, making it an economical and environmentally friendly choice. By adding a 3D rose, you transform these squares into intricate works of art that are perfect as gifts or personal projects. Understanding the structural layout of the granny square before adding embellishments like a 3D rose ensures that your final piece maintains its shape and beauty.
Finally, mastering the granny square technique opens the door to more advanced crochet patterns. Once you are comfortable with the basics, integrating 3D elements like roses, flowers, and other motifs becomes easier. By practicing this tutorial, you will gain the necessary skills to confidently tackle more complex designs and experiment with various textures and patterns. The granny square with 3D rose is not only aesthetically pleasing but also a testament to your crocheting expertise.
The key highlight of this tutorial is the 3D rose, which brings depth and charm to your granny square. Creating a 3D rose involves a combination of basic crochet stitches, including chains, single crochets, and half-double crochets. The technique focuses on layering petals to give the rose a realistic, three-dimensional appearance. By carefully following the steps, even beginners can achieve a beautifully textured rose that pops out from the granny square.
To start, you need to crochet a long strip of petals and then carefully roll or fold it into the rose shape. This step may require some practice, but once mastered, it becomes a straightforward process. Adjusting the size of the petals allows you to create roses of various dimensions, depending on the overall design of your granny square. Experimenting with colors can also enhance the realistic effect of the 3D rose, making it look more vibrant and lively.
Placement is crucial when attaching the 3D rose to the granny square. Typically, the rose is added to the center of the square, but creative placement can yield unique designs. Securing the rose with careful stitching ensures that it remains sturdy and maintains its three-dimensional effect. Choosing yarn with slight elasticity can also improve the rose’s appearance, giving the petals a soft and delicate look.
The choice of hook size influences the rose’s texture as well. Using a smaller hook can result in tighter, more defined petals, while a larger hook produces softer, looser petals. Practicing a few sample roses before adding them to your granny square is highly recommended. Once you feel confident, you can incorporate multiple 3D roses into a single blanket or project, creating a visually captivating pattern.
Finally, combining the granny square with the 3D rose is about balancing structure with creativity. The square provides a stable foundation, while the rose adds flair and sophistication. With patience and practice, you can create elegant pieces that are perfect for gifts, décor, or personal use. Learning this technique not only enhances your crochet skills but also expands your design possibilities.
Before starting your granny square with 3D rose, it’s important to gather all necessary materials and tools. Quality yarn is essential for achieving the best results. Cotton or acrylic yarn is often preferred due to its smooth texture and ease of handling. Choosing vibrant colors for the 3D rose ensures it stands out against the base square, creating a striking contrast.
The crochet hook size should match your yarn weight for optimal tension and stitch definition. A hook that is too large may result in loose stitches, while a hook that is too small can make the rose tight and difficult to shape. Alongside yarn and hooks, you will need scissors, a yarn needle for weaving in ends, and stitch markers to keep track of your progress.
Understanding the role of each tool can improve your workflow. For instance, stitch markers help maintain symmetry in the granny square and ensure even spacing for the 3D rose petals. Selecting ergonomic hooks can also reduce hand fatigue during long crocheting sessions. Preparing your workspace with good lighting and a comfortable chair contributes to a more enjoyable experience.
Experimenting with different yarn textures and colors allows for creative freedom. Blending complementary or contrasting shades for the 3D rose and the granny square can produce unique and visually appealing effects. Maintaining consistent tension throughout your project ensures that the final piece looks neat and professional.
By being mindful of materials and tools, you set the stage for a successful crochet project. This preparation minimizes frustration and allows you to focus on mastering the granny square with 3D rose technique. Gathering all supplies beforehand ensures a smooth and enjoyable crafting process.
Creating a granny square with 3D rose involves a series of carefully sequenced steps. Begin by crocheting the foundation of your granny square, forming the center with a simple circle or starting chain. Once the base is ready, work on building the square by adding corner clusters and side stitches, ensuring symmetry and proper tension.
Next, crochet the petals for your 3D rose. Make multiple rows of petal stitches, gradually increasing in size to give a natural, layered effect. Roll or fold the petals to form the rose shape, and secure the base with tight stitches to prevent unraveling. Position the rose at the desired spot on the granny square and sew it carefully with matching yarn, making sure it is firmly attached.
Throughout the process, maintain even tension to ensure that both the square and rose retain their shape. Use stitch markers to mark key points for alignment and symmetry. Pay attention to details like the spacing of petals and corners of the square, as they contribute to the overall aesthetic.
After attaching the rose, weave in all yarn ends neatly using a yarn needle. This step gives your project a polished and professional finish. Blocking the granny square may also help in maintaining its shape and enhancing the rose’s three-dimensional effect.
Once the first granny square with 3D rose is complete, you can replicate the pattern for additional squares if creating a larger project like a blanket. Consistency in size and rose placement ensures a cohesive and visually appealing design.
Finally, assemble the squares according to your project plan, whether joining them with slip stitches, sewing, or crocheting them together. The result is a beautifully textured item that showcases your skill and creativity in crochet.
Q1: Can beginners make a granny square with a 3D rose?
Yes, beginners can create a granny square with 3D rose by following step-by-step tutorials and practicing basic stitches. Patience is key to mastering the layering of petals.
Q2: What yarn is best for 3D roses?
Medium-weight cotton or acrylic yarn works best for 3D roses, as it holds the shape well and allows for smooth, defined petals.
Q3: How do I attach the 3D rose to the square?
Use a yarn needle and matching yarn to sew the rose securely onto the granny square, making sure the base is tight and petals remain upright.
Q4: Can I make multiple roses on one square?
Yes, you can add multiple 3D roses to a single square, but ensure proper spacing to prevent overcrowding and maintain balance.
Q5: How do I keep the rose from flattening?
Maintain tight stitches at the base and consider lightly stuffing the petals with yarn ends to enhance the three-dimensional effect.
Q6: What projects can I make with granny squares with 3D roses?
You can create blankets, pillow covers, bags, scarves, wall hangings, and other decorative items using granny squares with 3D roses.
In this tutorial, we explored how to create a granny square with 3D rose, covering everything from understanding the granny square, crafting the 3D rose, selecting materials, and following step-by-step instructions. By practicing these techniques, you can produce stunning crochet projects that combine texture, color, and elegance. The combination of a traditional granny square and a layered 3D rose elevates your crochet skills to a new level.
We encourage you to try this tutorial, experiment with different colors and yarn types, and share your creations with others.
Your feedback, opinions, and suggestions are invaluable, so leave a sincere comment about your experience and any tips you’ve discovered along the way. Happy crocheting, and enjoy creating beautiful granny squares with 3D roses that showcase your creativity!


