
Crocheted house-shaped cookie for Christmas tree

The Classic Granny Square is one of the most beloved and versatile crochet patterns in the world of crafting. Loved by beginners and experienced crocheters alike, the classic granny square has stood the test of time due to its simplicity, flexibility, and endless creative possibilities.
Whether you are making blankets, pillows, or decorative items, mastering the classic granny square is a foundational skill that opens the door to countless crochet projects.
Understanding the classic granny square is about more than just following a pattern. It’s about appreciating the symmetry, structure, and rhythm of the stitches.
This tutorial will guide you step by step, offering tips on color combinations, stitch techniques, and design options. The classic granny square allows you to transform small motifs into large, stunning projects, giving your handmade items a timeless, elegant appeal.
Crocheting a classic granny square is also an excellent way to improve your overall crochet skills. It teaches you how to maintain tension, create consistent stitches, and work in rounds. Whether you are creating a single square or combining multiple squares into a blanket, the classic granny square remains one of the most rewarding patterns to master. This article will cover everything you need to know to crochet your own classic granny square with confidence.
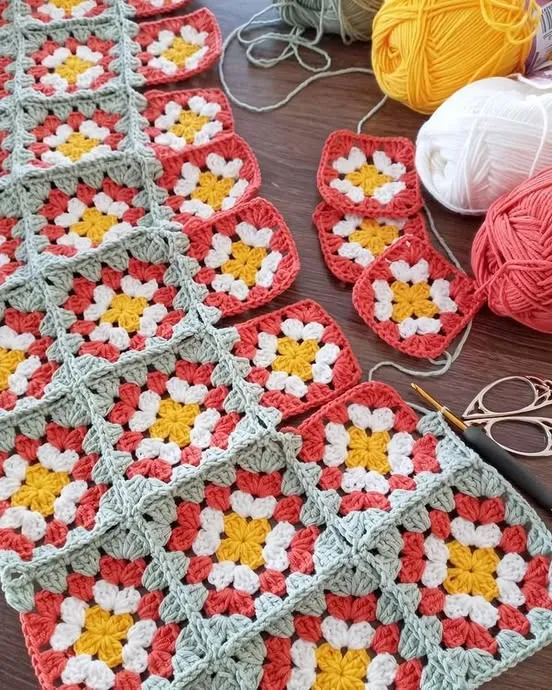
The classic granny square is made by working in rounds from the center outward. Traditionally, it consists of clusters of double crochet stitches separated by chain spaces, which form the characteristic square shape. The simplicity of this pattern makes it easy to adapt to different sizes, colors, and designs.
One of the main benefits of the classic granny square is its versatility. You can create large blankets by joining multiple squares, or small coasters, pillow covers, and other decorative items. Understanding the structure of the classic granny square is crucial before attempting more intricate designs.
Corners in the classic granny square are typically formed by placing three double crochet stitches separated by chain spaces. This creates a square that expands evenly as you work more rounds. By mastering these corner techniques, you ensure that your classic granny square maintains perfect symmetry.
Another key feature of the classic granny square is the ability to change colors at the end of each round. This allows you to create vibrant, multi-colored designs that reflect your personal style. Using contrasting colors can make the classic granny square stand out, while subtle shades create a more classic, elegant look.
The classic granny square also helps crocheters practice consistent stitch tension. Maintaining even stitches ensures the square lies flat and doesn’t curl at the edges. Practicing with different yarns and hooks will also improve your technique and prepare you for more advanced crochet patterns.
Finally, understanding the basics of the classic granny square opens the door to countless variations. You can add textures, embellishments, or even 3D elements to your squares once you are comfortable with the foundational pattern. This versatility is one of the main reasons the classic granny square has remained popular for generations.
To create a classic granny square, you will need a few essential materials. High-quality yarn is recommended for best results, with acrylic and cotton being popular choices due to their durability and ease of handling. Selecting colors that complement each other will enhance the overall design of your classic granny square.
Choosing the right crochet hook is also important. The hook size should match your yarn weight to achieve consistent tension and neat stitches. Using a smaller hook will produce tighter, more compact squares, while a larger hook will create a softer, more flexible fabric.
Additional tools include scissors, a yarn needle for weaving in ends, and stitch markers to keep track of rounds. Good lighting and a comfortable workspace make the crocheting process more enjoyable and reduce strain on your hands and eyes.
Using different yarn textures allows you to experiment creatively. You can blend soft and chunky yarns, or combine multiple colors for a striking effect. The classic granny square is perfect for practicing color changes and experimenting with different yarn types.
Being mindful of materials before starting your project ensures smoother progress. It helps avoid mistakes such as mismatched colors, inconsistent tension, or uneven squares. Preparing your tools and workspace is a simple step that makes the crocheting experience more enjoyable.
By gathering quality materials and tools, you set yourself up for success in creating a beautiful and long-lasting classic granny square.
Creating a classic granny square starts with a magic ring or chain loop as the foundation. The first round usually consists of three double crochets into the ring, followed by chain spaces to form the corners. Ensuring proper spacing is critical to maintaining a square shape.
As you progress to subsequent rounds, continue building corner clusters of three double crochets separated by chain spaces. The key is to keep the corners aligned and the stitch count consistent. This method ensures the classic granny square remains even and symmetrical.
Color changes can be made at the end of any round to create vibrant patterns. To change color, simply finish the last stitch of the round with the new yarn, and continue crocheting. This technique allows you to create multi-colored classic granny squares with eye-catching designs.
Maintaining even tension throughout the project is essential. Uneven stitches can lead to curling edges or misshaped squares. Regularly checking your work and adjusting tension will help keep your classic granny square neat and professional-looking.
Once the desired size is reached, fasten off your yarn and weave in the ends using a yarn needle. This step gives your classic granny square a polished finish and ensures the square holds its shape over time.
Finally, if creating multiple squares for a larger project, block each square to straighten edges and align corners before joining them. Joining can be done with slip stitches, sewing, or crocheting, depending on your preference. The result is a beautiful, cohesive piece that showcases the timeless appeal of the classic granny square.
The classic granny square is incredibly versatile, making it suitable for a wide range of projects. From blankets and afghans to cushions, bags, and clothing, the possibilities are endless. The small square format allows you to mix and match colors, creating unique patterns with each project.
Combining multiple classic granny squares can produce large, eye-catching blankets. By arranging colors strategically, you can create geometric patterns, stripes, or checkerboard effects. These versatile squares also work well for smaller projects such as coasters, trivets, or wall hangings.
You can also experiment with textures and stitch variations within the classic granny square. Adding puff stitches, shells, or bobbles gives the square a three-dimensional look while maintaining its traditional structure. This adds sophistication and creativity to your crochet projects.
Color placement is another way to customize your classic granny square. Alternating bright and muted shades or using gradient yarn creates visual interest and depth. Each square becomes a miniature work of art that contributes to the overall design.
The classic granny square is also perfect for scrap yarn projects. Using leftover yarn from other projects allows you to make colorful and eco-friendly creations. This not only reduces waste but also results in unique, one-of-a-kind squares.
Finally, the classic granny square can be adapted for seasonal or themed projects. Incorporating holiday colors or motifs allows you to create personalized gifts or decorations, showcasing your creativity and skill.
Q1: Is the classic granny square suitable for beginners?
Yes, the classic granny square is ideal for beginners. Its repetitive pattern makes it easy to learn basic crochet stitches and techniques.
Q2: What yarn should I use for a classic granny square?
Acrylic or cotton yarn is best for the classic granny square. These yarns are easy to work with and create neat, long-lasting squares.
Q3: Can I make a blanket using classic granny squares?
Absolutely! By joining multiple squares, you can create blankets of any size. Planning colors and patterns in advance helps achieve a cohesive design.
Q4: How do I maintain square shape while crocheting?
Proper corner placement and consistent stitch tension are key. Mark corners and check alignment regularly.
Q5: Can I change colors in the middle of a granny square?
Yes, changing colors at the end of a round is simple. Finish the last stitch with the new yarn and continue crocheting.
Q6: Are there variations of the classic granny square?
Yes, you can experiment with textures, stitch patterns, and embellishments to create unique versions of the classic granny square.
In this tutorial, we explored the classic granny square, covering its structure, materials, step-by-step creation process, and creative uses. Mastering the classic granny square allows you to create versatile, timeless crochet projects that are both functional and decorative. By practicing the techniques outlined here, you can confidently make blankets, cushions, and a variety of other handmade items.
We encourage you to experiment with colors, textures, and patterns to personalize your classic granny squares. Share your experiences, tips, and suggestions in the comments to inspire others.
Your feedback is valuable and helps build a creative crochet community. Enjoy crafting beautiful classic granny squares and let your creativity shine!


