
Hunter's Star Quilt Block - Quick & Easy Tutorial

The Stars Over Scott – Quilt Tutorial is a detailed and inspiring guide for anyone looking to create a beautiful quilt that combines creativity, precision, and a touch of artistry.
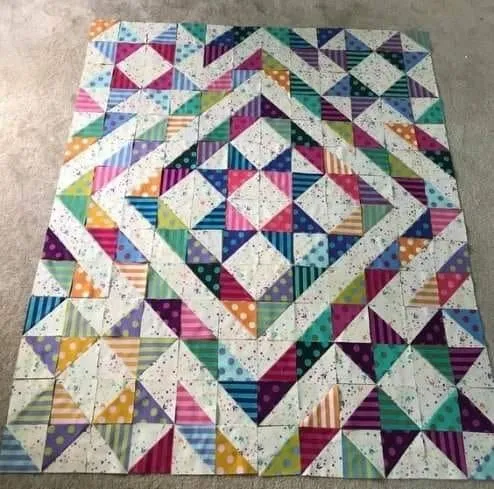
This pattern has gained attention in the quilting community for its elegant star motifs and the way it harmoniously blends colors, producing a striking visual effect.
Whether you are an experienced quilter or a beginner eager to learn new techniques, the Stars Over Scott – Quilt Tutorial provides step-by-step instructions that ensure a stunning result.
One of the main attractions of the Stars Over Scott – Quilt Tutorial is its versatility. The quilt can be adapted in size, color, and complexity, making it suitable for a wide range of projects, from cozy lap quilts to large bedspreads.
The pattern encourages quilters to experiment with color combinations, fabric textures, and block arrangements, resulting in a personalized piece that reflects individual creativity.
Additionally, this tutorial emphasizes not only aesthetics but also functional skills. By following the Stars Over Scott – Quilt Tutorial, quilters learn valuable techniques such as precise cutting, accurate piecing, and careful seam alignment. These skills are essential for creating professional-quality quilts and can be applied to future quilting projects.
The Stars Over Scott – Quilt Tutorial is structured around a repeating star motif that forms the quilt’s central design. Each star is composed of multiple fabric pieces carefully cut and sewn together to achieve a balanced, geometric look. Mastering the construction of these stars is key to the overall success of the quilt.
Quilters often begin by selecting a primary color palette. Choosing fabrics with complementary tones enhances the visual impact of the star motifs. Many prefer using a mix of solids and prints to create depth and texture, giving the quilt a dynamic, layered appearance.
Cutting accuracy is crucial in the Stars Over Scott – Quilt Tutorial. Precise measurements ensure that each piece fits together seamlessly, maintaining clean lines and consistent shapes. Investing time in accurate cutting pays off in a polished, professional-looking quilt.
Sewing techniques are equally important. The tutorial encourages using a consistent seam allowance, typically ¼ inch, which is standard in quilting. Maintaining uniform seams throughout the quilt contributes to both structural integrity and aesthetic appeal.
Another feature of this pattern is its adaptability. While the tutorial provides specific instructions, quilters can modify the star size, block layout, or quilt dimensions to match personal preferences or intended use. This flexibility makes the Stars Over Scott – Quilt Tutorial suitable for a wide range of projects.
Finally, pressing each seam properly is an essential step. Pressing improves accuracy, flattens fabric layers, and enhances the overall look of the quilt. Following these foundational steps ensures that the finished quilt meets both functional and artistic standards.
To successfully complete the Stars Over Scott – Quilt Tutorial, gathering the right materials and tools is essential. Fabric selection is the first step, with quilters typically choosing cotton for its ease of use, durability, and color retention. The amount of fabric depends on the quilt size and the number of star blocks desired.
Cutting tools, such as rotary cutters, cutting mats, and acrylic rulers, are vital for achieving precise measurements. Accurate cutting ensures that pieces fit together seamlessly and that the quilt maintains its geometric integrity.
Sewing tools include a reliable sewing machine, thread matching your fabric, pins or clips, and a seam ripper for corrections. These tools make the sewing process efficient and help maintain accuracy throughout the project.
Quilters should also prepare batting and backing fabric. Batting provides warmth and thickness, while the backing fabric completes the quilt aesthetically. Choosing complementary colors for the backing can enhance the quilt’s overall appeal.
Marking tools, such as fabric pencils or chalk, assist in aligning pieces and ensuring accuracy during assembly. These small tools make a significant difference in achieving a professional finish.
Finally, quilting accessories like a walking foot or quilting gloves can simplify the quilting process, especially when working with larger quilts. Using the right tools improves workflow and reduces frustration during assembly.
The Stars Over Scott – Quilt Tutorial begins with preparing the star blocks. Start by cutting all fabric pieces according to the provided measurements. Accuracy here is critical, as it affects the assembly of each star and the overall alignment of the quilt.
Next, sew the individual pieces of each star together. Follow the instructions carefully to maintain the correct order and orientation of the fabrics. Using pins or clips helps prevent shifting and ensures precise alignment of seams.
Once all star blocks are completed, arrange them on a flat surface to determine the final layout. This step allows quilters to visualize the overall design and make adjustments to color placement or block orientation for maximum impact.
Begin joining the blocks row by row, maintaining consistent seam allowances and alignment. Check measurements periodically to ensure rows remain straight and edges match correctly. Accuracy at this stage ensures that the final quilt top is even and professional-looking.
After assembling the quilt top, layer it with batting and backing fabric. Baste the layers together using pins, spray adhesive, or hand-basting stitches to prevent shifting during quilting. This step ensures the layers remain stable throughout the quilting process.
Finally, quilt the layers together using your preferred method, whether machine quilting, hand quilting, or a combination of both. Pay attention to maintaining consistent stitching and following the star motif to enhance the quilt’s design. Once completed, bind the edges with your chosen fabric to finish the quilt beautifully.
The Stars Over Scott – Quilt Tutorial allows for a variety of personal touches to make the quilt unique. One way is to experiment with color schemes, from bold and bright contrasts to subtle pastels. Choosing colors that resonate with your home décor or personal taste enhances the quilt’s visual impact.
Fabric texture is another opportunity for customization. Mixing prints, solids, or even specialty fabrics like batiks can create a quilt with depth and dimension. The tactile quality of the fabric adds another layer of interest to the project.
You can also adjust the quilt size to fit different purposes. Smaller quilts make excellent gifts or lap throws, while larger quilts serve as statement bedspreads or wall hangings. Modifying the number of star blocks provides flexibility in achieving the desired dimensions.
Borders and sashing offer additional creative options. Adding contrasting borders or sashing between blocks can highlight the star patterns and enhance the overall design. Experimenting with border widths and styles can dramatically change the quilt’s appearance.
Embellishments, such as embroidery, appliqué, or decorative stitching, can personalize the quilt further. These finishing touches allow quilters to add their signature style to the Stars Over Scott – Quilt Tutorial.
Documenting your process is also valuable. Taking photos, keeping notes on fabric combinations, and tracking layout choices provide a reference for future projects or sharing your experience with other quilters.
Q: Is this quilt pattern suitable for beginners?
A: Yes, the Stars Over Scott – Quilt Tutorial can be adapted for beginners, especially those willing to follow detailed instructions and practice accurate piecing.
Q: What type of fabric is recommended?
A: Cotton fabrics are preferred due to ease of use, durability, and vibrant colors. Mixing prints and solids adds depth.
Q: How long does it take to complete the quilt?
A: Completion time varies based on quilt size and experience. Smaller quilts may take a few days, while larger quilts can take several weeks.
Q: Can I change the quilt size?
A: Yes, you can adjust the number of star blocks and their size to create a quilt that fits your needs.
Q: What tools are essential for this pattern?
A: Rotary cutters, cutting mats, rulers, sewing machine, pins, and thread are essential for precise and efficient construction.
Q: How do I maintain the sharp star points?
A: Accurate cutting, consistent seam allowance, and careful pressing ensure crisp, clean points in each star.
The Stars Over Scott – Quilt Tutorial is a versatile, rewarding project that combines technical skill with creative expression. From selecting fabrics and cutting pieces to sewing star blocks and quilting the layers, this tutorial guides quilters through each step with clarity. By following the instructions and tips provided, you can create a beautiful, personalized quilt that is both functional and visually stunning.
We hope this guide has inspired you to try the Stars Over Scott – Quilt Tutorial. Share your experiences, suggestions, and honest feedback in the comments to help the quilting community grow and encourage others to embark on this creative journey.


