
How to Crochet Tulips – Tutorial and Ideas is the ultimate guide for anyone interested in creating beautiful, handcrafted tulips using crochet techniques.
Crocheted flowers are not only a charming addition to home décor, but they also make thoughtful gifts that can be cherished for years. Learning how to crochet tulips allows you to combine creativity, relaxation, and skill in a single activity, producing delicate, vibrant flowers that bring joy to any space.
Crocheting tulips may seem challenging at first, but with proper guidance and step-by-step instructions, anyone can master this art.
The versatility of crochet enables you to experiment with colors, patterns, and textures, creating tulips that match your personal style or home aesthetic. How to Crochet Tulips – Tutorial and Ideas will show you the techniques, tips, and design ideas to craft tulips that look lifelike and elegant.
Moreover, crocheted tulips are perfect for multiple applications. From embellishing pillows and blankets to creating floral bouquets or decorative wall hangings, the possibilities are endless. By learning how to crochet tulips, you can transform a simple yarn project into a stunning work of art that showcases your attention to detail and craftsmanship.
Materials and Tools Needed for Crocheting Tulips
Before diving into crocheting, understanding the materials and tools required is crucial. Choosing the right yarn, hook, and accessories ensures a smooth crocheting experience.
The first essential item is yarn. For crochet tulips, lightweight or medium-weight yarn is recommended. Cotton yarn works exceptionally well because it provides structure to the petals while remaining soft and pliable. You can select vibrant colors for realistic tulips or experiment with imaginative shades for decorative purposes.
Next, the crochet hook size must match your yarn choice. Typically, a 2.5 mm to 4 mm hook works best for flower projects. Using the correct hook ensures consistent stitches and a neat finish on your crocheted tulips.
Additional materials include scissors, stitch markers, and a yarn needle. Stitch markers help you keep track of rounds, while the yarn needle is essential for weaving in ends and assembling the tulip petals and stem.
Optional accessories such as floral wire and green yarn can be used to make the tulip stems more rigid. This technique allows your crocheted tulips to stand upright in vases or floral arrangements, mimicking real flowers.
Finally, having a printed pattern or diagram can be extremely helpful. Many beginners find visual guides invaluable for understanding stitch placement and petal shaping, which is critical when learning how to crochet tulips for the first time.
Step-by-Step Tutorial: How to Crochet Tulips
Learning how to crochet tulips requires following a systematic approach. The process begins with the flower petals, moves to the stem, and ends with assembly.
Start by creating a magic ring, which forms the base of the tulip. Inside the ring, crochet the required number of stitches as indicated by your pattern. This step ensures the petals will have a neat, circular foundation.
Next, follow the petal pattern. Tulip petals are typically made using a combination of chain stitches, single crochet, and double crochet. Each petal is worked individually and then joined at the base to form the complete tulip flower.
Once the petals are complete, begin crocheting the stem. Using green yarn, chain to the desired length and work single crochet stitches along the chain. For added stability, consider inserting a floral wire inside the crocheted stem to make it more structured.
After completing the stem, attach the petals to the top. Use a yarn needle to sew the base of the petals securely to the stem. Make sure the tulip looks natural by slightly adjusting the angles of each petal.
To finish, weave in all loose yarn ends to ensure a clean, professional look. This step is crucial for maintaining the shape of your crocheted tulip and preventing unraveling.
Finally, adjust the petals and stem until the tulip looks lifelike. With practice, the process becomes faster and more intuitive, allowing you to create multiple tulips for bouquets, decorations, or gifts.
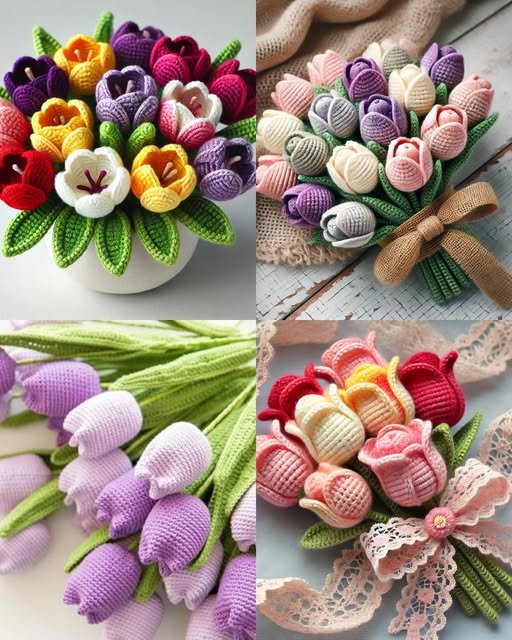
Creative Ideas for Displaying Crocheted Tulips
Once you’ve learned how to crochet tulips, the next step is discovering creative ways to display them. Crocheted tulips can transform everyday spaces into elegant, floral-inspired environments.
One popular idea is creating a crocheted tulip bouquet. Combine several tulips of different colors and heights in a vase. This arrangement can be used as a centerpiece for dining tables or coffee tables, adding a charming handmade touch.
Crocheted tulips also work beautifully as wall décor. Attach them to a decorative frame, wreath, or hanging mobile. This approach provides a whimsical, textured look that brightens any room.
Another option is incorporating tulips into home textiles. Sew crocheted tulips onto pillow covers, blankets, or table runners to create a consistent floral theme throughout your home. The tactile quality of crochet adds warmth and sophistication.
Gifting crocheted tulips is also a wonderful idea. Handmade flowers show thoughtfulness and effort, making them suitable for birthdays, anniversaries, or holidays. Unlike real flowers, these tulips last indefinitely, serving as lasting mementos.
Finally, consider using crocheted tulips in mixed-media projects. Combine them with embroidery, fabric art, or paper crafts to create unique, personalized artwork that showcases your creativity and crocheting skills.
Tips and Tricks for Perfect Crocheted Tulips
Achieving perfection in your crocheted tulips requires a few helpful tips. Consistency in stitch tension is key. Maintaining even tension ensures that each petal looks uniform and professional.
Choosing high-quality yarn improves both the appearance and durability of the tulip. Soft cotton or cotton-blend yarn works best, providing structure for petals while remaining easy to manipulate.
Blocking is another useful technique. After completing your tulips, lightly steam or wet block them to shape the petals and smooth any uneven areas. This enhances the lifelike appearance of your flowers.
Pay attention to color selection. Mixing shades of the same color for petals and stems can create depth and realism. For example, using a slightly darker red on the inner petals gives your crocheted tulips a natural, three-dimensional look.
Experiment with different petal shapes and sizes. Not all tulips are identical, so varying the petals’ dimensions adds authenticity and charm to your creations.
Finally, practice regularly. Like any craft, crocheting tulips improves with time. The more you practice, the faster and more accurate your tulips will become, allowing you to create larger projects or bouquets with ease.
FAQ About How to Crochet Tulips
Q1: Can beginners crochet tulips easily?
Yes! With step-by-step instructions and practice, even beginners can learn how to crochet tulips. Start with simple patterns before advancing to more complex designs.
Q2: What yarn is best for crocheted tulips?
Lightweight or medium-weight cotton yarn is ideal. Cotton provides structure while remaining soft and easy to manipulate.
Q3: How can I make my tulips stand upright?
Insert a floral wire inside the crocheted stem or use thicker yarn for additional stability.
Q4: Can I make multiple tulips in different colors?
Absolutely! Mixing colors adds visual interest and allows you to create vibrant bouquets or decorative arrangements.
Q5: Are crocheted tulips washable?
Yes, most are washable. Hand wash gently with mild detergent and reshape while damp to preserve their form.
Q6: Can I use crocheted tulips in gifts?
Definitely! They make thoughtful, long-lasting gifts for any occasion, from birthdays to holidays.
Conclusion
Learning how to crochet tulips opens a world of creative possibilities. From selecting the right materials to mastering the steps for petals and stems, this guide has provided all the essential knowledge to create beautiful, lifelike tulips. Crocheted tulips are versatile, long-lasting, and perfect for home décor, gifts, or craft projects.
With patience, practice, and attention to detail, anyone can produce stunning floral creations. Share your experiences, suggestions, and personal ideas on crocheting tulips—your feedback can inspire others to explore this rewarding craft.