
Crocheted house-shaped cookie for Christmas tree

Learning how to crochet mini hoop flowers is an enjoyable and rewarding DIY project that allows crafters to create delicate, charming decorations.
These small floral hoops are perfect for embellishing your home, gifting to friends, or adding a handmade touch to special occasions. With their compact size and versatility, mini hoop flowers have become a popular choice among crochet enthusiasts.
By following this guide, you can craft beautiful flowers step by step, regardless of your experience level, while enjoying the calming and creative process of crocheting.
Crocheting mini hoop flowers offers a wonderful opportunity to experiment with textures, colors, and patterns. Choosing the right yarn and crochet hook can make a significant difference in the final appearance of your project.
Many crafters prefer soft cotton yarns in vibrant or pastel colors to make the flowers visually appealing and durable. Adding embellishments, such as beads or tiny leaves, enhances the charm of your mini hoops, creating a personalized piece of art that reflects your unique style.
In addition to their aesthetic appeal, mini hoop flowers serve multiple purposes. They can be used as wall hangings, ornaments, gift decorations, or even incorporated into larger projects like wreaths and garlands. Creating your own flowers using this DIY project not only saves money but also gives you the satisfaction of producing something handmade and meaningful. The versatility and beauty of mini hoop flowers make this a must-try crochet project for anyone looking to enhance their crafting skills.
Before starting your mini hoop flowers DIY project, it’s essential to gather the proper materials. The main components include a small embroidery hoop, crochet hooks appropriate for your yarn, and soft cotton or acrylic yarn in your chosen colors. These materials will help you achieve neat stitches and a durable finished product. Small scissors, a yarn needle, and optional embellishments like beads or ribbons are also necessary to complete your design.
Choosing the right embroidery hoop is key to creating a well-finished flower. Mini hoops typically range from 2 to 4 inches in diameter, allowing for flexibility in design. A smaller hoop is ideal for delicate floral arrangements or gifting, while slightly larger hoops give you more space to work intricate patterns. Picking the right size enhances the overall appearance and usability of your crochet flower.
Selecting the yarn is another important step in your how to crochet mini hoop flowers project. Cotton yarn works beautifully because it holds its shape well and has a smooth finish, making it easier to crochet fine details. Acrylic yarn is also a good option, especially if you want a softer texture or more vibrant color choices. Consider the durability, color, and feel of your yarn to match the intended use of your mini hoop flowers.
Organizing your workspace is crucial for a smooth crafting experience. Ensure you have adequate lighting, a clean flat surface, and all tools within reach. Using stitch markers or small clips can help keep your stitches aligned and your project neat. Proper preparation ensures that your mini hoop flowers turn out professional-looking and makes the crochet process more enjoyable.
Adding small embellishments can elevate the appearance of your mini hoop flowers. Tiny beads, sequins, or ribbon bows can be incorporated during the crocheting process or sewn on afterward. This attention to detail allows you to personalize each piece and create a truly unique project. Enhancing your flowers with these touches makes them even more suitable for gifts or home décor.
Finally, having patience and following the pattern step by step is essential in a how to crochet mini hoop flowers DIY project. Each stitch contributes to the final shape, so taking your time ensures a polished and durable product. Enjoying the creative journey is just as important as completing the finished flower.
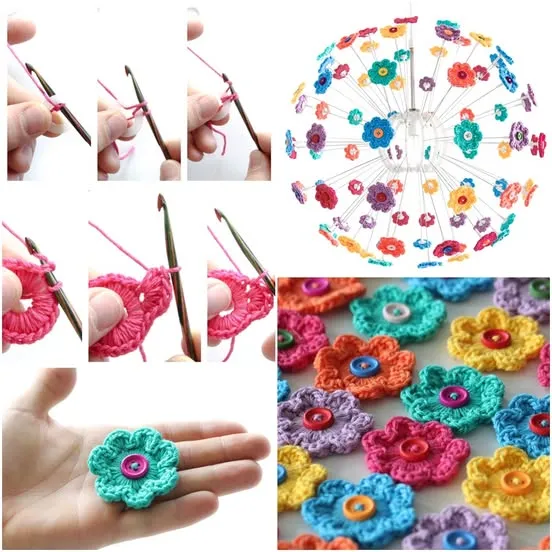
The process of making mini hoop flowers begins with a simple foundation chain, which will form the base for your petals. Working into this chain, create the first layer of petals using single, half-double, or double crochet stitches, depending on your chosen design. The size and number of petals can vary, allowing you to customize your mini hoop flowers for a unique look.
Once the first layer of petals is complete, continue building additional layers to add depth and dimension. Layering creates a realistic, three-dimensional flower effect, making your mini hoop decoration visually appealing. Carefully counting stitches and following the pattern ensures that each petal is evenly spaced and symmetrical.
Next, attach the crochet flower to your mini embroidery hoop. Wrap the flower securely around the hoop, sewing it in place with a yarn needle or using a combination of stitches to fasten it firmly. Ensuring that the flower is centered and stable is essential for a professional finish and allows the hoop to be displayed without shifting or drooping.
Adding leaves or additional small flowers can enhance the overall design of your mini hoop flowers DIY project. Use green yarn or contrasting colors to make your decoration more vibrant. These additional elements can be crocheted separately and sewn onto the hoop, providing flexibility in your design choices and adding a creative flair.
Finishing touches, such as weaving in all loose ends and trimming excess yarn, complete your crochet mini hoop flowers. Neat finishing ensures durability and gives the project a polished, professional appearance. Taking time with these final steps guarantees that your flowers will be admired for both craftsmanship and beauty.
Finally, consider customizing your mini hoop flowers with hanging loops or ribbons. This allows you to display your flowers as wall decorations, gift toppers, or ornaments. Personalizing the display method makes your how to crochet mini hoop flowers project versatile and adaptable for different occasions or home décor styles.
Maintaining consistent tension is crucial in your mini hoop flowers DIY project. Even tension ensures that petals are uniform and the flower sits flat against the hoop. Practicing a few stitches before starting can help you maintain a steady hand and achieve a professional look.
Choosing the appropriate hook size for your yarn affects the final shape and texture of the petals. A smaller hook produces tighter stitches, ideal for delicate flowers, while a slightly larger hook creates a softer, more open design. Experimenting with hook sizes helps achieve the perfect balance for your mini hoop flowers.
Using stitch markers can simplify complex patterns and keep track of petal placement. Marking the starting point of each round ensures symmetry and prevents mistakes. This small addition to your workflow improves the accuracy of your design and saves time correcting errors.
Color combinations play a significant role in the visual appeal of mini hoop flowers. Mixing pastel shades or contrasting colors can make your flowers stand out. Planning the color palette beforehand ensures a harmonious and visually pleasing result. Adding subtle gradients or ombre effects can further enhance the aesthetic appeal.
Paying attention to finishing touches elevates the quality of your mini hoop flowers. Secure all yarn ends, straighten petals, and ensure layers are evenly spaced. A polished finish reflects care and craftsmanship, making your project gift-ready or suitable for display.
Finally, don’t hesitate to experiment and make your how to crochet mini hoop flowers project your own. Incorporating unique shapes, embellishments, or mixed textures adds creativity and individuality to your flowers. Each mini hoop can become a signature piece that showcases your personal style.
Mini hoop flowers created from this DIY project can be used in numerous creative ways. Hang them on walls as delicate decorations, place them on shelves, or attach them to gift packages for a personalized touch. Their versatility makes them suitable for both home décor and special events.
These crochet flowers also make thoughtful handmade gifts. Their intricate design and handmade quality demonstrate effort and care, making them perfect for birthdays, holidays, or special occasions. Personalized color choices or embellishments enhance their sentimental value.
Mini hoop flowers can be incorporated into larger craft projects such as wreaths, garlands, or table centerpieces. Combining multiple flowers in varying sizes and colors creates an eye-catching display that is perfect for seasonal décor or themed events.
Using crochet mini hoop flowers as educational projects is another creative approach. Children and beginners can learn basic crochet techniques while enjoying the process of crafting a visually appealing project. This DIY activity fosters creativity, fine motor skills, and a sense of accomplishment.
These charming mini hoops can also be used for weddings, baby showers, or other celebrations. They can serve as decorations, favors, or part of photo backdrops, adding a handmade and elegant touch to any event.
Finally, documenting and sharing your mini hoop flowers on social media or craft communities can inspire others and build a supportive creative network. Showcasing your projects spreads the joy of crochet and encourages others to try this delightful DIY craft.
Q1: Is this project suitable for beginners?
Yes, how to crochet mini hoop flowers is beginner-friendly. The pattern uses basic crochet stitches and allows for customization, making it accessible for all skill levels.
Q2: What type of yarn is best for mini hoop flowers?
Cotton yarn is ideal because it holds shape well and has a smooth finish. Acrylic yarn is also an option for a softer texture and bright colors.
Q3: How long does it take to make one mini hoop flower?
Depending on experience, it usually takes 1–3 hours per flower. Beginners may take longer, especially when learning new stitches.
Q4: Can I add embellishments to the flowers?
Absolutely! Beads, sequins, ribbons, or leaves can be added to personalize your mini hoop flowers and enhance their charm.
Q5: How do I attach the flower to the hoop?
Sew the flower securely using a yarn needle or wrap it around the hoop with stitches, ensuring it is centered and stable.
Q6: What sizes of hoops are recommended?
Mini hoops from 2–4 inches in diameter work best for small crochet flowers, but you can experiment with larger hoops for more intricate designs.
Creating mini hoop flowers through this charming DIY project allows crafters to combine creativity, skill, and personalization into a beautiful handmade decoration. By carefully selecting materials, following step-by-step instructions, and incorporating finishing touches, anyone can produce a stunning crochet flower that is versatile and elegant. These mini hoops can be used for décor, gifts, celebrations, or craft activities, offering endless possibilities.
We encourage you to try this project, experiment with colors and designs, and share your thoughts and suggestions to inspire others in the joy of crochet.


