
Hunter's Star Quilt Block - Quick & Easy Tutorial

The Dresden Plate – Quilt Tutorial is a timeless guide for quilters who want to create a stunning, vintage-inspired design. This classic quilt pattern has captivated quilting enthusiasts for decades, offering both visual elegance and a fun sewing challenge.
With its distinctive circular “plate” design, the Dresden Plate quilt brings a combination of creativity and technical skill to any project. Whether you are a beginner or an experienced quilter, this tutorial will help you master the art of creating beautiful Dresden Plate blocks.
The Dresden Plate – Quilt Tutorial focuses on precise cutting, piecing, and sewing techniques. Unlike simpler quilt patterns, the Dresden Plate requires attention to detail in shaping the petals and assembling the circular design.
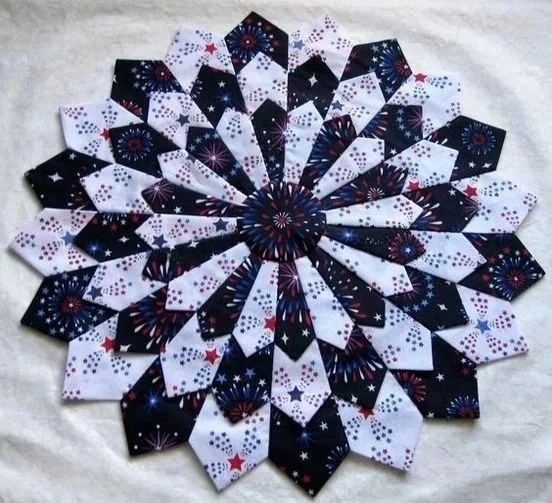
Each “plate” is made up of wedge-shaped pieces arranged around a central circle, creating a floral or geometric effect. This pattern can be adapted to different fabric styles, from modern prints to traditional calicos, making it versatile for any quilting project.
Beyond its technical appeal, the Dresden Plate – Quilt Tutorial encourages creativity and personalization. Quilters can experiment with color combinations, textures, and fabrics to achieve a unique look. The finished quilt becomes not just a functional piece but a work of art, perfect for gifting or decorating your home. Following this tutorial ensures a satisfying and professional result, helping quilters achieve a polished finish every time.
Before starting the Dresden Plate – Quilt Tutorial, it is essential to gather the right materials. The quality and selection of fabrics can significantly influence the final appearance of your quilt. Typically, you will need a mix of cotton fabrics with complementary colors and patterns.
In addition to fabrics, ensure you have a rotary cutter, cutting mat, and quilting ruler. These tools are essential for achieving precise cuts, which is crucial for the wedge-shaped petals of the Dresden Plate. Accurate cutting minimizes errors and ensures uniform blocks.
You will also need basic sewing supplies, including thread, pins, and a sewing machine. High-quality cotton thread provides durability and a smooth finish. Using pins or clips helps keep the fabric pieces aligned while sewing, which is especially important for circular designs.
Templates for the Dresden Plate wedges are another key material. These templates can be store-bought or handmade from cardboard. Using consistent templates ensures uniformity across all quilt blocks, making assembly easier.
For finishing, include batting and backing fabric. Batting adds warmth and structure to the quilt, while the backing fabric complements the front design. The choice of batting thickness can affect the quilt’s texture and weight.
Finally, consider adding embellishments like applique, embroidery, or decorative stitching. While optional, these details can enhance the quilt’s aesthetic and make it a one-of-a-kind creation.
The first step in the Dresden Plate – Quilt Tutorial is cutting and preparing the wedges for the quilt blocks. Each wedge forms a section of the circular “plate,” so precision is key. Start by using your template to trace the wedge shapes onto your chosen fabrics.
Cut each wedge carefully using a rotary cutter. Accurate cutting ensures that the petals will align properly when sewn together. It’s important to cut slightly outside the traced line to allow for seam allowances.
Once all wedges are cut, press them flat with an iron. Pressing removes wrinkles and helps maintain the shape during assembly. You can also fold the wedge pieces in half lengthwise to create a crease, making it easier to match the edges when sewing.
Consider arranging the wedges in a pattern before sewing. This allows you to visualize the color combinations and make adjustments before permanent stitching. Mixing prints and solids can create dynamic visual effects in your Dresden Plate blocks.
If you plan to make multiple Dresden Plates, label the wedges by block. Keeping pieces organized prevents confusion and streamlines the sewing process. This small step saves time and ensures consistency across your quilt.
Finally, practice a few wedges on scrap fabric. This helps you get comfortable with the stitching process and refine your technique before working on the main quilt blocks.
Assembling the wedges is the core step in the Dresden Plate – Quilt Tutorial. Begin by sewing pairs of wedges together along their long edges, right sides facing each other. Press the seams open after each pair is sewn.
Continue joining the wedge pairs until you have a complete circle. It is normal for small gaps to appear at the center; these can be concealed later with a circular center piece or applique. The circle should lay flat and even, with all points aligned.
Adding a center circle is the next step. Cut a circle slightly larger than the gap in the middle of your wedge circle. This center piece covers the raw edges and provides a neat, polished appearance. Sew it in place using a hand stitch or machine applique technique.
After completing one Dresden Plate block, trim any uneven edges to ensure uniformity. Repeat the process for additional blocks until you have enough to form your quilt top. Maintaining consistency in block size is crucial for easy assembly later.
Consider basting the blocks to the batting before quilting. This prevents shifting during quilting and keeps the design aligned. Basting can be done with pins, spray adhesive, or hand stitches, depending on your preference.
Finally, arrange all blocks on a flat surface before final assembly. This allows you to experiment with layout, color balance, and overall quilt design before sewing the blocks together.
Quilting the Dresden Plate blocks requires both patience and creativity. Choose a quilting pattern that complements the circular design. Straight lines, echo quilting around the plates, or free-motion quilting can all enhance the visual appeal.
Start quilting from the center of each block, working outward to avoid puckering. Consistent stitch length and tension ensure a smooth, professional finish. If using free-motion quilting, practice on scrap fabric to perfect your technique.
After quilting, trim the quilt edges to square them up. This creates a clean, uniform shape and prepares the quilt for binding. Choosing a binding color that complements the quilt’s overall palette adds a finished, polished look.
Sew the binding to the quilt using a consistent seam allowance. Many quilters prefer hand-stitching the binding on the back for a neat, invisible finish. Press the binding well for crisp edges.
Labeling the quilt with a small tag, including your name and date, is a lovely finishing touch. This adds a personal element and preserves the quilt’s history for future generations.
Finally, wash and dry the quilt according to fabric care instructions. This removes any markings and softens the fabric, giving the quilt a finished, cozy feel.
Q: What skill level is required for the Dresden Plate quilt?
A: This pattern is best suited for intermediate quilters, but beginners can attempt it with patience and practice.
Q: Can I use scrap fabrics for this quilt?
A: Absolutely! The Dresden Plate design is ideal for using scraps, creating a vibrant and varied quilt.
Q: How do I prevent gaps at the center of the plate?
A: Adding a center circle or applique piece conceals any small gaps and creates a neat finish.
Q: What type of thread should I use?
A: Cotton thread is recommended for durability and smooth stitching. Choose a color that blends well with your fabric.
Q: Can the Dresden Plate be made in different sizes?
A: Yes, simply adjust the wedge dimensions and number of blocks to create a smaller lap quilt or a large bed quilt.
Q: How do I wash a finished Dresden Plate quilt?
A: Use a gentle cycle with cold water and lay flat or tumble dry on low heat to prevent distortion.
The Dresden Plate – Quilt Tutorial is a beautiful and rewarding project for quilters of all experience levels. By following the steps outlined above, you can create a quilt that combines precision, creativity, and timeless design. From cutting wedges to assembling blocks and finishing with quilting, this tutorial covers every essential detail.
This pattern allows quilters to explore color combinations, fabric textures, and stitching techniques, resulting in a quilt that is both functional and decorative. Each completed Dresden Plate quilt is a testament to patience, skill, and artistry.
We invite you to share your thoughts, experiences, and suggestions after completing your Dresden Plate quilt. Your feedback helps inspire other quilters and ensures this timeless pattern continues to delight for generations.


