
Hunter's Star Quilt Block - Quick & Easy Tutorial

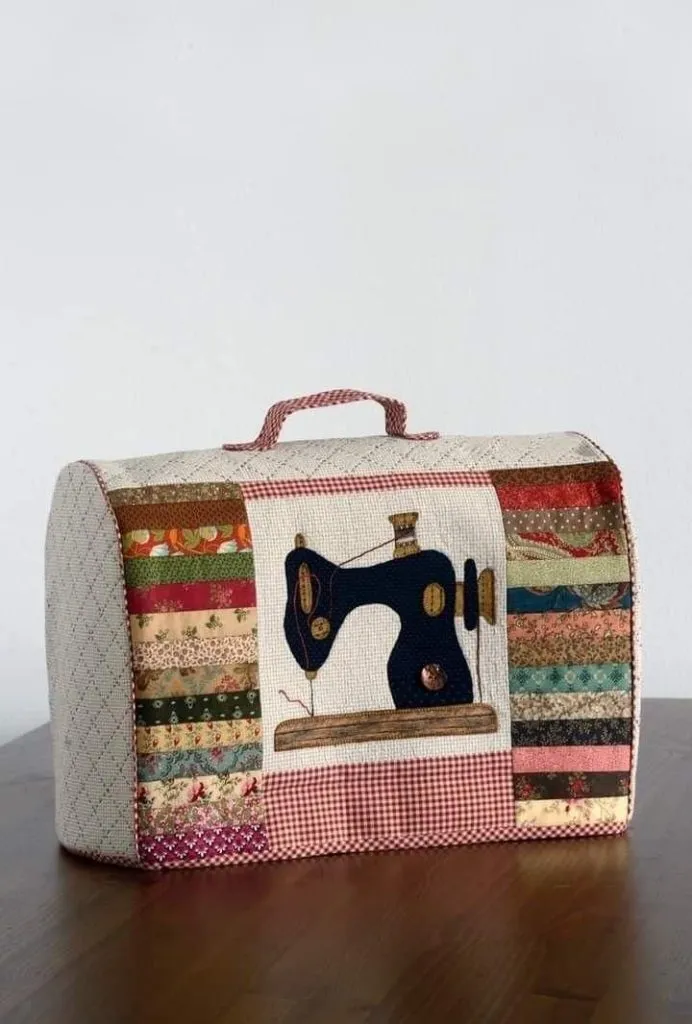
The Machine Cover Quilt Tutorial is an essential guide for quilters and sewing enthusiasts who want to protect their sewing machines while adding a personal touch to their workspace.
A custom machine cover is not only functional, keeping dust and debris off your sewing machine, but also an opportunity to showcase your creativity through quilting. By following this Machine Cover Quilt Tutorial, you can create a durable, stylish, and unique cover that complements your sewing space.
Quilting your own machine cover combines practicality and artistry. The Machine Cover Quilt Tutorial provides step-by-step instructions for beginners and experienced quilters alike.
Learning this skill allows you to explore different fabrics, patterns, and sewing techniques while creating a product that serves a real purpose. It’s an excellent way to practice piecing, quilting, and finishing skills on a small-scale project before moving on to larger quilts.
Additionally, making a machine cover through quilting provides a sense of satisfaction that comes from crafting something useful and beautiful. The Machine Cover Quilt Tutorial emphasizes careful fabric selection, precise measurement, and thoughtful design. By following the tutorial, you not only protect your machine but also gain a deeper understanding of quilting construction, finishing, and creativity.
Selecting the right fabrics is a critical step in any Machine Cover Quilt Tutorial. Fabric choice affects durability, ease of sewing, and visual appeal. Quilters often opt for cotton fabrics because they are sturdy, widely available, and easy to work with. Cotton also takes quilting stitches well, ensuring your cover holds up over time.
Consider color and pattern when choosing fabrics. Neutral tones or subtle prints blend seamlessly with most sewing rooms, while bright colors or bold patterns can make your cover a standout decorative piece. The key is to ensure the fabric complements both your machine and your workspace aesthetic.
Layering fabrics is another important factor. A machine cover requires at least three layers: the quilt top, batting for softness and protection, and a backing layer. Cotton batting is typically recommended for its softness and lightweight structure, which helps the cover maintain shape without being too bulky.
Prewashing fabrics is highly recommended. Prewashing prevents shrinkage, removes chemical finishes, and ensures colors remain true after washing. This step is crucial in the Machine Cover Quilt Tutorial to maintain size and durability after use.
Texture can also enhance the final result. Combining smooth cotton with textured fabrics, such as corduroy or linen blends, can create a unique look and provide subtle visual interest. It’s important to test the feel and flexibility of fabrics before proceeding.
Finally, gather small fabric samples for practice. Experiment with quilting stitches and fabric combinations before committing to the full project. This approach ensures your Machine Cover Quilt Tutorial is both enjoyable and successful, giving you confidence in your design choices.
Accurate measurement is vital in the Machine Cover Quilt Tutorial. A cover that is too tight may stretch and wear quickly, while one that is too loose can slip and look sloppy. Start by measuring the height, width, and depth of your sewing machine, taking care to include any protruding parts like handles or knobs.
Create a simple paper template using these dimensions. This allows you to visualize the cover shape and adjust as necessary before cutting your fabric. Many quilters recommend adding an extra half inch for seam allowances, ensuring the cover fits comfortably.
Cutting fabric accurately is another essential step. Use a rotary cutter, ruler, and cutting mat to achieve straight, clean edges. Precision in cutting helps the pieces align perfectly during piecing, which is especially important for the Machine Cover Quilt Tutorial since small misalignments are more noticeable on a fitted cover.
Pay attention to directional prints and fabric patterns. Aligning stripes, plaids, or motifs consistently ensures a professional appearance. Misaligned patterns can distract from the overall design, so careful placement is key.
Consider cutting extra pieces for pockets or decorative features. Some quilters add a small front pocket to hold sewing tools, scissors, or bobbins. This functional addition enhances the practicality of the Machine Cover Quilt Tutorial.
Finally, label all cut pieces. This helps keep the project organized, especially if you are working with multiple fabric types or colors. Proper preparation saves time and frustration during assembly, leading to a smoother quilting experience.
The piecing phase in the Machine Cover Quilt Tutorial involves sewing your fabric layers together to form the quilt top. Accuracy in piecing ensures your cover maintains its intended shape and size. Use consistent seam allowances and press seams carefully to keep pieces flat and aligned.
Quilting techniques add both strength and aesthetic appeal. Many quilters use straight-line quilting along the seams for a simple, clean look, while others incorporate decorative stitches to enhance the design. Echo quilting around motifs or geometric patterns can create a visually appealing effect that draws attention to the cover’s details.
For small-scale projects like a machine cover, free-motion quilting is an excellent technique to explore. Free-motion allows you to create flowing, intricate designs that enhance the cover’s texture and visual interest. Practice on scrap fabric first to achieve smooth, even stitches.
Another important aspect is basting. Secure the quilt top, batting, and backing layers with pins or temporary adhesive spray before quilting. Basting prevents shifting and puckering, which is crucial for a professional finish in the Machine Cover Quilt Tutorial.
Consider edge finishes early in the quilting process. Many quilters add a binding strip around the edges for a polished, durable finish. The binding not only protects the edges but also contributes to the cover’s overall design aesthetic.
Finally, always review your work during quilting. Pause to check for alignment, stitch quality, and tension issues. Correcting mistakes early ensures that your Machine Cover Quilt Tutorial results in a neat, functional, and visually pleasing machine cover.
Finishing touches in the Machine Cover Quilt Tutorial bring your project to life. Binding the edges is the final step that ensures durability and provides a professional appearance. Choose a coordinating or contrasting fabric to complement your quilt top.
Adding embellishments, such as decorative stitches, embroidery, or appliqué, can personalize your machine cover. These details make your cover unique and showcase your creativity. Small design elements can also reinforce the quilting’s structural integrity.
Consider including functional elements like handles or pockets. A handle makes it easy to remove and replace the cover, while pockets add utility by holding small sewing tools. Thoughtful additions enhance both aesthetics and practicality.
Labeling your cover is an optional but meaningful touch. Some quilters add their initials, project date, or a small quilt label as a signature. This personalizes your creation and creates a keepsake you can treasure for years.
Final pressing ensures the cover looks neat and professional. Lightly pressing the quilted cover smooths any wrinkles and helps the fabric layers settle, making your Machine Cover Quilt Tutorial project ready for immediate use.
Lastly, try fitting the cover over your sewing machine to check for proper fit and adjustments. Minor tweaks can be made if necessary, ensuring that your quilted cover fits snugly and enhances the beauty of your workspace.
Q1: Is the Machine Cover Quilt Tutorial suitable for beginners?
A1: Yes, beginners can follow this tutorial by starting with simple fabrics and quilting techniques. It’s a small, manageable project that builds essential skills.
Q2: What fabrics are best for a sewing machine cover?
A2: Cotton fabrics are ideal for ease of use, durability, and variety of patterns. Blends or textured fabrics can also add visual interest.
Q3: How do I ensure the cover fits my machine perfectly?
A3: Accurate measurements of your machine’s height, width, and depth, combined with a paper template, help achieve a precise fit. Include seam allowances.
Q4: Can I add pockets to my machine cover?
A4: Yes, small pockets can be added for functional storage of scissors, threads, or bobbins. Placement can be customized based on your needs.
Q5: What quilting techniques work best for small projects?
A5: Straight-line quilting, echo quilting, or free-motion quilting are suitable for machine covers. Choose based on your skill level and desired visual effect.
Q6: Do I need special tools to complete this tutorial?
A6: Basic quilting tools like a rotary cutter, ruler, cutting mat, sewing machine, and pins are sufficient. Optional templates or guides can enhance precision.
The Machine Cover Quilt Tutorial is a practical and creative project that protects your sewing machine while showcasing your quilting skills. By carefully selecting fabrics, measuring accurately, mastering piecing and quilting techniques, and adding finishing touches, you can create a functional, stylish, and personalized cover.
This project is perfect for both beginners and experienced quilters, offering an enjoyable, rewarding experience. We invite you to share your thoughts, leave an honest opinion, and provide suggestions for future tutorials to inspire the quilting community.


