
Crocheted house-shaped cookie for Christmas tree

Easter is the perfect time to bring out your creative side, and what better way than with a Swirly Easter Bunny crochet pattern? This free pattern allows you to craft a whimsical, charming bunny that’s ideal for holiday décor, gifts, or even as a playful addition to a spring centerpiece.
With its swirly, textured design, this crochet bunny stands out as both a festive and fun project. Whether you’re an experienced crocheter or a beginner, this free pattern guides you through each step, making it accessible and enjoyable.
The appeal of a Swirly Easter Bunny lies in its unique texture and playful shape. Unlike standard crochet bunnies, this pattern incorporates swirling stitches that give the piece dynamic movement and personality.
These spirals mimic the soft, fluffy curves of a real bunny, creating a delightful and eye-catching decoration. Perfect for Easter baskets or tabletop displays, this handmade bunny embodies the joy of spring and the creativity of handmade crafts.
Before starting, it’s helpful to understand the basic components of this design. The Swirly Easter Bunny crochet pattern typically includes the body, ears, tail, and optional embellishments such as eyes, nose, or little bows. The swirling stitch technique is central to the bunny’s charm, adding texture and dimension that make your finished piece look professional and whimsical. Gather your materials, and let’s bring this Easter bunny to life!
Creating a Swirly Easter Bunny is simple and requires only a few essential supplies. Choosing the right materials will enhance both the look and feel of your finished bunny.
Choosing soft, tactile yarn enhances the cozy, playful nature of the bunny. For a swirly effect, make sure the yarn is smooth enough to highlight the stitch patterns while being easy to manipulate.
The Swirly Easter Bunny crochet pattern is worked mostly in rounds, using a combination of basic stitches and swirl techniques to create dynamic curves and texture.
1. Begin the Body:
Start with a magic ring using your chosen body color.
2. Shape the Bunny:
Once the base is complete, work in rounds without increasing to build the height of the body. The swirly stitch pattern will create a spiral texture naturally. Adjust the stitch height to make the bunny taller or shorter, depending on your preference.
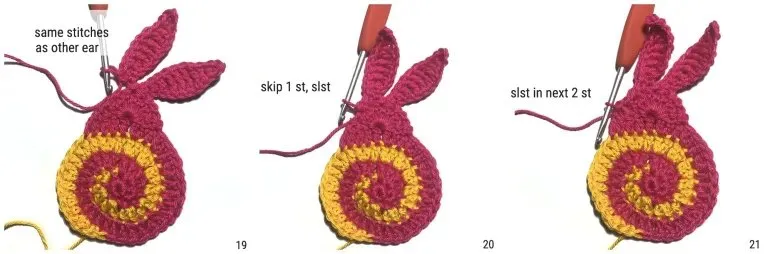
3. Add Ears:
Use the same color or a contrasting shade for the ears. Chain the desired length and work back along the chain using single or half-double crochet stitches. Attach the ears securely to the top of the bunny’s head. You can curl or shape them slightly for a playful, dynamic appearance.
4. Make the Tail:
A small puff or pom-pom tail works perfectly. Attach it to the lower back portion of the body, giving the bunny its signature finishing touch.
5. Add Facial Features:
Use safety eyes or embroider small eyes with black thread. Add a tiny nose with pink or peach yarn. Optional accents, like a small ribbon bow, can be added around the neck for a charming Easter look.
6. Finish the Bunny:
Weave in all yarn ends and lightly stuff the body and ears to create a soft, 3D shape. Your Swirly Easter Bunny is now ready to bring festive charm to your home.
To make your bunny truly stand out, focus on the swirl texture and shaping. Here are some tips:
These small details will make your Swirly Easter Bunny look polished and lively, perfect for spring decorations or gifts.
Once you’ve mastered the basic Swirly Easter Bunny crochet pattern, you can explore variations to make each bunny unique:
These variations allow endless creativity, making your bunnies perfect for gifts, décor, or craft fairs.
Crochet bunnies are a classic Easter symbol, combining tradition with creativity. Handmade Swirly Easter Bunnies offer a personal touch that store-bought décor can’t match. They’re fun to make, customizable, and reusable year after year.
Creating these bunnies also encourages mindful crafting. Working with yarn and your hands provides a relaxing, satisfying experience. Plus, kids and adults alike enjoy watching a plain skein of yarn transform into a cheerful Easter character.
They’re ideal for gifting, adding to holiday displays, or even using as a playful centerpiece for Easter brunch. Handmade decorations like these bring warmth, personality, and lasting memories to your holiday celebrations.
1. Is this pattern suitable for beginners?
Yes! While the swirl stitch adds texture, the pattern mainly uses basic stitches like single and half-double crochet.
2. How long does it take to complete one bunny?
Most crafters can finish a small to medium bunny in 2–4 hours, depending on experience and size.
3. Can I make it in different sizes?
Absolutely! Adjust the number of rounds for the body and length of the ears to create small, medium, or large bunnies.
4. What kind of yarn works best?
Light or medium-weight yarn in pastel shades or neutral colors works well. Cotton or acrylic yarns are ideal for texture and durability.
5. How do I add facial features safely?
Use safety eyes for durability, or embroider features with yarn or thread for a child-safe option.
6. Can I make a set for gifts?
Yes! Crochet a family of Swirly Easter Bunnies in different sizes or colors—they make perfect handmade gifts.
The Swirly Easter Bunny crochet pattern is a fun, festive, and creative project that’s perfect for celebrating spring and Easter. From the textured swirls to the playful ears and tiny tail, this bunny adds personality and charm to any décor. It’s easy to customize, fun to make, and ideal for gifting or display.
Bring a little handmade magic to your Easter this year—craft your own Swirly Easter Bunny and enjoy the satisfaction of a whimsical, one-of-a-kind decoration. Share your creations, variations, and feedback to inspire even more festive crochet ideas!


