
Crocheted house-shaped cookie for Christmas tree

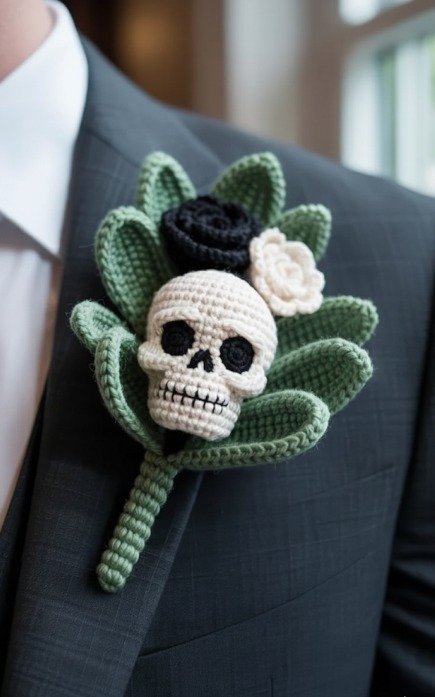
Amigurumi Skull & Rose Bouquet – FREE Crochet Pattern is a unique and eye-catching project for crochet enthusiasts who love combining creativity with a touch of edgy charm.
This pattern blends the intricacy of amigurumi with the elegance of floral designs, creating a stunning bouquet that is both spooky and beautiful.
Whether you are making it as a Halloween decoration, a gothic-themed gift, or just a conversation starter, this amigurumi bouquet is perfect for anyone looking to explore more advanced crochet techniques while making something truly special.
Creating an Amigurumi Skull & Rose Bouquet allows crafters to practice a variety of stitches, from simple single crochets to more complex shaping techniques.
Each element — the skull and the roses — is crocheted separately and then assembled into a cohesive arrangement. The combination of soft roses and the more structured skull design creates an appealing contrast that highlights your skills. This project is also an excellent way to use different yarn textures and colors, making your bouquet completely customizable.
One of the best things about this FREE crochet pattern is that it provides a complete guide for both beginners who want to challenge themselves and experienced crocheters seeking a unique project. Amigurumi projects like this bouquet are excellent for building patience and attention to detail, as each piece requires careful shaping and finishing. By the end, you’ll have a stunning handmade decoration that looks professional and sophisticated.
Before starting your Amigurumi Skull & Rose Bouquet – FREE Crochet Pattern, it’s important to gather all the necessary supplies. Proper materials make a huge difference in the final appearance and durability of your project.
First, choose cotton or acrylic yarn in colors appropriate for your bouquet. White or off-white is ideal for the skull, while red, pink, or any color of your choice can be used for the roses. Green yarn will be used for the leaves and stems.
Next, pick the correct crochet hook size that matches your yarn. Typically, a 2.5 mm to 3.5 mm hook works well for amigurumi projects because it creates tight stitches that prevent stuffing from showing.
You will also need polyester fiberfill to stuff the skull and roses. Make sure to stuff evenly to maintain a smooth and firm shape. A yarn needle is essential for sewing the pieces together and weaving in ends neatly.
Other optional but helpful tools include stitch markers to keep track of rounds, scissors, and floral wire or pipe cleaners for added structure in the stems. You may also want hot glue or craft wire for assembling the bouquet securely.
Finally, ensure a comfortable workspace with good lighting. Amigurumi projects require attention to detail, and proper lighting helps prevent mistakes while working on small pieces.
Creating the skull is the central element of the Amigurumi Skull & Rose Bouquet – FREE Crochet Pattern. Follow these steps carefully for a professional look.
Begin with a magic ring and crochet 6 single crochets (sc) into the ring. Pull tight to close the center.
Round 2: Increase in each stitch around, making 12 stitches. Round 3: 1 sc in the first stitch, 2 sc in the next; repeat around to total 18 stitches.
Continue increasing until you reach the desired width for the skull. Typically, rounds 4–7 will involve gradual increases to shape the head. Then, work several rounds of single crochet without increases to create the height of the skull.
Begin decreasing symmetrically to shape the lower part of the skull. Use single crochets with decreases spaced evenly, and stuff the skull firmly with fiberfill before closing the final rounds.
For details, such as the eyes and nose, either embroider directly onto the skull with black yarn or crochet small circular pieces and sew them on. Ensure symmetry to maintain a polished appearance.
Finally, weave in all ends carefully using a yarn needle. Your skull should be firm and smooth, ready to be combined with the roses for the bouquet.
The roses are the second key component of your Amigurumi Skull & Rose Bouquet – FREE Crochet Pattern. These flowers bring softness and vibrancy to contrast with the skull.
Start each rose with a small chain, typically 21–25 stitches depending on the desired size, and work single and half-double crochets along the chain. Roll the crocheted strip into a spiral to form the rose shape.
Secure the base of the rose with stitches or a dab of glue to hold the spiral firmly. Adjust the petals by gently stretching and curving the edges for a natural look.
Create multiple roses in different shades for a visually appealing bouquet. Varying the size slightly adds depth and realism to your arrangement.
Attach green leaves and stems using chains and single crochets. Leaves can be small triangles or oval shapes, sewn or glued to the base of the rose. Stems can be reinforced with floral wire for stability.
Once all roses are made, assemble them into a bouquet around the skull. Secure each rose tightly using yarn or glue to ensure they stay in place. The combination of structured skull and soft roses makes a striking contrast.
Assembling your Amigurumi Skull & Rose Bouquet – FREE Crochet Pattern requires attention to detail to achieve a cohesive and beautiful result.
Begin by arranging the skull at the center of your workspace. Place the roses around the skull, experimenting with the composition until it looks balanced and appealing.
Use yarn, embroidery thread, or craft wire to attach each rose securely to the skull. Make sure each flower is positioned firmly to avoid movement over time.
Add leaves and stems between the flowers to fill gaps and add natural texture. Twisting floral wire inside the stems can help create a sturdy, adjustable bouquet.
Consider adding small decorative elements like beads, glitter, or lace for an extra touch of creativity. This step is optional but can make your bouquet even more unique.
Finally, inspect your bouquet for loose ends or uneven stitches. Tidy up any visible yarn ends, trim excess threads, and make any final adjustments to ensure a polished and professional finish.
Q1: Can beginners make this amigurumi bouquet?
A: While it’s slightly advanced, beginners can attempt it by following each step carefully and practicing basic stitches beforehand.
Q2: What type of yarn is best?
A: Cotton or acrylic yarn works best. Cotton provides a smooth finish, while acrylic offers more vibrant colors.
Q3: How do I keep the roses firm?
A: Roll the rose tightly and secure the base with stitches or glue. Lightly stuffing the petals also helps maintain shape.
Q4: Can I make the skull larger or smaller?
A: Yes, adjust the number of rounds in the skull to change its size. Remember to proportionally adjust the roses.
Q5: How do I make the bouquet stand upright?
A: Use floral wire or pipe cleaners inside the stems and arrange them in a weighted vase or decorative base.
Q6: Can I machine wash this bouquet?
A: Hand washing is recommended to preserve shape and detail, especially for delicate roses.
In this guide on Amigurumi Skull & Rose Bouquet – FREE Crochet Pattern, you’ve learned how to combine the intricate details of amigurumi skulls with the elegance of crocheted roses. This project offers both challenge and satisfaction, resulting in a unique handmade decoration that is perfect for gifting, home décor, or seasonal display.
With patience, practice, and creativity, you can customize your bouquet in colors, sizes, and arrangements to make it truly your own. Share your honest feedback and suggestions in the comments — your insights will inspire other crochet enthusiasts to try this striking and fun project!


