
Crocheted house-shaped cookie for Christmas tree

Pumpkin Baby Booties – FREE Crochet Pattern is one of the most adorable and festive crochet projects you can make for little ones.
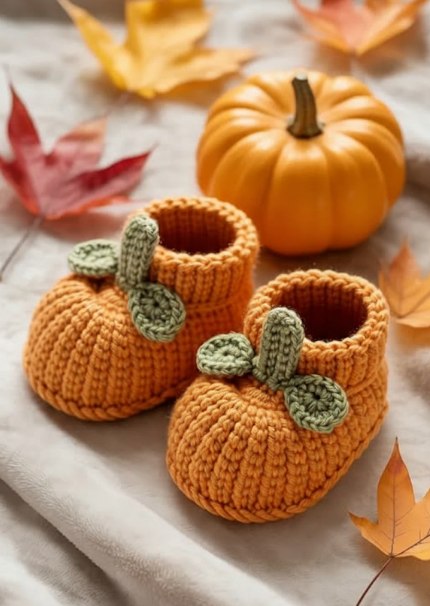
These tiny pumpkin-inspired booties combine the coziness of handmade baby shoes with the cheerful spirit of autumn. Perfect for fall photoshoots, Halloween costumes, or Thanksgiving celebrations, these crochet booties are a wonderful gift for newborns and infants.
With their soft texture, warm colors, and charming pumpkin details, they bring both comfort and style to your baby’s outfit while showcasing your creativity as a crafter.
If you enjoy quick crochet projects that blend practicality and cuteness, the Pumpkin Baby Booties – FREE Crochet Pattern is ideal for you. They’re small, simple to make, and require only a bit of yarn.
The design can be easily adjusted for different baby sizes, and because the pattern uses basic stitches, it’s perfect for both beginners and advanced crocheters. The booties are worked in rounds, with an easy-to-follow structure that makes them sturdy enough to stay on tiny feet while still being gentle and flexible.
Another great reason to make Pumpkin Baby Booties is their versatility. You can use the same base pattern to create other themed booties — just change the colors or add different embellishments. They also make thoughtful handmade gifts for baby showers or seasonal events. The free pattern we’ll explore here offers step-by-step guidance, so even if you’ve never made baby booties before, you’ll find this project fun and rewarding. Let’s get started by gathering the materials and learning the steps to crochet these sweet pumpkin booties.
Before you begin the Pumpkin Baby Booties – FREE Crochet Pattern, make sure you have all your materials ready. You won’t need much, and most items are probably already in your crochet toolkit.
You’ll need medium-weight cotton or acrylic yarn in pumpkin orange for the main part of the booties. For the stem and leaves, use green and brown yarn. Cotton is great because it’s soft, breathable, and comfortable for babies’ sensitive skin.
Next, select a crochet hook that matches your yarn weight — usually between 3.5 mm and 4 mm for baby booties. The right hook size helps ensure your stitches are tight enough for structure but still soft and flexible.
Other essentials include a yarn needle for weaving in ends, stitch markers to keep track of rounds, and scissors for trimming. You may also want a small button or ribbon for decoration, although this is optional.
Finally, prepare a soft stuffing if you plan to slightly fill the pumpkin top or use it as a 3D embellishment. Having a clean, well-lit workspace makes the process more enjoyable and helps prevent mistakes. With these tools, you’re ready to crochet the cutest fall booties imaginable!
The Pumpkin Baby Booties – FREE Crochet Pattern is worked in two parts: the sole and the upper portion, followed by the decorative pumpkin details.
Step 1: The Sole
Start with a magic ring or chain 10. Work single crochets along one side of the chain, add 3 stitches in the last chain, then continue along the opposite side. Slip stitch to join. Continue with a few more rounds of increases until the sole fits the desired baby size (usually around 8–10 cm for newborns).
Step 2: The Sides
Once the sole is complete, crochet one round of single crochets in the back loops only. This creates a defined edge for the shoe wall. Continue working in rounds without increasing for 3–4 rounds to build height.
Step 3: The Upper Front
To form the front of the bootie, mark the center and work decreases on each side to shape the toe area. This creates a snug fit. You can also add a few half-double crochets across the front to round the edge.
Step 4: The Pumpkin Details
Using brown yarn, crochet a small stem (chain 4, slip stitch back). With green yarn, make a simple leaf or vine by chaining 6 and working back with slip stitches. Attach both to the top center of each bootie.
Step 5: Finishing Touches
Fasten off, weave in ends, and add any optional embellishments such as a tiny bow, button, or face for a fun Halloween twist. Your Pumpkin Baby Booties are now complete — adorable, cozy, and festive!
One of the best parts about the Pumpkin Baby Booties – FREE Crochet Pattern is that it’s easy to customize. You can adapt colors, textures, or embellishments to suit any theme or season.
Try using different shades of orange — from bright pumpkin to rustic copper — to create depth and variation. If you want a more whimsical look, use variegated yarn for a textured, striped effect.
You can also transform the design into other seasonal baby booties. Change the color palette to red and green for Christmas booties, or pastel shades for spring. The base pattern remains the same, but the theme shifts completely.
Add tiny appliqués like crochet leaves, vines, or even smiling pumpkin faces for a fun and playful touch. This turns a simple bootie into a miniature piece of art.
If you prefer a minimalist look, skip the embellishments and focus on clean lines and soft stitches. This gives the booties a modern aesthetic, perfect for everyday wear.
Another creative variation is to make matching accessories — a pumpkin-themed hat, bib, or blanket. These make wonderful gift sets for babies born in autumn.
Lastly, experiment with different yarn textures, such as velvet or soft bamboo blends. These materials give the booties a luxurious feel and extra comfort for tiny toes.
Even simple crochet projects like the Pumpkin Baby Booties – FREE Crochet Pattern can benefit from a few expert tips.
Always check your gauge before starting. Baby sizes are small, and even a few millimeters off can affect the fit.
Use soft, baby-safe yarn that won’t irritate delicate skin. Avoid fibers with metallic threads or rough textures.
Work with consistent tension throughout to ensure both booties are the same size. Uneven stitches can cause one bootie to be looser than the other.
If your booties seem too loose, try going down one hook size; if they’re too tight, go up a size. Adjusting this small detail can make a big difference in the final fit.
When attaching decorations like leaves or stems, secure them tightly to prevent them from coming loose, especially since babies tend to grab everything.
Lastly, block your booties lightly after finishing to smooth stitches and shape them perfectly. A gentle steam or damp towel method works great for small crochet pieces.
Q1: Are these booties suitable for beginners?
A: Yes! The Pumpkin Baby Booties – FREE Crochet Pattern uses basic stitches and simple shaping, making it perfect for beginners.
Q2: What type of yarn is best for baby booties?
A: Soft cotton or baby acrylic yarn is ideal. These are gentle on the skin and easy to wash.
Q3: How can I adjust the size of the booties?
A: Add or remove rounds in the sole section to increase or decrease the length. Adjust the height by adding more rows in the upper section.
Q4: Can I make these booties for newborns?
A: Yes, just use a smaller hook and finer yarn for tiny newborn sizes.
Q5: How do I clean crochet baby booties?
A: Hand wash or machine wash on a gentle cycle using mild detergent. Always air dry to preserve their shape.
Q6: Can I sell booties made from this pattern?
A: Yes, as long as you give design credit to the Pumpkin Baby Booties – FREE Crochet Pattern source, you can sell your handmade items.
In this complete guide to Pumpkin Baby Booties – FREE Crochet Pattern, we’ve covered everything from materials and steps to creative variations and expert tips. These charming baby booties are more than just footwear — they’re a celebration of the cozy autumn season, full of warmth, color, and handmade love. Whether you’re crafting them for your baby, as a gift, or for a fall market, each pair carries the personal touch of your creativity.
Now it’s your turn to bring these little pumpkins to life! Grab your hook, pick your favorite yarn, and start crocheting. Don’t forget to share your honest opinions and suggestions — your feedback helps other crafters make their own adorable pumpkin baby booties even better! 🎃🧶


