
Crocheted house-shaped cookie for Christmas tree

Amigurumi Skull & Rose Bouquet – FREE Crochet Pattern is a creative and bold crochet project that blends beauty and edge into one stunning handmade piece.
Perfect for those who love gothic aesthetics, Halloween decorations, or simply enjoy unconventional crafts, this unique bouquet combines delicate crochet roses with charming little skulls.
The result is a beautiful fusion of elegance and rebellion — a bouquet that makes a statement. Whether you want to gift it, decorate your home, or accessorize an event, this project offers endless possibilities for personalization.
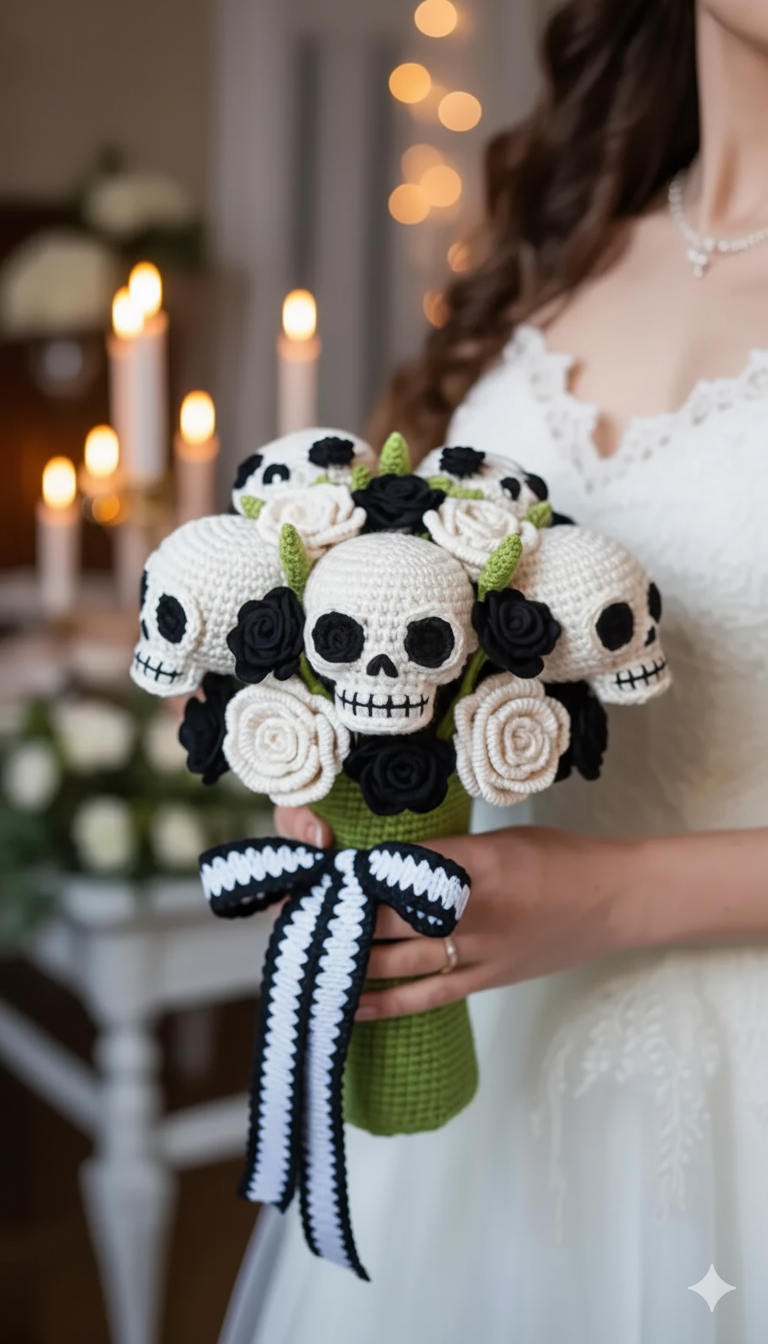
Unlike traditional flower bouquets, the Amigurumi Skull & Rose Bouquet stands out for its originality and durability. Each crochet rose and skull is made by hand, meaning every bouquet is one of a kind.
The project uses common crochet materials and simple amigurumi techniques, making it accessible for beginners and experienced crocheters alike. It’s a creative way to express individuality while developing new crochet skills such as shaping, stuffing, and assembly.
With this FREE crochet pattern, you can easily craft your own bouquet that lasts forever — no wilting, no water, and no maintenance. It’s a sustainable and heartfelt alternative to traditional floral arrangements, ideal for special occasions like gothic weddings, themed parties, or even as décor for your craft space. In this detailed guide, you’ll learn all the materials needed, step-by-step instructions, creative variations, and expert tips to make your amigurumi skull and rose bouquet truly unforgettable.
Before starting your Amigurumi Skull & Rose Bouquet – FREE Crochet Pattern, gather all the essential materials. Having everything ready ensures a smooth crafting experience.
First, choose your yarn. Cotton yarn is ideal for this project because it holds its shape well and provides a clean stitch definition. You’ll need white or ivory yarn for the skulls and red, pink, or black yarn for the roses. For leaves and stems, use green yarn in any shade you prefer.
Next, select a crochet hook suitable for your yarn weight — usually between 2.5 mm and 3.5 mm. Tighter stitches are better for amigurumi, so go down one hook size if necessary to prevent gaps between stitches.
You’ll also need polyester stuffing for shaping the skulls and roses, a yarn needle for sewing pieces together, and scissors for trimming ends. Small safety eyes or black embroidery thread will be used to create the skull faces.
Optional supplies include floral wire or sticks for stem support, floral tape to wrap stems, and a hot glue gun to secure the bouquet arrangement. A decorative ribbon can also be added to tie everything together beautifully.
With these simple tools and materials, you’re ready to bring your amigurumi skull and rose bouquet to life.
Now it’s time to begin crocheting your Amigurumi Skull & Rose Bouquet – FREE Crochet Pattern. You’ll make multiple skulls and roses, then assemble them into a bouquet.
For the Skull:
Start with a magic ring using white yarn and make 6 single crochets inside. Pull tight to close.
Round 2: Increase in each stitch around (12 stitches total).
Round 3: 1 single crochet, increase around (18 stitches).
Round 4–6: Single crochet in each stitch for three rounds.
Round 7: Single crochet, decrease around (12 stitches). Begin stuffing lightly with fiberfill.
Round 8: Decrease in every stitch (6 stitches). Close the hole, cut the yarn, and weave in the ends.
Using black embroidery thread or safety eyes, stitch two eyes and a small nose shape. Add simple stitches for teeth if desired.
For the Rose:
With red yarn, chain 51.
Row 1: Starting from the second chain, 1 single crochet, skip one chain, 5 double crochets in the next, skip one chain, repeat until the end.
Row 2: Once complete, gently roll the strip into a rose shape. Secure the base with a few stitches or hot glue.
For the Leaves and Stems:
Use green yarn to chain 10. Work 1 single crochet, half double crochet, 3 double crochets, half double crochet, and single crochet back down the chain. Fasten off, leaving a long tail for sewing.
Once you’ve created several roses, leaves, and skulls, attach each skull to the center of a rose or between petals using a small stitch. Insert floral wire as stems, wrap with floral tape, and arrange your bouquet as desired.
One of the best things about the Amigurumi Skull & Rose Bouquet – FREE Crochet Pattern is its flexibility. There’s no limit to how creative you can get with colors, textures, and arrangements.
Try using different rose colors for variety — deep purple for a gothic aesthetic, black for mystery, or white for elegance. Mixing shades can make your bouquet look more dynamic and natural.
Add metallic or glitter yarn accents to give your flowers a subtle shimmer, perfect for weddings or night events.
For a fun Halloween twist, create multicolored skulls in neon shades or pastels to contrast with dark roses.
You can also make mini versions of the bouquet as boutonnieres, hair accessories, or table decorations. Small skull-and-rose combinations look adorable as pins or magnets.
If you’re feeling artistic, include crochet vines or lace to make the bouquet fuller and more intricate. These extras elevate your handmade creation to a work of art.
Lastly, personalize your bouquet by wrapping the stems in black satin ribbon or lace fabric for a romantic, gothic finish.
To make your Amigurumi Skull & Rose Bouquet – FREE Crochet Pattern look professional and well-balanced, follow these helpful tips.
Always use tight stitches to keep the skulls firm and the roses in shape. Loose stitches can cause the stuffing to show through.
Stuff gradually while crocheting the skulls — too much at once can distort the shape. Use small pinches of stuffing for smooth, even filling.
If you’re using floral wire, wrap it securely with green floral tape to prevent it from poking through the yarn.
Arrange your skulls and roses before gluing or sewing to visualize the final composition. Symmetry and balance make the bouquet more appealing.
Don’t rush assembly. Taking time to secure each piece properly ensures your bouquet stays intact and durable.
Finally, block the roses and leaves if needed to shape them perfectly. A quick steam or light misting can help them hold form beautifully.
Q1: Is this pattern suitable for beginners?
A: Yes! The Amigurumi Skull & Rose Bouquet – FREE Crochet Pattern uses simple stitches and basic shaping techniques, perfect for adventurous beginners.
Q2: Can I make the bouquet without floral wire?
A: Definitely. You can use crochet stems or attach the pieces directly onto a base like a foam ball or vase.
Q3: What yarn works best for this pattern?
A: 100% cotton or cotton-blend yarn is ideal because it provides structure and holds the stitches tightly.
Q4: How many skulls and roses should I make?
A: That depends on the bouquet size — typically 5–7 skulls and 10–15 roses create a full, balanced look.
Q5: Can I wash the finished bouquet?
A: It’s best to spot clean it gently with a damp cloth to preserve the structure and color.
Q6: Can I use this bouquet as wedding décor?
A: Absolutely! Many crafters use this amigurumi skull and rose bouquet for gothic or alternative weddings, as it lasts forever and makes a stunning keepsake.
In this complete guide to the Amigurumi Skull & Rose Bouquet – FREE Crochet Pattern, you learned how to create an extraordinary handmade bouquet that combines dark charm with elegant craftsmanship. From crocheting tiny skulls to shaping delicate roses, this project allows endless creativity while being eco-friendly and everlasting.
This bouquet is not just a craft — it’s an artistic expression that captures individuality, emotion, and imagination. Whether you’re making it as décor, a gift, or a personal statement, each stitch carries meaning.
Now that you have the knowledge and pattern, it’s time to bring your amigurumi skull and rose bouquet to life. Try different colors, textures, and arrangements — and when you finish, share your experience! Leave your honest opinion and suggestions to inspire others who want to create their own hauntingly beautiful crochet bouquets. 🌹💀


