
Crocheted house-shaped cookie for Christmas tree

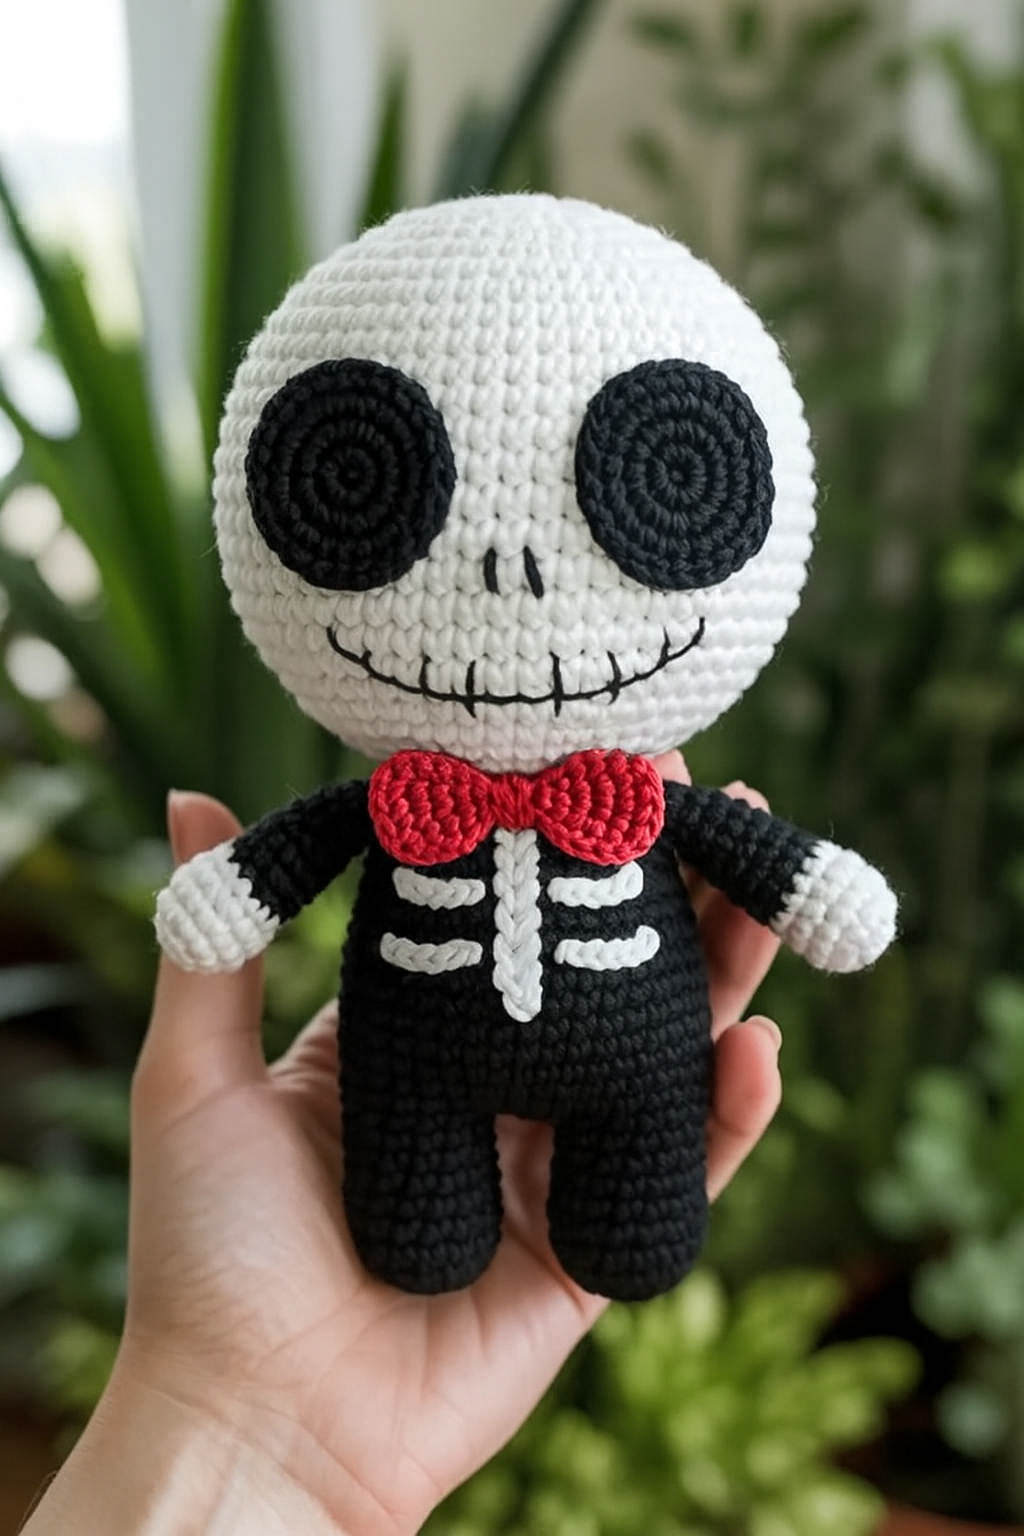
Amigurumi Skeleton with Red Bowtie – FREE Crochet Pattern is a charming and playful project that brings a fun twist to traditional Halloween or gothic-inspired crafts.
This cute skeleton design, complete with a bright red bowtie, is perfect for enthusiasts of amigurumi, miniature crochet projects, or collectors of quirky handmade items.
Whether you want to decorate your home, create a unique gift, or add a fun accessory to costumes, this free crochet pattern makes it easy to craft a small yet impressive piece that is both whimsical and stylish.
The beauty of this Amigurumi Skeleton with Red Bowtie – FREE Crochet Pattern lies in its combination of simplicity and detail. While the pattern is accessible to intermediate crocheters, beginners with some experience in basic amigurumi techniques can also complete it.
The red bowtie adds a splash of color that contrasts beautifully with the skeleton’s white body, giving your creation a striking and memorable appearance. Each stitch builds structure and character, allowing crafters to enjoy a satisfying and rewarding crafting experience.
This amigurumi skeleton pattern is also highly versatile. You can make it small enough to fit on a desk or shelf, or slightly larger as a decorative accent for parties, Halloween displays, or themed events. The skeleton can be posed, displayed, or even gifted as a unique handmade item. With this guide, you’ll learn not only the step-by-step instructions to create the skeleton but also tips on personalization, finishing touches, and creative variations to make your crochet project truly one-of-a-kind.
Before starting your Amigurumi Skeleton with Red Bowtie – FREE Crochet Pattern, gather all necessary materials for a smooth crafting experience.
You will need white and black cotton yarn for the skeleton’s body and details. The red yarn is for the bowtie. Cotton yarn is ideal as it provides structure and durability, while being easy to clean and shape.
A 2.5 mm to 3.5 mm crochet hook is recommended. Using the correct hook size ensures tight stitches, which help the skeleton hold its shape. Beginners may prefer a slightly larger hook to make stitching easier, but tight stitches are key for amigurumi.
You will also need a yarn needle to sew pieces together and weave in ends. A pair of small scissors is essential for trimming yarn neatly. Stitch markers can help keep track of rounds, particularly for smaller parts like limbs and fingers.
Optional materials include polyfill stuffing to give the skeleton a three-dimensional shape and safety eyes or embroidery thread to create facial details. For the bowtie, a small button or bead can be added for extra flair.
Lastly, prepare a clean and well-lit workspace. Organize your materials to make it easy to follow the Amigurumi Skeleton with Red Bowtie – FREE Crochet Pattern step by step, ensuring the best possible results.
Creating your Amigurumi Skeleton with Red Bowtie – FREE Crochet Pattern is an enjoyable process. Follow these detailed steps for each part of the skeleton.
Step 1 – Head and Skull: Begin with a magic ring and crochet 6 single crochets into it. Increase rounds gradually to form a rounded skull. Maintain symmetry while decreasing stitches towards the top to close the head.
Step 2 – Body: Attach white yarn and continue crocheting the torso in rounds. Increase slightly in the chest area, then decrease towards the waist. The body should be proportionate to the head.
Step 3 – Arms and Legs: Crochet each limb separately using single crochet stitches. Keep stitches tight and even for a smooth finish. The arms should be shorter than the legs, and you can slightly bend limbs for a playful pose.
Step 4 – Hands and Feet: Create small rounded ends for hands and feet. Use embroidery thread to detail fingers or toes if desired. Attach limbs to the body securely with yarn and needle.
Step 5 – Bowtie: Using red yarn, crochet a small rectangle or bow shape. Sew or tie it around the skeleton’s neck. Optionally, add a button or bead in the center to give the bowtie more detail.
Step 6 – Facial Details: Embroider eyes, nose, and mouth with black yarn or thread. Safety eyes can be added for a more polished look. Ensure stitches are secure to avoid fraying.
Step 7 – Assembly: Attach all pieces together, ensuring the skeleton is balanced and stable. Stuff the body lightly with polyfill to give it a soft yet structured form. Your amigurumi skeleton with red bowtie is now complete.
After completing the basic skeleton, explore creative variations to make your project unique.
Try different bowtie colors. Bright or metallic yarn can create an eye-catching effect that matches different themes or personal styles.
Add small accessories, like a tiny hat, scarf, or crochet flowers, to personalize the skeleton for holidays or special events.
Experiment with limb positioning. Poseable arms and legs make the skeleton interactive and playful, perfect for displays or photography.
Use embellished embroidery on the skull, like patterns or designs inspired by Dia de los Muertos, for a festive appearance.
Adjust the size by changing yarn weight or hook size. A miniature version works well as a keychain or ornament, while a larger version can be a centerpiece decoration.
Create themed skeletons. Combine skeletons with pumpkins, bats, or other crochet items for a Halloween display or themed gift set.
To ensure the best results with the Amigurumi Skeleton with Red Bowtie – FREE Crochet Pattern, follow these expert tips.
Use tight, even stitches to maintain the shape and prevent gaps in the skeleton’s body. This ensures a smooth, professional look.
Keep track of rounds with stitch markers, especially when crocheting the head and limbs, to avoid losing count and ensure symmetry.
Stuff the skeleton lightly but evenly. Too much stuffing can stretch the stitches, while too little will make the figure floppy.
Securely attach limbs and bowtie using yarn and needle. Double-check connections for durability, especially if the skeleton will be handled frequently.
Use embroidery for facial details to add personality. Consistent stitches and secure knots will make the skeleton more polished.
Experiment and have fun! The Amigurumi Skeleton with Red Bowtie is meant to be playful, so feel free to add creative touches that reflect your personal style.
Q1: Is this pattern suitable for beginners?
A: Yes, though some amigurumi experience is helpful. The project is small and manageable, making it beginner-friendly with patience.
Q2: Can I use different yarn colors?
A: Absolutely! White is standard for the skeleton, but feel free to experiment with colors for the bowtie or decorative details.
Q3: How do I make the bowtie stay in place?
A: Sew it securely with yarn or attach a small button for extra stability.
Q4: Can the skeleton be washed?
A: Yes, gently hand wash in cold water and air dry to maintain shape and color.
Q5: How long does it take to crochet one skeleton?
A: Depending on skill level, it typically takes 2–3 hours from start to finish.
Q6: Can I customize the skeleton for holidays or themes?
A: Definitely. Add miniature accessories, change bowtie colors, or embroider festive patterns to match different occasions.
In this guide to the Amigurumi Skeleton with Red Bowtie – FREE Crochet Pattern, you’ve learned how to create a whimsical, detailed, and fully customizable crochet skeleton. From selecting materials to shaping, assembling, and adding finishing touches, each step ensures a unique and playful result. With endless options for personalization, this skeleton makes a perfect decoration, gift, or collectible item.
Start your amigurumi skeleton with red bowtie today, and explore different colors, accessories, and poses to make your project truly your own. Share your creations, provide feedback, and leave suggestions to inspire fellow crochet enthusiasts!


